Monday, July 29, 2013
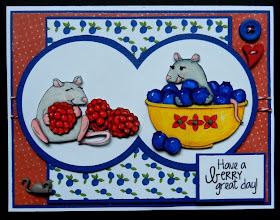
Have a berry great day ~ CYP Challenge 173
One of the things I love best about summer is fresh fruit, especially berries so this week's Craft Your Passion card makes me smile. Our challenge this week is 3-D It which is something I have been trying my hand at lately because the effect is so cool. My talented CYP teamie, ~ginny, is a master at this technique and has been really helpful with tips. Thanks, ~ginny! Our sponsor this week is Doodle Pantry and I was able to play with Berry Nice Mice which comes with the images coloured and uncoloured as well as sentiments and background papers. I coloured the images with Prismacolor pencils and fussy cut them. Extra parts on a second set of images were coloured, fussy cut, and popped up on foam tape to create the 3-D effect. It's difficult to see in the photos but the paws and the berries they are holding, the centers of the two raspberries on the floor, the mouse's feet, and the two blueberries on the floor were the extra bits. The blueberry mouse has black flat pearls added to his eyes. The images were then popped up on foam and added to the matted punched circles.
The red dotty background paper comes from K & Company's Wild Raspberry stack and was matted in the same blue cardstock as the image. The blueberry paper also matted in blue is part of the Doodle Pantry digi kit. Before it was adhered to the background, red and white baker's twine was wrapped around the red layer twice. The little sentiment, also from the digi kit, was printed on white cardstock, matted in blue, and popped up on two layers of foam tape. Three buttons were added to complete the card. So there you have it, my 3-D card for this week's challenge. If you get a chance, pop over to the Craft Your Passion Challenges blog to see the creations from the rest of the DT. Let me tell you, they are cute!! I'm hoping they inspire you to play along this time.
I am entering this card in the following challenges:
613 Avenue Create ~ #30 Anything Goes
Dream Valley Challenges ~ #62 Summer Days
Great Impressions ~ July Anything Goes
One Stitch at a Time ~ #174 Anything Goes
Pile It On ~ #30 Anything Goes
Scrappy Frogs Challenge ~ July Red White & Blue
Thanks for your visit today.
Life is good; so is art.
Bonnie
Wednesday, July 24, 2013
Choose Joy and Love Life ~ eP Picks Challenge
On the third Thursday of the month,the eTeam Picks challenge begins at eclectic Paperie. It's an opportunity to be inspired by one of the eTeam's creations, to share your work, and to be entered into our prize drawing. It's a great chance to mix it up, enjoy the creative process, and try something new. Last Thursday was our talented Teresa Jaye's turn to host the challenge and she has asked us to use papers from our kitchens as part of a collage. Hmmm. Gotta engage the brain for this one :) I actually love that because by shaking things up and having to think outside the box, it gets my sometimes lazy mojo fired up.
I began with an 8" x 10" canvas onto which I spritzed water, Pink Bubblegum, Squeezed Orange, and Lemon Zest Dylusions ink sprays. While that was drying, I raided the kitchen drawer and tore off a piece of parchment (cooking) paper. Using black Stazon, I stamped Dy's Alphabet a, b, and c on the sheet and ripped it into strips. The strips were crumpled and then flattened by hand before being adhered with spaces between them onto the canvas using matte medium.
Out came the stencils! To create texture and interest, I used Dylusions Number Jumble and Picked Raspberry Distress ink, TCW's Mini Chicken Wire Reversed and black Archival ink, TCW's Confetti and Dylusions Dotted Flowers with white gesso, and finally, TCW's Chevron Arrow with Studio 490 Black Embossing paste . After applying a little black and white Duck tape in three places, I felt that the colours and contrasts were too strong (hard to believe, I know) so I spritzed the whole canvas with Dylusions White Linen ink spray.
Next I stamped Prima's Doll with Bolero Dress once on white cardstock and then the jacket only on the center of a cupcake paper. The doll was coloured with Prismacolor pencils before being fussy cut, The ruffled outsides of three cupcake papers were cut away from the centers and used to form her three tiered skirt. Kitchen twine was used to create her belt. Her jacket was shaded with black coloured pencil and then cut out and adhered to Joy's form. I called her Joy because then the sentiment makes me smile. It reads like a campaign slogan or a personal ad if Joy is a person...just my quirky sense of humour :D and not what I meant when I created the sentiment. Just a little secret bonus...which is no longer a secret.
The top lettering, Choose Joy, was done with stickers from my stash. White dots were added to the letters. The 'and' was part of another sticker sheet. The words 'Love life' are on one of the stamps from the Melody Ross set by the same name. I knew that I wouldn't get a good impression if I stamped directly over the wrinkled parchment paper so I stamped it onto a piece of Melange Tissue wrap and adhered it to the canvas with Matte Medium. Once dry the letters were outlined in black pen and highlighted with white.
I punched circles from black cardstock and scattered them across the canvas without gluing them down. Then I removed some of the circles and auditioned some stars in their place. Better but not quite there so back to the kitchen I went to find some corrugated cardboard torn from a box in the pantry. I ripped and cut it and added it several places both for the texture and for the colour.
I added stamping with more black Archival ink. The stitching is from Tim Holtz's Seamless Experience set and the crackled stamp is from Stampendous. White dots were added to the stars and spirals to the circles. Finally, Black Soot Distress ink was added to the edges of the canvas and black doodling around some of the elements to complete this kitchen paper extravaganza.
Thank you for stopping by today and for reading yet another marathon post, if you managed to get this far. I had absolutely no plan for this piece when I began. I hadn't even thought as far as the Dylusions ink sprays which was the first step. Some projects are like that. If you want more info about any of the products I used here, click on the thumbnails below and you will be magically transported to the eclectic Paperie shop where Kim can hook you up. We would love to see your kitchen paper creation.
Life is good; so is art.
Bonnie
Monday, July 22, 2013
Paint the Town ~ CYP Challenge 172
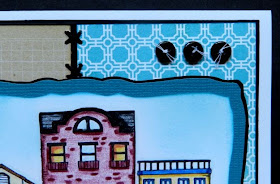
For those of you who are unfamiliar with Birdie Brown digital stamps, you have been missing out! Torico, the fabulous designer of Birdie Brown images, creates some of the cutest characters out there. This week at Craft Your Passion, we are lucky enough to have Birdie Brown as our sponsor for the current challenge, Happy Birthday. Since I am so fond of houses and building images, I chose her Doodled Town - Shops image to feature. I coloured these charming and detailed shops with Prismacolor pencils, cut out the image using a Spellbinders die, and then inked around it with Broken China Distress ink. The image was matted on teal cardstock and then black for more definition.
All three background papers come from MME's Follow Your Heart - Be Amazing paper pack. Each layer was matted with black cardstock. The beige checked band was cross stitched to the turquoise layer using black embroidery floss. The sentiments were computer printed onto white card, cut to shape, and matted with more black. The sentiment on the bottom was popped up on foam dots. To complete the card, three black buttons threaded with white were adhered to the top right corner and two Martha Stewart punched photo corners accented the left hand corners.
Thanks for coming to visit our little town...and me! It's always lovely to have you here. If you get a chance, pop over to the Craft Your Passion Challenges blog to see the wonderful DT creations using more Birdie Brown stamps. maybe you'll even join in this time. After all, everyone needs birthday cards in their stash.
Life is good; so is art.
Bonnie
Sunday, July 21, 2013
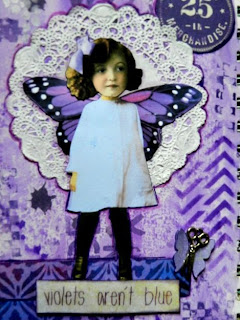
Violets aren't blue ~ Eclectic Ellapu Challenge
I made a most interesting discovery about my art when faced with this week's Purple Team challenge at Eclectic Ellapu. Our wonderful DT member, Purple,set the challenge which is for the focus to be butterflies + shades of purple + one or more of the following :brads, buttons, bling, ribbon. Now for my discovery...in my absolute ton of supplies, I have very little purple. I have no idea why that is. I like purple, I just don't use it. I had one purple Neocolor II crayon in my bin of 42 colours. I have no purple Inktense blocks or pencils and only one purple Distress ink...no markers, stains, papers...nothing, nada. That, my friends, is about to change.
I started my journal spread by gessoing both pages. Then I took my lonely little purple Neocolor II and scribbled it across the pages spreading the colour with water. Next, I loaded some purple watercolour from my palette (it came with it...I didn't buy it) and heavily painted it on the left page. Then I closed the pages together and smushed it with my hands to spread the colour and create lots of texture. It also created lights and darks to make up for my lack of purpleness...purple-tude...whatever.
Next Dusty Concord Distress ink was applied to the pages through the Dylusions Letter Jumble stencil, TCW's Mini Chevron and Confetti stencils. White gesso was pounced through TCW's Mini Punchinella stencil with a scruffy brush. The checkerboard stamp was inked with Dusty Concord and applied randomly on both pages.
The images with the exception of the butterflies come from a collage sheet from Tumble Fish Studios (Deviant Art). They were fussy cut, edged with my purple Big Brush pen (Ha! Found it!) and adhered to the background. A white doily was adhered behind Violet and her wings so that she would be more visible. She's no Shrinking Violet!! The large butterfly with the Stickles body is an Etsy image from Picky Chicken and the other butterflies were internet images. The small double layered butterfly with scissors for its body is cut with a Martha Stewart punch.
The zigzag trims were from my stash (who knew they were there?) and had white paint pen dots applied. The purple ink dripping from the paintbrush is Dylusions Crushed Grape ink spray which was dripped onto the brush and page and allowed to run.
To complete the spread, three paper flowers, sent in a RAK from my friend, Paulette (Thank you!), were adhered to the bottom right corner. Threaded buttons were added to the centers and Dusty Concord Distress ink was applied to the page edges. A final outlining of everything with a purple coloured pencil and I called it done. And it left me wondering where purple has been all my life!
Thanks for visiting today and sharing in my discoveries. I always appreciate your company but I have to ask you...do you use a lot of purple? Inquiring minds want to know. Be sure to pop by the Eclectic Ellapu blog to see the rest of the challenge inspiration makes from the DT...and that would be the Purple Team...lol.
Life is good; so is art.
Bonnie
Thursday, July 18, 2013
Enjoy the journey ~ eP post
On Tuesday, I posted a sneak peek here of an altered canvas I designed for the eclectic Paperie blog where I tried out one of my new Silks glazes and Viva Decor Modeling Cream. While I was playing with that canvas, I had another idea using the same TCW Layered Butterflies stencil so during drying times, I had to try it out.
I started with a 5" x 7" canvas board, painting one half with black gesso and the other half with Golden's Titan Buff acrylic paint. On the black half, I mixed Titan Buff mixed with Studio 490 white Embossing paste and layered it through the large overlay butterfly wing. I pulled the stencil off carefully, cleaned it off, and waited for the embossing paste to dry. Then, I flipped the stencil over and used the black Embossing Paste to create the wing on the other side. When that was dry, an Idea-ology number 8 was adhered to the center to form the body.
Titan Buff paint was pounced through TCW's Mini Harlequin stencil onto the black background. The process was repeated with black gesso on the Titan Buff side. Three strips of washi tape with half pearl accents were adhered to the canvas, helping to balance it. Stamping was done on each side with one of the TH Bitty Grunge stamps.
The sentiment block started with a layer of torn corrugated cardboard. On top of that is a torn piece of canvas. On top of those two layers, a word band was attached with Glossy Accents. Natural twine was laced through the two end tabs and wrapped to the back of the canvas.
I kept this piece very simple because I wanted both the high contrast and the symmetry to be the stars of the show. It works for me :D Thanks for dropping by today. I imagine you are in shock since this is a short post compared to the usual ones. What will you do with all that extra time...lol.
Life is good; so is art.
Bonnie
The thumbnails below link up to the products at the eclectic Paperie store.


