Sunday, January 06, 2013

Snow Fun at Eclectic Ellapu

We had the most amazing entries for our three week Anything Goes Challenge at Eclectic Ellapu. Thanks to all who participated and provided us with so many wonderful blogs to visit. It's time for a new challenge set by Trisha of the Purple Team. The theme is Snow Much Fun and Trisha asks that your project feature any winter activity...easy peasy, right?


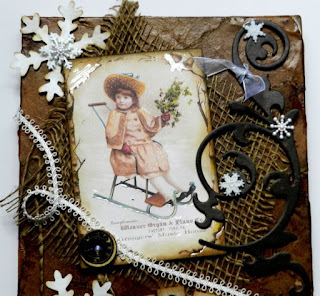
I chose to alter another canvas 'cause that makes me happy :) Random shapes were torn from a paper grocery bag, crumpled like I meant it, and then adhered to a gessoed canvas with Decou-Page (like Mod Podge). There was no rhyme or reason to the layering with some areas left blank and other pieces overlapping. Some pieces were brought down over the edges of the canvas. Once this was completely dry, Vintage Photo, Walnut Stain, and Black Soot Distress inks were applied to the entire canvas. Extra Vintage Photo reinker was spread with my finger to the areas where the canvas still showed through. This helped them blend better with the crumpled paper background. A few spritzes of Gold Glimmer Mist were applied over the Distress inks for added shine and texture. Wish I'd taken a photo of the background before I covered so much of it up because it's such a cool effect. (head smack) I'll remember next time.


A chunk of garden burlap was cut, unravelled a little and adhered to the canvas under this fabulous vintage image from Gallery Cat's Etsy shoppe. Distress Inks and Liquid Pearls had been applied to it before popping it up on foam over the burlap. Large and small snowflakes punched from dotty white cardstock were inked with Antique Linen DI and spritzed with Pearl Glimmer Mist before being stacked and adhered to the canvas. The large snowflake punch is Recollections and the smaller one is Martha Stewart. A Bo Bunny chipboard flourish was added to the mix and glittery, as well as shiny, snowflake buttons were glued randomly around the canvas. A small piece of sheer white ribbon was knotted around the flourish...just because.


The letters are Scrabble tiles inked around the edges with Vintage Photo DI. A length of white trim was looped across the canvas on the diagonal and adhered with some extended onto the sides. A wooden clock button was threaded with white ribbon and adhered to the image corner overlapping the trim. Finally two large half pearls decorated the center of the small snowflakes in the bottom right corner and helped them from looking lost.

This canvas makes a nice companion piece to the Vintage altered Santa canvas I created here. If you haven't altered one, give it a go. It's great fun and canvases can be displayed so easily around the home. Be sure to visit the Eclectic Ellapu blog to see the other creations from the Purple Team. Amazing variety and talent...a little something for everyone. Thanks for visiting today and thanks also for the lovely comments you leave. I look forward to visitng your blog and seeing what you create.

I am entering this project in the following challenges:

Eclectic Paperie Get Altered Challenge ~ use canvas
Challenges 4 Everybody ~ Anything Goes
Dream Valley Challenges ~ Anything Goes (48)

Life is good; so is art.
Bonnie


Wednesday, January 02, 2013

Fairy Wishes


Wednesday? Yikes! It's time for my Wednesday post for Stamp N Plus Scrap N blog. This week I chose to play with the Large Fairy Princess stamp (one of the Patti's kids line) which I coloured with Prismacolor pencils. After adding Stickles to her shoes and star, as well as the circle sparklies showing that she's waving that wand, I fussy cut her leaving a narrow white border. Foam tape was added to her backside and she was asked to wait quietly for her entrance cue.


The background is a series of papers from the MME Lost & Found Market Street collection. Parts of the pages have sparkly sections perfect for this little fairy's world. The fishtail banners were hand cut, edges inked, and mounted on black cardstock for greater contrast. Using an MFT Monarch border die, I had cut a border for another card. The piece on this card is the leftover off-cut or negative border which is also fun to use and gives a different look.

To complete the card, three star buttons were threaded with white satin ribbon and the ends were allowed to peek out from under the buttons. Tracy MacDonald, whose cards I adore, uses this button treatment and I just love it! So cute! Three half pearls were added to the top right corner and letter stickers were  adhered to the bottom. The princess fairy was finally called to make her grand entrance and all was right with her world :)

Thanks for dropping by today. It's always a treat to visit with you.

I am entering this card in the following challenges:
Whoopsidaisy Challenge ~ celebration
One Crazy Stamper ~ Anything Goes
Cards Galore ~  January Challenge Anything Goes

Life is good; so is art.
Bonnie


Tuesday, January 01, 2013

Chalk-Ah-Lot challenge ~ Anything New

Sometimes I have small stamps that I want to use because of their cute factor but they are too tiny to be the only image on the card. I have done multiples of the same image using them on inchies or twinchies but this time I decided to combine them into a larger scene for this fortnight's Chalk-Ah-Lot Cafe challenge of Anything New.


Stamp N Plus Scrap N images Magic Cutie and Star Baby Sitting were stamped with Memento Tuxedo Black ink so that it looks like Cutie has waved her magic wand and conjured up the star to amuse the sitting baby.  Both images were coloured with Prismacolor pencils before being cut with an MFT die. Their tiny wings were coloured with metallic blue gel pen. The edges of the die cut were inked roughly with Versamark and then Jules Blue and Pearl Purple powdered chalks were brushed on over the Versamark. The star was punched twice and then Buzz N Magic paint was dabbed on before Dandy and Shine powdered chalks were pounced on top. The two stars were layered using foam dots for dimension.


Once the image was matted with purple cardstock, a small hole was punched on each side of the purple for the white grosgrain ribbon to slide through. The Image was mounted on foam dots before being adhered to the purple snowflake background from DCWV's Christmas Combo Stack. The ends of the ribbon were taped to the back and that layer was matted with more purple cardstock. To finish off the card, part of a small doily was added to the bottom of the image and bead letters were added to spell Happy New Year. Flat pearls were added to each corner before that layer was adhered to another patterned paper from the same stack.


Be sure to check out the Chalk-Ah-Lot Cafe blog to see Cindy's take on this challenge and other ways to use powdered chalk. Maybe you'll be inspired to create a project for this chalk challenge...hope so:) Thanks for visiting today.

Life is good; so is art.
Bonnie

Monday, December 31, 2012

CYP Challenge 143 ~ Get Well


Allow me to introduce Lenny, the star of my get well card which is the theme this week for Challenge # 143 at Craft Your Passion Challenges. Lenny from Stamp Fairy has been coloured with Prismacolor pencils with the exception of his ice pack. That was paper-pieced because I wanted a very retro pattern on it and this paper was just the ticket. I did shade and highlight the patterned paper with Prismas. Lenny's nose has Glossy Accents over the pencil...he might not be as sick as he says :) Lenny was cut out using a Spellbinders die and then matted on blue cardstock. A doodled border was addedwith a Micron pen and the dizzy circles were inked with metallic gel pens..


The striped paper behind the image comes from the MME Moments paper pack. Two layers of cardstock, one yellow, the other deep blue, matted the striped paper, pulling from the colour of the stripes. A precut chevron border was layered over that and anchored with blue brads. A photo corner cut  from the chevron piece was added to the top corner with another light blue brad repeating  the colours from the bottom right. The sentiment was computer generated, printed on a yellow dotty scrap from the same collection, and then.coloured with a Sharpie marker. Two layers of foam dots on the sentiment and one layer on the image addded dimension to the card.

CAS all the way on this one. The image is adorable and strong enough to stand alone without many embellishments. Hope Lenny gives you a smile today. Be sure to check out the rest of the DT projects on the Craft Your Passion blog. They'll make anyone feel better...just like sunshine :)Thanks for visiting today.

Life is good; so is art.

Bonnie

Saturday, December 29, 2012

FPWA Challenge 30 ~ New or Celebrations


It's time for another new challenge at Fat Pages With Attitude and since the new year is just around the bend, our challenge theme this fortnight is New or Celebrations. That means a card for anything new (new baby, new job, new house) or a celebration of an occasion (B-day, New Year's, etc.). That gives a very broad set of choices for this time...no excuses not to play along :)


I was fortunate to be able to play with Party Time Cat, a fun image from one of our fabulous sponsors, Meljen's Designs. I based my colours for his hat and balloons on a scrap of glittery paper which I used as one of the background layers. If you follow my blog or even visit only occasionally, you'll know that I love bright colours especially paired with kraft. I coloured Mr. Kitty with My Prismacolor pencils, rounded the corners of the image, and inked the edges with Vintage Photo Distress ink. The image was then matted with turquoise sparkly paper.

The background and banner flags were cut from corrugated card and inked along the edges with Walnut Stain Distress ink. The banner flags were popped up on foam tape before adhering the brown embroidery floss to the tops and attaching the flags to the dotty background. The sentiment was computer generated, coloured in with a Sharpie, cut out and inked with Vintage Photo. Once the card layers were assembled, a hot pink button was threaded with more of the brown floss and adhered to the bottom right corner.

Love this party cat image. He's be cute for a birthday or Congratulations card, as well. He certainly knows how to party hardy :) Thanks for visiting with us today. Be sure to visit the Fat Pages With Attitude blog to see what the rest of the DT have created. Lots of inspiration to get you thinking "new/celebrations". I hope you'll play along with us.

Thanks for visiting. That makes me happy...maybe I'll dance along with Mr. Kitty.

Life is good; so is art.

Bonnie

Wednesday, December 26, 2012

Happy New Year


Happy Boxing Day! Are you a mad shopper today or do you prefer to stay home and relax? I really am uncomfortable in crowds so I definitely prefer to stay home and play with my inks and pencil crayons. I have a list of things to complete that's a mile long! Good thing it's fun stuff.


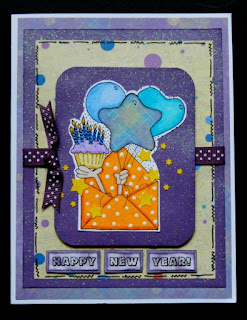
I wanted to create a Happy New Year post for my Wednesday Stamp N Plus card but I didn't have a New Year's stamp. I did, however, have this large birthday in envelope stamp which I love so I decided to repurpose it. I stamped it with Memento Tuxedo Black ink on white cardstock and stamped an extra of the star balloon which has the Happy Birthday sentiment in the center. Rather than masking or rubbing ink off the stamp, I decided to paper piece the star balloon using the extra one I stamped as a cutting template. The rest of the image was coloured with Prismacolor pencils except for the white dots which are acrylic paint and the small stars which were punched with a MS punch and adhered with glue. The image was then fussy cut leaving a narrow white border around it. More of the tiniest stars were set aside to glue to the image background once the card was assembled.

The background is layers of Paper Wishes birthday paper and glittery purple cardstock. A doodled border was done with a Micron pen around the yellow layer and a purple dotted ribbon was fastened around that same layer before adhering the image layer with foam dots. The sentiment was computer generated, inked with Distress ink, and mounted on the paper scraps from the first layer. Foam tape was added to the back of each word for added dimension. This stamp is extremely versatile and fun. I'm sure I'll be using it for other occasions in the future. I love when I get different uses out of the same stamp.

Thanks for visiting today. I'm always glad to have the company...and such good company at that!

Life is good; so is art.

Bonnie

Tuesday, December 25, 2012

Father Christmas

Merry Christmas!
 
I hope you have a wonderful day with family and friends.


Life is good; so is art.
Bonnie