Tuesday, December 03, 2019
There's Snow Family...inspired by a Vera Lane Studio digi set
Hi everyone!The Wintertimes image digi set was released by Vera Lane Studio yesterday and they are the cutest little family. There is a father, mother, and child snowman plus a sweet cloud and some lovely snow in the set. Lots of options to mix and match or use them individually. I decided to create a two page mixed media spread to give them room to spread out.
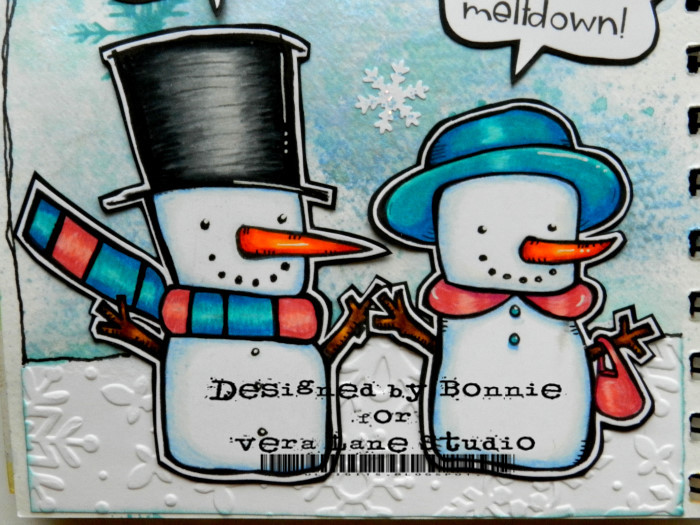
The snow family was coloured with a mix of Prismacolor and Polychromos pencils, fussy cut leaving a white border, and matted with black cardstock to create a second border.
The sky of the 6x6 inch watercolour paper background was spritzed with Heidi Swapp Ocean Color Shine spray and water, allowing it to drip and pool to create extra texture. Extra colour and pattern was added using Broken China Distress Oxide and an ink blending tool. The snow portion was torn from white cardstock which was then embossed with a snowflake folder.
Snowflakes were stencilled on the sky area with Broken China Distress Oxide Ink and white ones were punched and sparkled up with Icicle Stickles before they were adhered across the sky. The horizon line was deepened with Neocolor II crayon activated with a waterbrush. Once dry, it was then outlined with black pen which was also used to doodle a simple border. The wording on the right hand page was printed onto white cardstock and matted with black.
The speech bubbles were printed onto white cardstock and cut into their shapes freehand. The bubbles were matted with black and adhered over their heads. They are trying so hard to calm the wee one down...LOL. I'm not sure it's going to work though :)
Thanks for joining the Wintertimes and me today. We all appreciate that. When you get a chance, pop by the Vera Lane Studio Etsy shop to check out this set as well as the plethora of others available...so many must-haves. We would love to have you pop by the Vera Lane Studio Facebook group as well. It's a great place to hang out and get inspired.
Life is good; so is art.
Bonnie
Monday, December 02, 2019
Joggles Art Journal Adventure ~ Week 48 ~ Cozy
Hi everyone! It's Week 48 of the Joggles Art Journal Adventure and our prompt for this week is cozy. Cozy can look different ways for different people, can take different forms, and have different components but I think the feeling it brings is similar across the board. I decided to construct a scene that had many of the components that evoke that cozy feeling in me. It's a place I'd like to hang out, especially as the weather gets colder and nastier outside.
The first thing I wanted was a sunny room with wide white baseboards and wood floors. I used watercolour and Neocolor II crayons to create the floor, and lined it with a black pen to create the boards. The walls were coloured by smushing Antique Linen Distress Oxide on my craft sheet, spritzing with water, and dipping the top of the page into the puddles. Painters' tape protected either the floor or the walls when I was working on the opposite area. The walls were shaded with Inktense pencils activated with water.
Next I needed a comfy chair for Parker, my gray cat, and me to curl up in. I placed it next to a bookshelf filled with lovely hardcover books. I placed a window ( a die cut) above the bookcase so I could get lots of light and see the big fat flakes outside.
Beside the chair. I have a stack of books, my reading glasses, and a steamy cup of coffee in my favourite mug. On the back of the chair is a knitted throw to keep Parker and me warm, should we need it. Behind the chair is one of my art journal pages framed and displayed to make me smile.
On the other side of the chair is a cozy knitted basket for Molly, my black and white cat, to curl up in. All of the collaged elements except the picture hanging on the wall were elements from several digital collage packs from ATArtDigital, an Etsy seller. All were fussy cut and the gray cat, throw, book stack, and basket were popped up on foam tape to add dimension to the piece. The wording came from Idea-ology Small Chat Stickers.
Thanks for joining Parker, Molly, and me in our cozy space. I can't wait to be invited into yours if you take up the Week 48 Cozy challenge.
Life is good; so is art.
Bonnie
Sunday, December 01, 2019
Scrappy Kraft tags
Hi everyone! I raided my scrap box again to decorate some tags die cut from kraft cardstock. I love collaging with scraps, although I'm building up enough of a stash that I think I'm going to have to send out some happy mail so I can create more. My joy comes more from the process of creating them than from actually using them :)
The two larger tags were die cut using a 3 x 4.5 die from Poppy Stamps with pinpoint detail around the edges. The other 4 were cut with a Paper Smooches die which is about 2x3 inches in size. All 6 tags were inked around the outside edges with Coffee Archival Ink. The four smaller tags were faux stitched around the outside edges to create a border.
Scraps of various sizes and shapes were layered onto each tag after they were edged with Coffee Archival Ink to help the layers stand out. Threaded buttons were added as well as punched reinforcements for the front and back. Fine cord was used as toppers for each of the tags.
Thanks for popping by today. That was awesome of you. I have several more tags and embellies to share with you later in the week so stay tuned...LOL
Life is good; so is art.
Bonnie
Tuesday, November 26, 2019
Planner Girl Artist Trading Coins ~ Inspired by Vera Lane Studio collage sheets
Hi everyone! Last week, Vera Lane Studio released a wonderful set of collage sheets called Planner Girl. One sheet has fabulous planner accessories and embellies. The other sheet in the set is two slightly larger groups of wonderful images with no words attached to them. This second sheet is the one I pulled from to create a set of 4 artist trading coins. These could also be used in your planner if a paper clip was attached to the back or if they were adhered directly to your page. They are cute as can be!
These girls were fussy cut leaving my standard narrow white border, and matted with black. They were each popped up with foam tape to add some dimension to these little 2.5 inch circles. Little gems and enamel dots were added to the hats, clothing, and eyes to add my own artistic voice to these already gorgeous collage images. I think that's my favourite part of making these.
The backgrounds were punched from gel printed or spray inked scraps from previous projects. A chipboard backing was also punched and added to the atcoin to add strength to it.
The wording for each coin was added with a ChitChat Sticker. The edges of each coin were inked with Archival Inks and either stamping with Archival Ink or Ranger Texture Paste added through a stencil were added. A black border was added to each coin with Pitt Pen using a different style for each.
Thanks for joining the Planner Girls and me today. To check out these beauties and the other amazing collage sheets and images available, be sure to drop by the Vera Lane Studio Etsy shop. Stop by the Vera Lane Studio Facebook group while you're at it to see other amazing projects using these Planner Girls. There's always something new and inspiring in our FB group!
Life is good; so is art.
Bonnie
Owl Be There art journal page ~ inspired by Vera Lane Studio images
Hi everyone! I am smitten with the newly released Be Wise image set at Vera Lane Studio. The owl and the little girl are such sweet friends so I was excited to showcase that.
I coloured both images with Prismacolor and Polychromos pencils. Tiny Xs were added to her little yellow shirt. They were then fussy cut leaving a narrow white border, matted with black, and fussy cut a second time leaving a narrow black border. A tree branch was free handed and cut from brown patterned paper. It was edged with Coffee Archival Ink, lined and edged with brown Sharpie.
Broken China Distress Oxide was applied to a 3x3 inch gel plate, spritzed with water, and transferred onto the 6x6 inch watercolour paper background, lifting and plunking it down several times. It was allowed to dry thoroughly amd more of the same ink was applied through AALL& Create Lotza Dots stencil. The brown Sharpie was used to outline several of the circles as well as creating little clusters of the tiny ones in different places. Xs were added to the background by using a black Pitt Pen through an Alexander Renke stencil. Text stamping was added here and there with Coffee Archival ink and an Indigo Blu Tasty Textures stamp. The branch was adhered to the background and the two amigos adhered to the branch.
The wording at the top of the page was printed onto white cardstock and matted with black cardstock. The word, Friends, was added with stickers separated by punched black dots to mimic the tv show logo. The page was finished by doodling a little heart and line border which serves as a frame and by adding three little pink hearts to replicate the hearts on the border.
Thanks for joining Wendy, her owl friend, and me today. We are delighted you came by. When you get a chance, be sure to pop by the Vera Lane Studio Etsy shop where you can fin the Be Wise image set as well as a plethora of other images sure to inspire you. Stop by our VLS Facebook group, too. There is wonderful inspiration on a daily basis! See you there!
Life is good; so is art.
Bonnie
Monday, November 25, 2019
Joggles Art Journal Adventure Week 47 ~ Squares and/or Rectangles
Hi everyone! It's Week 47 of the Joggles Art Journal Adventure and the prompt this week is Rectangles and/or Squares. We are challenged to create a project which features those shapes. I thought about creating a page in the Piet Mondrian style of art but decided I wanted more of a random collage effect.
I pulled a bunch of scraps from my stash which I thought would play well together and then prepared the 6x8 inch background by spraying it with Lindy's Creme Brule Cream Starburst Spray. Once it was dry, Gathered Twigs Distress Oxide was added lightly through Carabelle Studio Cosmic Cubes stencil.
The scraps were cut into rectangles or squares and auditioned on the background, placing the long vertical pieces first to anchor the rest. The rectangles and squares which were more on the plain side were embossed with folders to add texture and interest. All of the shapes are connected through overlapping and layering to create unity. They were all edged with Coffee Archival Ink and were outlined with brown Sharpie. Hand stitching was added in three places with black crewel thread, creating a visual triangle. Three pieces of the same spritzed text paper as well as black cardstock emphasized this triangle, keeping the eye moving around the collages pieces.
To complete the page, the edges of the background were edged with Gathered Twigs Distress Ink as well as Coffee Archival ink. The wording came from Tim Holtz Big Chat Stickers. Black pen was used to create a simple border close to the edges before it was adhered to the black background.
Thanks for visiting today. I appreciate that. If you get a chance, pop by the Joggles Art Journal Adventure Facebook group to see what the others in our creative group do with this prompt. We only have 5 more weeks to finish the year!
Life is good; so is art.
Bonnie
Thursday, November 21, 2019
Altered tags
Hi everyone! I had this tag pad from K&Company kicking around for ages. I had already used all the ones I really liked and was left with a bunch that were OK but not really my style. They sat neglected for so long that finally I decided to alter them, keeping the parts I liked about each but changing the parts I was less fond of. Now, I love them and can see myself or someone else using them.
First I added scraps of patterned paper to cover the sections or details I didn't care for or to create a different colour story.
The front and back edges were darkened with Coffee Archival Ink and faux stitching was added with brown Sharpie pen. Reinforcement circles were punched from kraft or coordinating cardstock and edged with Coffee Archival Ink before being glued on to the front and back.
To finish them off, words from TH ChitChat Stickers were inked around with Walnut Big Brush Pen and adhered to the tag fronts. The good news is that I went from 10 tags I would never use to 10 tags I love. The bonus is that I used up more scraps and bits from my stash. And...I had great fun collaging them.
Thanks for joining me today. I appreciate that. Do you have anything kicking around your stash that you can alter to make something you like? Have a play! It'll be worth it :)
Life is good; so is art.
Bonnie
Subscribe to:
Posts (Atom)