Tuesday, December 31, 2013

Sneak Peek of my eP post


Today it's my turn to post on the eclectic Paperie blog...yay!
I'm sharing an art journal spread depicting how I feel when I have too much going on in my head...ever been there?  LOL
I'd love it if you popped over to the eclectic Paperie blog to see what I'm talking about. Wait 'til you see the other half. I had fun with this spread :)

In the meantime...
Happy New Year's Eve my friends! I hope 2014 is an amazing, soul-nourishing, inspirational and healthy year for us all.

Life is good; so is art.
Bonnie

Monday, December 30, 2013

Ready to Ring in the New Year ~ CYP Challenge 194


Hi everyone...long time, no blog! I took a bit of a break over the holidays and now I'm ready to go again. We have a new theme at Craft Your Passion Challenges: Celebrate something new (house, baby, year, job, etc.) or use a new product. Our wonderful sponsor is The Paper Shelter and I chose to play with this fun image from them called Happy Meow Year. Love these party cats :) I coloured them with Prismacolor pencils and cut out the image with Spellbinder's large scalloped square die. The outside edges were inked with Broken China Distress ink before the image was matted on black cardstock.


The blue background paper comes from DCWV's The High School Matstack, The colourful stripey paper was from my scrap box. Both were matted in black for contrast before being adhered to a white card base. Primitive stars were cut from yellow scraps with a Tonic punch and two of the three were popped up on foam dots for added dimension. The finishing touch was to adhere two vintage style bingo chips to the front to form the new year, 2014.


To follow the theme, I am celebrating something new...the year. I hope it's a fabulous one for all of us. Thanks for popping in to visit. If you get a chance, swing by the Craft Your Passion Challenges blog to see the awesome projects by the rest of the DT...so fun! I hoping you'll join us this week either in celebrating or using something new.

I am entering this card in the following challenges:
613 Avenue Create ~ #52 Anything Goes
One Stitch at a Time ~ #194 Anything Goes (month long challenge)
That Craft Place ~ Anything Goes
The Squirrel and the Fox ~ #60 Anything Goes

Life is good; so is art.
Bonnie

Wednesday, December 18, 2013

S is for...altered dictionary


It's time for my weekly eP post. As soon as I saw this adorable sleepy elf from Mitzi Sato-Wiuff's shop AuroraWings, I knew what I wanted to do with it. I hadn't done the S page in my altered dictionary and Sleepy was perfect for what I had in mind. I coloured her with Prismacolor pencils and fussy cut her, before popping her up on foam tape. She sat quietly waiting for me to give her a place to reside.


The background started with the two page spread being adhered to the pages before and after with matte medium. Gesso was then applied to the pages I needed, making sure to leave the definition uncovered. Once the gesso was dry, pink and yellow Neocolor II watercolour crayons were scribbled across the pages and then spread with more gesso instead of water. This softens the watercolours and gives a muted and blended look. I was going for a gentle sleepy-time baby look.


Various shades of pink and yellow gelatos were used to intensify the colour in places, especially around the edges and the center fold. A little gesso on a wet brush was used to spread and soften the gelatos.


Stencilling was applied using gesso and TCW's Mini punchinella stencil. Picked raspberry was applied through TCW's Halftone borders stencil as well as though their Confetti stencil. Vintage Photo Distress ink created the dots through a stencil from my stash. Rocket Red Gold Brilliance ink was pounced through a hanging star stencil  and Tim Holtz's Measured stencil via a make-up wedge. That ink has a shimmer to it.


My old favourite TH script stamp was used with Picked Raspberry Distress ink to create some random text and a dotty stencil from my stash was used with the Rocket Red Gold to make spotty clusters.


The flag papers came from Me & My Big Ideas Mambi sheets and were cut in various size triangles and adhered around the edges. More stamping and some doodling was done to embed them into the background. Sleepy was tucked into place and some phrases were done up on the computer, cut out and edged with Picked Raspberry. The word Sleepy is Idea-ology Ransom Alpha Parts which I adhered to the page with Glossy Accents. Plain cream washi tape was given a checkerboard pattern with a pink Sharpie and then glued to the page so it would stay put. Pink dotty washi tape was also added beside Sleepy.


The finishing touches were more doodling around the edges, the addition of three threaded buttons, and a wooden S tile to mark the dictionary page. The colouring in of the loopy border around the definition was done with a white gel pen.

Thank you so much for popping in today. I am grateful for your interest and support of my artsy journey...you add so much to my happiness :)

I am entering this project in the following challenges:
Through the Craft Room Door ~ Anything Goes
Bearly Mine Challenges ~ #117
Love to Create ~ #96 Anything Goes

Life is good; so is art.
Bonnie

Here are links to the eclectic Paperie store for some of the products I used:

Monday, December 16, 2013

Merry Christmas canvas ~ CYP Challenge193


We have a bit of a change of pace at Craft Your Passion Challenges this week. Our Challenge theme is Christmas ABC...Anything but a card. It could be a gift box, decoration, present for someone, whatever. It doesn't have to be a papercraft project either. Love that! Our fabulous sponsor this week is Whimsy Stamps but we were allowed to choose any image from our stash so I chose to play with a Norma J Burnell image from 
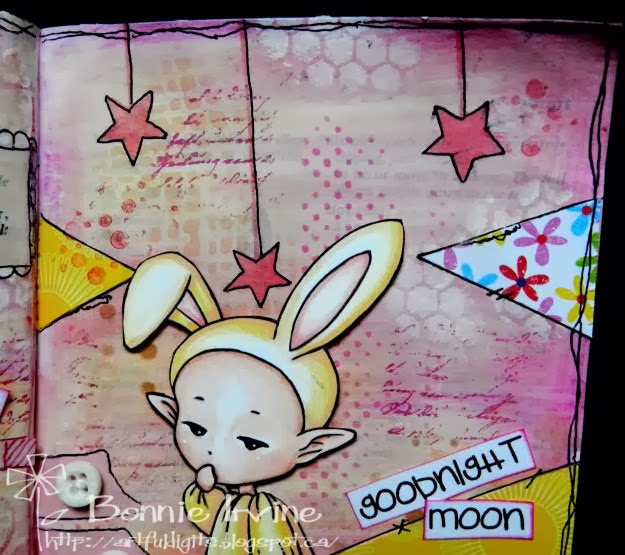
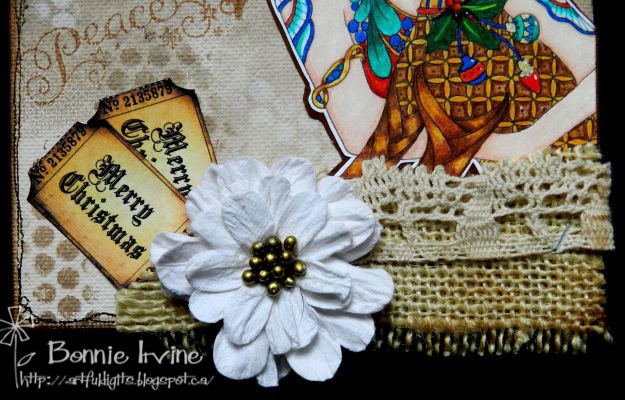
Sweet Pea Stamps. I love her images because they are so detailed and tangly...so fun to colour. This one is called Holly and Mistletoe. I coloured her and her friends with Prismacolor pencils and then fuusy cut her leaving a narrow white border. She was matted on brown cardstock and another narrow border was cut to help her stand out from the background. The vibrant colours on the image next to the neutrals on the canvas make me happy.


I applied Nougat and Mocha Mousse Fresco paints to the 5 x 7" canvas with a piece of Cut n Dry foam to get a blended effect. Once that was dry, I tapped more Mocha Mousse through the TCW Spinning Tops stencil. Nougat was pounced on using a stencil brush and TCW's Mini Punchinella stencil. The same stencil was used to apply both colours as a brush mix. The word Peace is a stamp from my stash...I can't remember the maker. I used Chestnut Roan Chalk Ink to apply it randomly to the background.


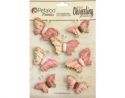
Once Holly and friends were adhered to the canvas, a scrap of frayed burlap was glued to the bottom right corner to blend the image into the background. A piece of trim was stapled over the top of the burlap and both were scuffed with the Chestnut Roan ink. An Artisan Flower from pink paislee was adhered onto the burlap and two Christmas tickets from Vectoria Designs were tucked into the grouping. To create some balance another burlap scrap was adhered to the top left of the canvas and a TH corner piece was placed over that.


Snowflakes were cut from kraft paper which I had used to clean off a white sprayed stencil. It gave a fun texture and pattern to the flakes. The larger punch is Recollections and the smaller is Martha Stewart. Both had Chestnut Roan applied to the edges for contrast and grunge. A large white snowflake was added to the bigger of the two sizes and white threaded buttons were added to the smaller flakes. A sparkly snowflake button with the shank removed was popped up on foam dots and added near the smaller flakes. The final touches were the doodling done with a sepia Micron pen and the edging of the canvas which was done with the Chestnut Roan ink.

That completes my little Christmas Anything But a Card project. Thank you so much for dropping by today to meet Holly and Mistletoe. I truly appreciate your visits and wonderful comments. If you get a chance, pop by the Craft Your Passion Challenges blog to see the fabulous creations from the rest of our talented team. I hope you will join us for this challenge. After this one we are taking a week's holiday so we'll see you again on December 30. If you celebrate Christmas, I hope you have a lovely one!

I am entering this project in the following challenges:
Allsorts ~ #237 Snowflakes
Di's Digi Designs ~ Non-Traditional Christmas Colours
Catch the Bug ~ Favourite Christmas Song (Let there be peace on earth)
Brown Sugar ~ #72 Christmas
613 Avenue Create ~ # 50 Anything Goes
Left Of Center Creative Challenges ~ #20 LOC Winter or Holidays
QKR Stampede ~ #68 Three favourite embellies (burlap, buttons, ephemera)
Sweet Pea Stampers ~ It's Cold Outside
One Sweet Challenge ~ A Gift in Itself

Life is good; so is art.
Bonnie

Friday, December 13, 2013

Dear Santa ~ Craftitude Challenge #55


There's are new challenge themes at Craftitude Challenges this fortnight...Anything Goes or Christmas Sparkle. One of our fab sponsors this challenge is Sassy Studio Designs and I chose to work with this Christmas Cutie called Santa Pin Up. I coloured her with my trusty Prismacolor pencils, fussy cut her and then added Icicle Stickles to her outfit's fur trim. Her earring is a tiny red rhinestone. Foam tape was applied to the back of Cutie to pop her up slightly, creating a shadow.


The background paper came from the DCWV Christmas Stack. Script stamping was added to the letter paper using Walnut Stain Distress ink. A band of plaid paper was added to the left side and three tiny strips were added to the right side. Brown flat pearls were adhered over the horizontal strips. The ornament was cut twice from the same paper stack. Baker's twine and Prismacolor pencil shading were added to the second one which was then popped up on foam tape over the first one. An embroidery floss bow was added to the hanger which was outlined with Sepia pen. More outlining was done with Sepia around the paper strips. Walnut Brown Big Brush pen was added to the edge of the ATC as well as Vintage Photo Distress ink.

That's it for my Christmas Sparkle ATC. Thank you for popping by today. I always appreciate your good company on this artsy journey. If you get a minute, pop by the Craftitude Challenges blog to see the wonderful inspiration provided by the rest of our fabulous DT. We'd love it if you joined us by linking up your Anything Goes or Christmas Sparkle creation. This challenge will last for an entire month as we take a break for the holidays.

I am entering this ATC in the following challenges:
Delightful Challenges ~ Colour Challenge Red & Green
Sassy Studio Designs ~ #207 It's beginning to look a lot like Christmas
The Sisterhood of Crafters ~ Christmas Sparkle

Life is good; so is art.
Bonnie

Wednesday, December 11, 2013

Altered Playing Cards


I do believe I have finished my first deck of altered playing cards. Time to sand another one and prep it for more play. I'll keep the description short and sweet...well, short anyway...OK not that either...because if you follow my blog you know the drill :D The cards were all sanded and gessoed, then coloured with Neocolor II crayons, gelatos, Inktense blocks, and Big Brush pens. A little stamping, a little stencilling, some flicking with water and the backgrounds were ready for layers of paper, washi tape, die cut and embossed leftovers. This first card had a layer of black and white Duck tape added to the bottom before a watercoloured and fussy cut stamped  experiment was added to black matting. The stamp is one of my favourite faces ever...Wendy Vecchi's Queen of Art and I had done it as a trial run for another project. Doodling, outlining with Black Big Brush pen, and computer generated wording finished it off.


 This strongman card has a piece of black cardstock embossed and highlighted with Treasure Silver adhered to the bottom section. The odd shape is due to the fact that it was left over from another project where I cut a chunk out. The images come from a number of sources such as Tumble Fish Studio, Alpha Stamps or Etsy. Love the look on the moon's face. Tiny star sequins, also from Alpha Stamps, helped with the starry sky. The words printed from the computer are matted with black cardstock and popped up on foam tape. Again, the edges are outlined with black Big Brush pen and shading was done with a Sketch & Wash pencil and a waterbrush.


This card cracks me up...my odd sense of humour. The message is Choose Joy but the couple look like they would have a hard time expressing it. I love old photos where everyone looks so serious and pained. For this card, I had used Frisket, a masking fluid, to cover the house shape before adding colour. It was rubbed off to expose the card background and then watercoloured yellow and orange. Washi tape was used to outline the house shape once the happy couple were adhered inside. The top border is a die cut piece with doodling and pearls to finish it off. More doodling was done around the edges before the wording was added.


This little fellow also amuses me because he doesn't look like he plays at all. He's very business-like with his little kitty watch, tie, and specs. Torn washi tape was added to the background along with the stamping and stencilling. The hand and Monsieur Le Kitty were fussy cut and heavily outlined. His glasses were given shine with Glossy Accents. Again, the wording is matted with black and popped up on foam tape to give it more presence.

Thanks for joining us all today. The Art Queen, the strongman, the happy couple, and M. Le Kitty all appreciate your company and your time as much as I do. Hopefully, you were given a smile or two in return.

Life is good; so is art.
Bonnie

Monday, December 09, 2013

Yippee...Day 1 of the eP 12 Days of Christmas is here!

 Hey everyone! The 12 Days of Christmas have started on the eclectic Paperie blog and guess who is posting on Day One...moi! There are 12 days of DT Christmas projects and 12 days of wonderful deals to be had in the eclectic Paperie store.


Here's a little peek at what I created for Day One using one of my favourite Unity stamps. You can see the rest of the project on the eclectic Paperie blog here. Hope to see you there.

Life is good; so is art.
Bonnie

Let it snow! ~ CYP Challenge 192


Given the extreme weather conditions lately and the forecast for another big dump of the white stuff in our area, this feels like a risky title...believe me, it's not a challenge to Mother Nature. I do like snow though, especially at the first of the winter season. What can I say...I'm Canadian and my husband deals with the snow removal :) Anyway, Let It Snow is our new challenge theme at Craft Your Passion this week. We'd like to see a snow-themed image or have you add a little snow to your card. Robyn's Fetish Digital Stamps and More is our wonderful sponsor this week and I chose to play with the image called My Mittens. I coloured this cutie with Prismacolor pencils and then added white paint pen dots to her skirt. Broken China Distress ink was applied to the edges of the image which had been cut with Spellbinders Wonky Rectangles die. The image was then matted on dark blue cardstock.


More of the same blue was used to mat the designer paper used for the background. Both the background piece and the snowflake band were cut from DCWV's Christmas Stack collection. Flat pearls were used to accent the snowflake centers on the band. The sentiment was cut from the same paper pack and matted on three layers of blue and white to give it more weight. Snowflakes were cut from shimmery white cardstock and from the dark blue cardstock using a Martha Stewart punch. These were offset and glued together before adhering them to the background. Large glittery silver gems were affixed to the snowflake centers. The final detail was to hand cut two little blue photo corners to balance out the design.


Doesn't she look like she's shouting out that message? She's probably an indoor cat which is why she's so excited about the snow and her adorable green mittens. Molly loves watching the snow fall especially when the flakes are big and fluffy. Thanks for joining us today. We do appreciate that. If you get a chance, check out the sweet snowy cards created by the rest of the Craft Your Passion DT...so cute. I hope you'll be able to play along. In the meantime, stay dry and warm.

I am entering this card in the following challenges:
613 Avenue Create ~ #48 Anything Goes
Glitter n Sparkle ~ #62 Show Us Some Blue
The Corrosive Challenges ~ #189 Anything Goes
The Squirrel and The Fox ~ #58 Summer or Winter
Allsorts ~ #236 Anything but Christmas
Crafty Hands ~ #4 Winter
Left of Center ~ #20 Winter/holiday

Life is good; so is art...and new green mittens.
Bonnie

Thursday, December 05, 2013

Be Brave ~ Altered Bottle


Hello everyone. It's time for a new challenge at eclectic Paperie hosted by the very talented and lovely Sue Carrington. The Get Altered Challenge is an opportunity to explore your creative journey, step outside of your comfort zone, to experiment with new products and create altered and mixed media art. By linking up your creation to the eP blog, you earn the chance to win a $15 gift certificate to the eclectic Paperie shop. The theme that Sue has chosen for this challenge is to alter a bottle...any kind, any way.


I started with a pretty little purple bottle that my niece gave me several years ago. It's under 5" tall and has the prettiest heart shape as the bottle part. I began the altering by wrapping a torn strip of unbleached muslin fabric around the neck. I then took a length of tissue wrap, tore it into a strip and twisted it to make it narrow. Silver jewellery wire was wrapped around the twisted tissue and then the wire was wrapped several more times around the neck crisscrossing over itself. Another length of wire had 6 clear and 1 pink Swarovski crystal beads fed onto it before being placed around the bottle neck. A length of antique crocheted lace was placed into the bottle opening so that the four points draped onto the bottle and the rest formed a nest. The little bird is an A Day For Daisies image printed on white cardstock, coloured with Distress markers (Spun Sugar and Worn Lipstick), and fussy cut. A tiny black half pearl accented the eye. He is glued to the lace at the bottom edge and the top and sides of the bird are outlined with Black Big Brush pen.


The middle of the bottle was embellished with several layers.Two torn scraps of pink dotty paper were edged with Vintage Photo Distress ink and glued under a torn piece of French book text aged with Vintage Photo Distress ink. A burlap tag from Little Yellow Bicycle was cut into a fishtail banner and stamped with a message from Unity's Empowered Words set by Donna Downey. Vintage Photo Distress ink grunged up the edges before splatter dots were stamped onto it using Coffee Archival ink. A butterfly from Petaloo was adhered to the banner and three vintage buttons from my collection were threaded with ecru embroidery floss and glued onto the layers. The final touch was to colour a Blossom Bucket heart with a pink Copic marker, wrap it with silver wire, and adhere it to the lower part of the collage.

I liked the bottle before but I really love it now. Why don't you try your hand at altering a bottle and link up to the challenge at eclectic Paperie. If you head over to the eP blog, you will see Sue's amazing creation... well worth the click! The fabulous responses of the rest of the DT will be found in the links below Sue's post as they are entered. I'm excited to see what everyone creates.

Thanks for visiting today.

Life is good; so is art...and altered bottles :)
Bonnie

Here are links to the eclectic Paperie store for the products used in this project: