Monday, June 30, 2014

Hello ~ CYP Challenge # 220


Hi, everyone. It's time for a new challenge at Craft your Passion. The theme this week is Ribbon so we want to see you using some of that on your project. Our awesome sponsor this time is artbymiran and I chose to play with the lovely 
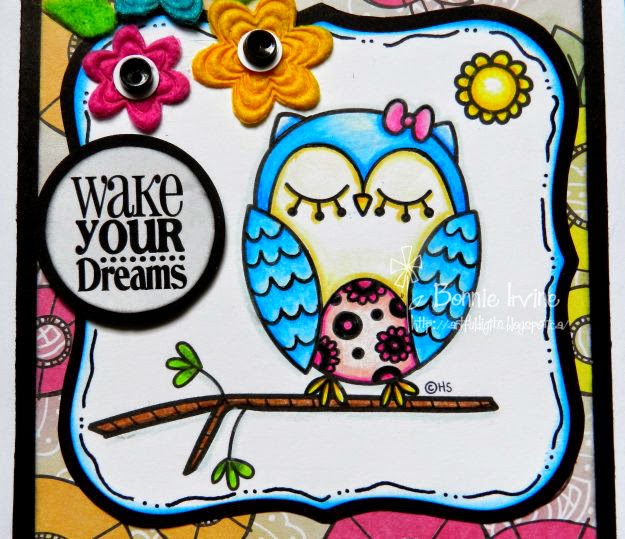
Shaylee Fairy. I coloured Shaylee with my Prismacolor pencils, inking the sky with Broken China Distress ink. Icicle Stickles was added to the wings with a paint brush. The image was cut along its frame lines, matted in black cardstock, and popped up on foam tape for dimension.


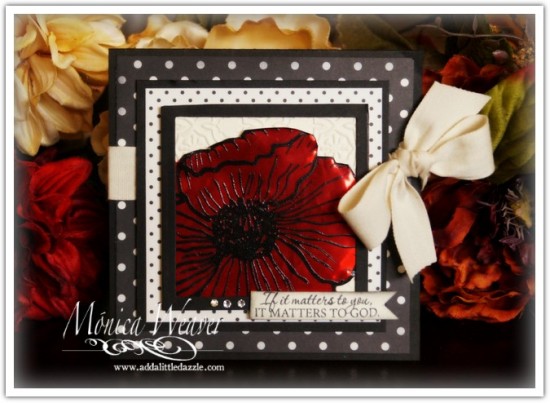
The background papers come from MME's Follow Your Heart – Be Amazing paper pad and were each matted with black cardstock to define the layers and add greater contrast. The yellow layer was given faux stitching with a Micron pen. Once the two were adhered to each other, a length of turquoise grosgrain ribbon was wrapped around the stack and glued to the back.


The Hello greeting was computer generated, cut with a Spellbinders die, and matted in black. It was then popped up on a double layer of foam tape and adhered over the ribbon. Two flat black pearls were placed on the ends. Tiny pale turquoise rhinestones were spaced on both sides of the greeting label. A black tab was cut to tuck in behind the image and then faux stitched with a white paint pen. A second tab was cut smaller and then faux stitched in black before being placed over the black layer.

Shaylee and I both thank you for joining us today. We appreciate your wonderful company. When you get a minute, pop over to the Craft Your Passion Challenges blog to see the wonderful creations by the rest of my talented teamies. We would love to see you join us for our Ribbon Challenge.

I am entering this card in the following challenges:
artbymiran ~ #9 Anything Goes
Crafting by Designs ~ Here Comes Summer
Crafty Creations ~ #266 Things With Wings
Crafty Sentiment  Designs ~ Summer/Summer Colours
613 Avenue Create ~ #78 Anything Goes
Dragonfly Dreams ~ #6 Anything With Wings

Life is good; so is art.
Bonnie


Friday, June 27, 2014

Hug Your Cat ~ TEW new release


Since it's Friday, it's time for a new release at The East Wind. This one features Unky's new character, Rainbow Raver Anj Hoola Hoop.


This particular image is called Kitty Kitty...love it! I coloured Anj with Prismacolor pencils and fussy cut her. I then matted her in black cardstock because I love that look and the way it creates contrast with the background. Ang and her sweet friend were popped up on foam tape and set aside to continue their cuddle while I created the background.


I covered a #8 manila tag with a scrap of yellow and pink music paper. Stencilling was added with Magenta Archival ink sponged through TCW's Tiny Circles template. A different pattern was added using Black Soot through the TCW's Well Rounded stencil. A strip of black and white dotty paper was inked on the edges with Black Big brush pen before being chopped into shorter lengths and added to the left side and bottom. Another little triangle was added to the top right for balance and flow.


The sentiment was computer generated, coloured in with a pink Sharpie, and matted in black. These words were popped up on foam tape for dimension and to create a shadow. A small heart was die cut from dotty pink DP as well as black. They were offset, faux stitched, and popped up on foam. Three tiny black buttons were threaded with pink and adhered to the bottom left corner of the tag. The final touch was to add a topper of green ribbon with a bit of sparkly gold in it. This pulls the green from the image into the background and draws the eye to the top of the tag. The eye looks for similarities/repetition so it goes to the image first and then moves through the tag to find that other snippet of green.

Thanks for visiting today. Anj, Kitty Kitty, and I appreciate your fine company. When you get a chance, pop over to our Facebook group to see other examples using this fun new The East Wind release. It's always so fun to see how differently the DT interpret and showcase the same image.

I am entering this tag in the following challenges:
613 Avenue Create ~ #77 Anything Goes/ twist: Pink
QKR Stampede ~ #94 Include a Dog or Cat
Crafters Cafe ~ #69 Polka Dots and Ribbon
Try It on Tuesdays ~ Tags
Digi Choosday ~ #25 Anything But a Square Card
Cutie Pie Challenge ~ #72 Girls, Girls, Girls + Cute
All Crafts Challenge ~  June/July Anything but a card

Life is good; so is art.
Bonnie

Thursday, June 26, 2014

Guest Designing at Cute Card Thursday


Hi everyone. Rick St. Dennis is sponsoring the current challenge at Cute Card Thursday so the EDT have the opportunity to guest design. The theme for their challenge is Circles and I had the ideal image to use for this: A Stitch in Time which can be found at Etsy or Zibbet. I love clocks and the image of this guy from the SIT Maintenance Company hand stitching the numbers onto the clock face is delightful. I coloured him up using my Prismacolor pencils, fussy cut the image, and then matted it on a die cut circle of black cardstock.


The background paper started out as a designer paper from BasicGrey in a kraft colour featuring a tiny check. The paper was embossed with a Sizzix Brick folder. The bricks were then darkened with Vintage Photo and Walnut Stain Distress inks and scuffed lightly with white gesso. The same treatment was done to the edges with the addition of Walnut Brown Big Brush pen. A larger rectangle of black cardstock was cut to fit inside the white card base and the brick rectangle was adhered on top towards the upper edge.


The image was popped up on foam dots. The sentiment, "You cannot find time; you must make time" was computer generated, edged with Walnut Stain Distress ink, and the words which would sit on the brick background were matted in black. All were popped up on foam tape. The two words I wished to emphasize were created with circle stickers which sparkle in the light. To complete the card and further the themes of clock mechanisms and circles, metal gears were grouped in opposite corners and adhered with Glossy Accents.

Thanks so much for popping by today and thanks to Cute Card Thursday for allowing us to play along with their Circles challenge. When you get a chance, why not check it out! We'd love to see what you create.

Life is good; so is art.
Bonnie

Tuesday, June 24, 2014

Believe in Magic ~ RSD Altered Dictionary Spread


Hi everyone. I'm here today with an EDT project I created in my nearly completed altered dictionary. I chose to do L for Legend so I could feature this wonderful Rick St. Dennis image called Lil Wizard which can be found in Rick's Zibbet shop. My dictionary is filled with whimsical and humourous characters so this guy fits right in.


I coloured Wiz with Prismacolor pencils, fussy cut him, and then matted him in black. He was popped up on foam tape and then backed with cheesecloth to add texture and the feeling of mist..


The background started with the two pages being adhered to the adjacent ones for strength and to better stand up to the mixed media process. Then the pages were gessoed except for the word and definition. Blue and purple Neocolor II watercolour crayons were scribbled onto the background, spread with water, and then given a coat of gesso to knock the colour back. Black ink was added to the top of the pages and allowed to drip as well as being splattered onto the background. Various scraps of three different blue and purple designer papers were layered onto the pages. Stencilling was done with gesso and TCW templates. Stamping was added with a text stamp and Forget-Me-Not Archival ink and more stencilling was done with gold metallic paint.


Bits of washi tape, scraps of die cut borders, brads,  and punched circles were adhered around the page. Metal accents in the form of punched stars, letter stickers, and an embossed and punched circle were also scattered around the spread to bring in the play of light and create a little magic. The sentiment was computer generated, matted in black and popped up on foam. To emphasize the word magic, it was added in shiny black stickers with white raised letters. The Ll letters were adhered to the metal circle to mark which dictionary spread this is.


To complete the pages, Black Big Brush pen was messily used around the edges. Doodling with both black and white pen was added. Black gesso rings made with a bottle top and rows of dots made with a catalyst tool were  introduced. To tie the red from the image into the rest of the spread, an arrow was coloured with a red marker, Glossy Accented, and added to the top corner. The visual triangle was completed with a scrap of red scalloped border glued to the bottom left corner.

Thanks for visiting today. Wiz and I both appreciate it. For more inspiration using Rick's fabulous images, fun challenges, and some wonderful sharing of projects and knowledge, come and visit:

our Facebook group
our Airless Chambers blog
our Rick St Dennis Gallerie
our Tuts and Comments blog

Life is good; so is art.
Bonnie

Monday, June 23, 2014

eclectic Paperie and Add a Little Dazzle Blog Hop


Welcome to our joint blog hop with Add a Little Dazzle. We are so excited to partner with them and have had so much fun playing with their products.  They have a beautiful collection of metal sheets, in a variety of colors, that are perfect for mixed media projects.. We have two amazing days of inspirational projects so make sure to stop by tomorrow.
 First we’d like to share a little bit about the two companies…
eclectic paperieeclectic Paperie is a different breed of craft store, conceived as more than just a place where you can purchase supplies, we believe in the strength of collaboration, in coming together and sharing with like-minded crafters. Our goal is to offer a mixed media marketplace where a generation of artists can congregate, explore, imagine, and inspire one another.

Sweet 'n Sassy Stamps and Add a Little Dazzle Blog Hop
We specialize in an exclusive line of craft metal sheets that helps you take your crafting to the next level. Whether you are a seasoned or new crafter, our craft metal sheets will help you create unique projects that will make you stand out among the crowd. Are you ready to take your crafting to the next level? Add a Little Dazzle Craft Metal Sheets will help you turn the ordinary into the extraordinary.

Prize Alert!

Make sure to stop by and visit each of the Design Team Blogs for a chance to win 1 of 2 prize packages from eclectic Paperie and Add a Little Dazzle  valued at $25.  You have until Friday, June 27th to enter.  The winners will be announced on both blogs on Saturday, June 28th.  You must leave a comment on all blogs.

So Are You Ready for Some Amazing Inspiration?


I created a Steampunk altered canvas for my project using 4 different colours of the Add a Dazzle Craft Metal Sheets. I embossed a piece of Black Diamond with a Tim Holtz Sizzix diamond plate folder and cut it into two random shapes layering it with some scraps of designer paper in two different prints. All four pieces were adhered to the canvas with Scor tape. Stamping was done on the large piece of designer paper with Coffee Archival ink and Wendy Vecchi 's Mesh Background stamp as well as a Tim Holtz splatter stamp and text one. Jet Black Archival ink was used to add a little more texture using one of Dina Wakley's Textures stamps.


The heart was die cut twice: once from black cardstock and once from a Brushed Copper metal sheet which had been embossed with the Tim Holtz Sizzix Riveted Metal folder. This metal embosses and cuts like butter...love it! Gears were cut with Tim Holtz dies from Diamond Black, Golden Glimmer, and silver which is the reverse of the metal sheets. The copper coloured gears were cut from scraps of the heart embossed metal.


The Tim Holtz Daydream  face of the my gear-head woman was stamped with Pale Ochre Archival ink onto white cardstock and coloured with Prismacolor pencils before she was fussy cut and adhered to the background. Some gears were then adhered as her hair and three to the opposite corner to create balance. 


The butterfly was fussy cut from another scrap of designer paper and popped up on foam tape. To help the red make more sense in the piece, two lengths of red grosgrain ribbon were added under the chin and a few red rhinestones were added to the gears.


The lettering for "Follow Your Heart" is a mix of stickers. The ampersand is an Idea-ology Ransom Parts letter and the "Leave Ordinary Behind" comes from the TH Random Quotes stamp set. It was stamped with Versamark and embossed in black before being torn around and inked with Black Soot Distress ink.

Thanks for hopping by today. To continue the hop, visit Kim Schofield's blog and see her fabulous make. Remember to leave a comment on each blog for a chance to win. Tune in again tomorrow for part 2 of this fun blog hop from eclectic Paperie and Add a Little Dazzle.

Life is good; so is art.
Bonnie

Here are the links for the Day 1 hop:

Wake Your Dreams ~ CYP Challenge #219


Happy Monday...hope that's not an oxymoron for you! We have a new challenge at Craft Your Passion this week that isn't a stretch for me at all...Bold Colours! They tend to be part of my go-to palette, usually the more vibrant, the better for me! 2 Cute Ink is our wonderful sponsor for this challenge and I chose to play with this adorable image called Owl Doodle. She makes me smile. I coloured Ms. Hootie with my Prismacolor pencils and cut out the image with a Spellbinders Labels One die. The edges were inked with Salty Ocean Distress ink, doodled around, and matted with black cardstock.


The background paper comes from an Amy Tangerine pad, inked on the edges with Black Soot Distress ink, and was also matted in black. The sentiment from Create With TLC was printed on white cardstock and cut into a circle. The black matting was punched to mat it and foam tape was placed on the back.


The stacked flowers are felt buttons with small white punched circles on top and black threaded buttons as the last layer. The leaves were cut from green felt. A half inch strip of the same black cardstock was added near the bottom of the card for better balance and design interest.

Thanks for stopping by today. Ms. Hootie and I appreciate your support...which she would tell you if she didn't keep dozing off :) When you get a chance, pop over to the Craft Your Passion Challenges blog to check out the BOLD colours projects from the rest of our fabulous team. We would love to have you play along with us. I can never get enough of those vibrant colours.

Life is good; so is art.
Bonnie

Friday, June 20, 2014

And Now for Something Completely Different...


Hi everyone. It's my turn to post over at the eclectic Paperie blog today so all I can offer here is a sneak peek and a link. You might want to be sitting down though because I steered away from my usual vibrant and bold palette and went soft and shabby on this project. I know....hard to believe :) If you want to check it out, please hop on over to the eP blog. I'd love to know what you think of this departure from the norm.
Thanks for visiting

Life is good; so is art.
Bonnie

Monday, June 16, 2014

How sweet...CYP Challenge #218


Hello everyone! Hope you all had a lovely weekend and are up for a new challenge. Craft Your Passion has a new theme today for Challenge 218, Use 3 or More Embellies. We are sponsored by The Paper Shelter (yay!) and I chose to play with this image called There's a Fairy in my Tea. There is so much that comes with this adorable set from the line drawing to the coloured image and even background paper.


I coloured Tia (yes, she introduced herself) with Prismacolor pencils and then fussy cut her before popping her up on foam tape. A scalloped circle was die cut from black cardstock to serve as a backing and provide contrast to the soft colours.


The background papers are from G45's Once Upon a Springtime pad. I am determined to use up my stash of older papers that I've been hoarding (sigh). Both the triangular piece and the rectangle were matted with black. A narrow strip of the same black was cut into three different lengths and added to opposite corners of the background. Large flat pearls were adhered to the triangle and a mulberry flower added to the top right corner.


The sentiment was computer generated, cut with a die, and faux stitched. The edges were darkened with Black Soot Distress ink and green hemp was fed through holes poked into the white cardstock. The label was then popped up on foam tape and the hemp was wrapped to the back of the layer.

Tia and I thank you for your visit today. We do appreciate when you stop by. When you get a minute, pop over to the Craft Your Passion Challenges blog to see the wonderful makes by the rest of my creative and talented teamies. We'd love it if you joined our 3 or More Embellies Challenge this week!

I am entering this card in the following challenges:
Open-Minded Crafting ~ #12 Something With Wings
My Sheri Crafts ~ #135 Three in a row (Patterned paper, image, pearls)
Fussy and Fancy ~ #116 Things With Wings
The Stamping Boutique ~ #21 Flower Embellishment
Crafty Calendar Challenge ~ June Petals and Pearls


Life is good; so is art.
Bonnie

Sunday, June 15, 2014

Sparkle and Glitter Progressive Challenge ~ Nyner


Back again for my second post of the day! There is a fabulous Progressive challenge going on at Sparkle and Glitter the Rick St Dennis EDT blog. Rick sent those who participated in the May Steampunk challenge this fun freebie  image called "You're a Winner!" Nyner the little monster to play with for the June Part 2 of the Steampunk challenge. To play along this time, you must use this image (which believe me is no hardship because he's adorable) still following the Steampunk theme. You can also purchase him if you would like to play along beginning with this challenge.


I coloured Nyner and his entourage with Prismacolor pencils except for the gears on his hat where I used metallic gel pens. He was then fussy cut leaving a narrow white border, matted with black cardstock, and fussy cut again. This not only made him contrast better with the background but also gave more strength to the fiddly bits. Nyner was adhered to a Bo Bunny chipboard clock which was popped up on two scraps of chipboard for dimension.


The substrate is a rectangle of chipboard covered with steampunk paper from the Recollections Steampunk Botanica pad. The next layer is black cardstock embossed with a gears folder and highlighted with Treasure Gold, White Fire, Treasure Silver, and Treasure Copper, applied with my fingers and then buffed. This rectangle was matted with kraft and then black cardstock. Nyner and the clock were then adhered to the background with Scor tape.


Gears were die cut from metallic silver cardstock as well as shiny black packaging. They were offset and topped with metal gears before being tucked under the image piece. More gears and metal bits were adhered to the lower left corner.


The sentiment from Create With TLC was printed on kraft cardstock, edged with Vintage Photo and Black Soot Distress inks, and adhered to the background using an Idea-ology memo clip. An additional gear was adhered over the base of the clip to tie it into the clock and not leave it floating awkwardly. To complete the piece, Jet Black Archival ink was used to cover the chipboard edges of the substrate.

Thanks for hanging out with Nyner and me today. When you get a chance, pop over to the Sparkle and Glitter the Rick St Dennis EDT blog to see the amazing creations from the rest of my uber-talented teamies. I love this challenge because it's so fun to see how so many people can use the same image and have it look completely different. So inspiring! We would love to see your Nyner Steampunk creation, too. Hope you'll join us. Be sure to check out the other cute monsters in Rick's shop, too!

I am entering this project in the following challenges:
Suzy Bee's Bloomin' Challenge ~ #33 Celebrate
Creative Corner Challenges ~ Just For Boys
Jellypark Friends Friday Challenge ~ All Things Sporty
Left of Center Creative Challenges ~ #33 At the Movies (Men in Black)
QKR Stampede ~ #92 Anything Goes
Aud Sentiments ~ #108 Any Sentiment for a Guy

Life is good: so is art.
Bonnie

Sparkle ~TEW Challenge #9


Happy Sunday! This is the first of two posts I have for you today. The 15th of the month marks the beginning of a new challenge at The East Wind. Our theme this time is Bling and I chose to play with Lucy Loo Powdered and Towered for my blinged up tag. I began by colouring Lucy Loo and her feline sidekick with my Prismacolor pencils. They were then fussy cut and popped up on foam tape except for the bottom of her dress.. Pink rhinestone stars were added to the dots in her hair as well as a few extra spots because Lucy said you can't have too much bling...lol.


I have had this collection of picture frames in my stash since for evah...don't even know who made them, maybe K & Co. Anyway, this oval one worked beautifully because I wanted Lucy's towering 'do to extend beyond the frame to emphasize how very tall it is... it cannot be contained in a mere picture frame.  I cut an oval of black dotty cardstock just slightly larger than the opening and tucked the bottom of the image into the bottom of the frame It sits flat and then the rest of her is popped up. Two squares of amber coloured bling were added to the frame.


The manila background for the #10 tag (4x8.5") was covered with black and white paper from my stash which was chosen for it's French Renaissance style pattern. Another scrap of white and black was layered with a punched scallop border and adhered at the top of the tag. Five larger pink rhinestone stars were used to embellish the border and repeat her hair stars. Gold shiny ribbon was used as the topper for the tag.


The sentiment was computer generated but is a version of one I have in my collection from Create With TLC. That one wouldn't fit inside the second frame that I wanted to use. The frame and sentiment combo were popped up on foam tape and layered over a scrap of cheesecloth both for the added texture and to give it more weight visually. To complete the tag, a length of pleated dotty ribbon was adhered to the bottom edge and a thin gold cord was adhered over that to bring a little more shine to the tag and repeat the gold from the topper ribbon and the smaller frame.

Thanks for visiting today. Lucy and I both appreciate your company. When you get a minute, pop over to The East Wind challenge blog to see the wonderful blingy makes from my talented teamies. We would love to have you join us for this challenge so "Bling It On"!

I am entering this tag in the following challenges:
Time 4 Scrap ~ #41 Anything Goes
613 Avenue Create ~ # 76 Anything Goes
Stampin' For the Weekend ~ Anything Goes
My Time to Craft ~ #251 DL It (vertical orientation/long and narrow)
4 Krafty Girlz ~ #20 Anything Goes
Charisma Cardz ~ #13 Sparkle and Glitter


Life is good; so is art.
Bonnie

Friday, June 13, 2014

Flowers and Lace ~ Craftitude Challenge 67


Hi there! Thanks for joining me on my last post as owner and DT member for the Craftitude Challenges blog. While I have thoroughly enjoyed being part of this team and have learned so much about managing a challenge blog, I have found that I was spending less and less time creating which was not what I wanted. I love the creative process and that's how I like to spend my time so I have decided to step down and my wonderful team mate, Carla Hiebert has agreed to take over the Craftitude Challenges blog. The funny thing is that right after I sent my letter to the team closing this door, another opportunity which fit my wish to spend more time creating presented itself. Don't you love when that happens!

Our current challenge theme is Flowers and Lace as well as our usual Anything Goes. Our sponsor  is the fabulous Dilly Beans. Megan's images always bring a smile to my face with their whimsy and fun  characters. I chose to play with Mimi's Heart Flowers Framed for my ATC. I coloured Mimi and her hearts with Prismacolor pencils and then cut the image next to the frame. I layered this onto black cardstock cut to the traditional 2.5 x 3.5" size. A strip of lace trim was adhered to the bottom of the image rectangle and flowers with gem or pearl centers were clustered in the lower left corner. Simple and sweet! (No, not me...the design!)

Mimi and I thank you for joining us today. I would like to thank the Craftitude team and our followers for joining me on this journey. I wish you all the best in the future!

Life is good; so is art.
Bonnie

Wednesday, June 11, 2014

A Great Hat a la RSD ~ An altered book spread


Hi everyone! I am thrilled to bits to be here today for my very first post as part of  Rick St Dennis' Elite Design Team. I am still pinching myself at my luck. I am absolutely smitten with Rick's images and the Hat ladies seem to hold a special place in my imagination. I decided to mark my debut with a mixed media spread featuring 1911 Stroller in the French Style which can be found in both Rick's Zibbet and Etsy shops. I love altering children's board books so that the entire book follows one theme, in this case Women's Hats.


I coloured the beautiful image with layers of Prismacolor pencils, using 3 to 4 colours for each hue. I usually have the main colour, a lighter colour or white, and two darker colours that can act as shading. Once she was coloured, and her glasses were given a coat of Glossy Accents, she was fussy cut, matted in black cardstock, and fussy cut again. She was then backed with foam tape and asked to wait patiently until the background could be completed.


The background of my mixed media pieces is created with many layers of colour, paper, stencilling, and stamping.


The spread began as a gessoed background to which Neocolor II water colour crayon in shades of pink and gray was added. A layer of TH tissue wrap was adhered with gel medium over the watercolour to tone it down and create more interest.


Two patterned Authentique designer papers, and a whole lot of stencilling (TCW Well Rounded, TCW Tiny Circles, TCW Punchinella, and Dylusions Blocks) with gesso and Archival inks (Watering Can, Jet Black, Magenta Hue) built up the layers. Two kinds of lace, remnant rubs, half pearls, and doodling created the elegant background with a French flair that I was looking for. I added some Paris themed digital elements purchased on Etsy to further the theme.


This is the first inside two page spread in the book. Each one will feature a different Rick St. Dennis image accompanied by an appropriate sentiment or quote. This one was computer generated, matted in black, faux stitched, and popped up on foam to create dimension. The lettering for "Un Chapeau (a hat)" was done in glittery stickers.

Thanks for visiting today. Mme Stroller and I appreciate your fine company. I hope you were inspired to check out the rest of Rick's amazing hat ladies. They really spark my creativity. Love using digital images in mixed media art!

For more inspiration using Rick's fabulous images, fun challenges, and some wonderful sharing of projects and knowledge, come and visit:

our Facebook group ~ share your projects, join our challenges
our Airless Chambers blog
our Rick St Dennis Gallerie
our Tuts and Comments blog ~ all tutorials all the time!

Hope to see you there.

I am entering this project in the following challenges:
Digi Choosday ~ Week 23 Use 2 Real papers
Fan-tastic Tuesday ~ #39 Anything Goes (Square or rectangular)
Through the Craft Room Door ~ Anything Goes
All Crafts Challenge ~ Anything but a card
613 Avenue Create ~ #75 Anything Goes
Oddball Art Stamps Co. ~ #3 Girly and Glam
Rhedd's Creative Spirit ~ June Anything Goes Altered Art Only

Life is good; so is art.
Bonnie

Monday, June 09, 2014

Happy Pappy Day ~ CYP Challenge # 217


Hi everyone! We have a new challenge today at Craft Your Passion with the theme of Father's Day/For the Boys so we want to see masculine cards. Our awesome sponsor this week is Just Some Lines and I chose to play with Emo Cowboy because he makes me smile...so cute!


 I coloured Emo with Prismacolor pencils, using silver gel pen on his spurs. I fussy cut him with a narrow white border so that he would stand out against the background and then popped him up on foam tape...instant shadow!


The three background papers came from my scrapbox and were matted with black cardstock. The circle was popped up on foam tape and the others were adhered flat. Tiny sepia faux stitching was doodled around the edge of the largest rectangle and a photo corner was punched and added. Two photo turns were adhered to the bottom left corner with brads.


Two threaded buttons to the top right corner. The sentiment was computer generated, matted in black, and popped up on foam tape. Pappy Day seemed a little more cowboy than Father's Day...lol.

Thanks for popping by today. Emo and I are plum grateful ya did (that's cowboy talk, too). When you get a chance, be sure to stop by the Craft Your Passion blog to take a look-see at the fine work by the rest of the DT. We'd love to have you join us...yeehaw! OK, I'm having way too much fun!

I am entering this card in the following challenges:
613 Avenue Create ~ #75 Anything Goes
That Craft Place ~ Men
Pile It On ~ #23 Use Some Patterned Paper
One Stitch at a Time ~ #216 Use a Digi
Crazy 4 Challenges ~ #239 Man Made
Crafts 4 Eternity Recipe Challenge ~ R#179 For the Boys
QKR Stampede ~ #91 Father's Day

Life is good; so is art.
Bonnie