Sunday, June 21, 2015

TEW Facebook Contest ~ Step Away from the DP


Hi everyone. Today marks the beginning of a brand new Facebook Contest on The East Wind Facebook group. The challenge this time is Step Away from the DP (no designer paper) which for some will be a piece of cake and for others, more difficult. Because I do so much mixed media, I often create without using designer paper like I did with this project.


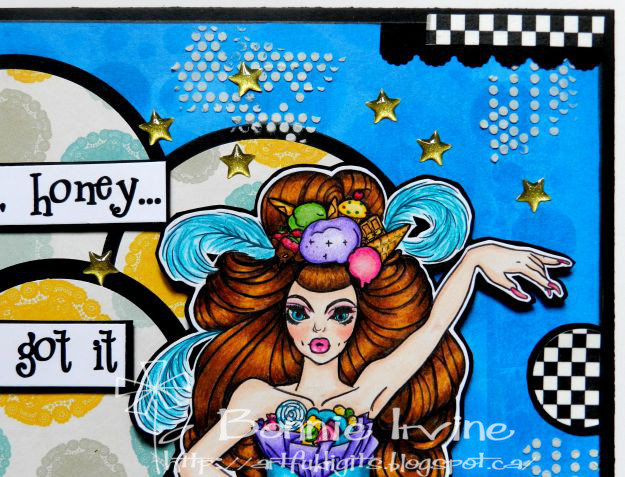
I chose Lucy Loo Punk Will Never Die to be the star of my art journal page. I coloured her with a mix of Prismacolor and Polychromos pencils and then did the usual fussy cutting leaving a narrow white border. Instead of matting her with black and trimming around her, I left the entire rectangle, no trimming, so that it could become a design element.


The background began as a rectangle of mixed media paper on which I sprayed Lindy's Stamp Gang's Hottie Patottie Hot Pink ink spray. Once dry, I sponged Magenta Archival ink through TCW's Triangle stencil and then used the same ink on a text stamp by Joggles. jet Black Archival was sponged through TCW's Tiny Circles stencil. before the image piece was adhered to the background, two doilies were cut in half and the parts were used behind it and in the top right corner. A small circle was punched from black cardstock and used to fill in the center of two doily halves. A small die cut bracket was layered over the two doilies on the left side. Another pop of black was added in the form of a punched scallop border.


The sentiment, one of my favourite things to say to my husband, was computer generated and printed on white cardstock using purple ink. The two segments were matted in black and a row of enamel heart stickers were added between to connect them. Black Big Brush pen was used to edge the outside of the mixed media paper and then it was double matted with hot pink and black cardstock to frame it and finish off the page.

Thanks for visiting Lucy Loo and me today. Your company was on our Want List and you gave it to us! To see other projects for this Facebook Contest, and to enter yourselves, please visit The East Wind Facebook group. We would love to have you play along with us.

Life is good; so is art.
Bonnie

Friday, June 19, 2015

TEW New Release ~ Baby Lucy Loo Candy Monster


Hi everyone. It's my turn to play along with another new release at The East Wind. The new releases happen every Tuesday and Friday. Today's new image features Lucy loo but this time as Baby Lucy Loo Candy Monster. She is sooo cute! I decided to create a Halloween card where she could be the star.


I coloured Baby Lucy Loo with a mix of Prismacolor and Polychromos pencils, reaching for the brightest colours in the box. I cut her out leaving a narrow white border and then matted her with black cardstock. She was then popped up on foam dots.


The background began as a rectangle of printed black designer paper with a subtle tone on tone flourish, three cute monsters, and a light standard. I added three pieces of washi tape adhered to white cardstock as well as stars punched from a left over segment. In the top right corner, part of an embossed yellow circle edged with Scattered Straw Distress ink became the Halloween moon watching over Lucy. A length of cheesecloth was added as a cloud and Lucy was placed over top.


The sentiment was computer generated and printed on white cardstock. It was cut into sections, edged with Black Soot Distress ink, and adhered to the left of Lucy. Glossy Accents was added to each little monster's eye(s) and a turquoise faceted gem was added to the top left to repeat the turquoise from her sack. The patterned paper was matted with yellow and then the whole layered piece added to a white card base.

Thanks so much for joining Baby Lucy Loo and me today. Maybe you can help me explain to her that she has a long wait until Halloween night. To see other fabulous projects by my DT buddies featuring this adorable image, be sure to stop by The East Wind Facebook group where they will be posted throughout the day.

Life is good; so is art.
Bonnie

Tuesday, June 16, 2015

Coffee Monsters Board book ~ The Finale


Hi everyone. Today I am sharing the last spread and front /back covers of the altered board book I have been working on using Rick St. Dennis' cute monsters available from his Zibbet shop.. The theme for this book has been coffee monsters and I have had so much fun creating backgrounds and matching monsters and coffee sayings.


The last spread of the book features Fworki who I coloured with Prismacolor and Polychromos pencils. I cut a balloon out of pink cardstock and used letter stickers so that it better suited the theme. Fworki was then fussy cut leaving a narrow white border and then matted in black cardstock.


The coffee mug was cut from vintage French text using Rick's Pencil Cup image as a template. It was coloured with Vintage Photo Distress ink and then shaded with an Inktense pencil activated with water before being matted in black. The sentiment was computer generated, matted in black, and adhered to the mug. Scraps of burlap, washi tape, and embossing paste stencilled black were layered under the mug. Steam was created with doodles and coloured heart shaped clips.The background was created by adding Vintage Photo Distress ink through TH Splatters stencil onto the gessoed background. More was added to frame the edges. The word Now was also stamped on the right side around where Fworki would be adhered. A border was doodled with black pen and the letters for Coffee were placed close to the middle fold. Black Big Brush pen finished off the page edges.


The front and back covers started with Dark Chocolate and Titan Buff acrylic paint  sponged onto the pre-gessoed pages.Bubbles were stamped with Coffee Archival ink and coffee rings with Jet Black Archival. Layers of doily, burlap, and raised bean paper as well as coupon tickets were adhered on each side to form the background and set the scene.


The image, Coffee Monster which Rick created especially for this project (so cool), was coloured with Prismacolor and Polychromos pencils. It was fussy cut leaving the narrow white border and matted in black before being popped up on foam squares. real coffee beans were added to the vignette with Glossy Accents. The book title, Gimme Coffee, was created with Idealogy Alpha Parts and mini scrabble letters.


The mug on the back was sprayed with Lindy's Stamp Gang Delphinium Turquoise and shades with an Inktense pencil activated with water. Vintage Photo Re-inker was dripped from the rim of the mug to create a messy cup. The mug was then matted in black along with the sentiment was matted. More beans were adhered to the back so that when the book is open and on display, the front and back read as one. The final touch was to ink the edges with black Big Brush pen.

Thanks for joining all of my coffee monsters and me today. We have enjoyed your visit and hope that you've enjoyed getting in touch with my inner coffee monsters. I'm happy to be finished...a few more projects are already percolating in my brain. See you soon.

Life is good; so is art.
Bonnie

Expand Your Horizons ~ One Sweet Challenge Mid Challenge Reminder


It's time for our mid-challenge reminder post for One Sweet Challenge's June theme for Sweet Pea Stamps. Our theme for June is Die Cuts and/or Punches...easy peasy, right? I was browsing all of the fabulous images at Sweet Pea Stamps when I saw this adorably quirky fairy by Linda Biggs called Fairy Freak. Love the whimsy of this little sweetie.


I coloured Fairy Freak with a mix of Prismacolor and Polychromos pensils.I added Wink of Stella dots to her eyes and then topped them up with Glossy Accents both for the shine and the dimension. The bubbles once coloured were also given a coating of Glossy Accents. Freaky's pretty wings were outlined with Cotton Candy Stickles. She was then fussy cut leaving a narrow white border and then was matted in blacl cardstock before being popped up on foam squares.


The background started as a rectangle of bright blue cardstock. Background stamping was done using Forget-Me-Not Archival ink and Joggles Sparks stamp plus a TH circles stamp. Little black circles were also stamped with Jet Black Archival ink. Freaky was adhered over cheesecloth to add texture, contrast, and a feeling of clouds. Stars were die cut from mop up paper where a stencil spritzed with Yellow Rose of Texas spray ink was cleaned. They have a lovely glimmer from the mica in the spray. More bubbles were added with Dew Drops.

The lettering is a combination of Idea-ology AlphaParts and black stickers both with added paint dots, plus chipboard circle letters. Two different patterns of washi tape were added to both sides of the background. Black Big Brush Pen was used to edge the background before it was double matted with yellow and black cardstock.

Thanks for joining Fairy Freak and me today. Be sure to pop by the One Sweet Challenge blog to see the amazing projects by the rest of the OSC DT. We would love to have you join us for our June Dies and/or Punches Challenge. You still have lots of time to play along. Pop over to Sweet Pea Stamps and check out Lynette's amazing selection of images in both rubber and digi. You are sure to be inspired.

Life is good; so is art.
Bonnie

Monday, June 15, 2015

Sweet Pea Stamps FB Progressive Challenge Part 2


Today marks the beginning of Part 2 of the Progressive Challenge at Sweet Pea Stamps Friends and Fans Facebook group. If you played along with Part 1, you will have already received this adorable image by Karen Middleton called Mushroom Fairie which is the required image for this segment of the challenge.


I coloured Mushroom Fairy with Prismacolor and Polychromos pencils. Clear Wink of Stella was added to her wings to create a lovely glimmer...and a little magic. She was then fussy cut leaving a narrow white border and was also given a black cardstock mat. Foam squares were added to the back of the image to pop her up and add dimension to the scene.


The background began with patterned paper. Latin text was stamped over that background with Tree Branch Archival ink. White embossing paste was scraped through TCW's Mini Netting stencil. It was then lightly coloured with Vintage Photo Distress ink. A crumpled and torn piece of TH Kraft Glassine paper was added to the bottom of the background to create the ground on which Mushroom Fairie would sit. Die cut leaf flourishes cut from dotty paper were added to the sides and punched butterflies and flowers were layered onto the background. Gems were adhered to the center of the flowers and beads to the butterfly bodies.


Black Big Brush pen was used to edge the patterned paper rectangle before it was matted with kraft and black cardstock to frame it. The final touch was to add a sticker sentiment which was also matted with black cardstock.

Thanks so much for joining Mushroom Fairie and me today. We are happy that you did. When you get a chance, pop over to the Sweet Pea Stamps FB group to see other awesome creations by some of the DT members. We would love to see you play along. If you didn't receive the image free for playing along last time, you can still purchase it at Sweet Pea Stamps and join us. While you are there, I'll bet you find many 'must-haves' in the huge selection Lynette carries.

Life is good; so is art.
Bonnie

Friday, June 12, 2015

New Release at The East Wind ~ Candy Candy


Fans of Unky's images at The East Wind will already have been introduced to the newest character, a lovely drag queen called Betty Cockus. Betty is flamboyant, over-the-top, and full of fun. This is my first project with Betty and I had so much fun colouring her. All the bright colours that I love work beautifully with these images.


I coloured Betty Cockus Candy Candy with a combination of Prismacolor and Polychromos pencils. I fussy cut her leaving a narrow white border and then matted her with black cardstock. Foam dots were placed on the back of the image for added dimension and to let Betty really stand out from the background (pun intended).


The background started with a piece of vibrant blue distresseed cardstock. Forget-Me-Not Archival ink was pounced through Colorbox's Rounded stencil. Three circles of patterned paper were die cut and then matted with black before being adhered to the background so they overlapped. White embossing paste was scraped through TCW's Tiny Circles stencil. Checked washi tape was added to white cardstock and then cut it into strips and a circle. These bits were layered over black punched or hand cut shapes and placed in a visual triangle around the page.


The sentiment was computer generated, printed onto white cardstock, and matted in black. It was then popped up on foam tape. Sparkly gold heart stickers were scattered above Betty and a black punched photo corner was adhered to the top left corner. Black Big Brush pen was used to edge the page and then the page was matted with black cardstock to tie it all together and frame it.

Thanks so much for joining Betty and me today. We appreciate your wonderful company. To see other awesome makes by some of The East Wind DT, pop over to The East Wind Facebook group. We would love to see what you create with Betty or any of her friends.

Life is good; so is art.
Bonnie

Tuesday, June 09, 2015

Coffee Monsters ~ RSD Altered Board Book


Hi there! I completed the next three page spreads in my Coffee Monsters children's board book using images from Rick St. Dennis' Cute Monsters. That just leaves me with one more spread plus the front and back covers. Love these little guys and their fun messages. The first of these three features Tworki who needs to apologize for things said pre-coffee. We can all relate to that, I'm sure. Tworki was coloured with Prismacolor and Polychromos pencils, fussy cut leaving a narrow white border, and then matted in black.


The background began with adding black gesso to the pages, followed by burlap and patterned paper. Splatter dots and coffee rings were stamped onto the background layers with Jet Black Archival. Washi tape was added to white cardstock to brighten the colours and then adhered to the background of both sides. A corrugated heart was die cut from a coffee sleeve and the page was then balanced with puffy heart stickers in the opposite corner.


The coffee cup from Rick's pencil cup image was used as a template to cut one from French text paper. It was inked with Tattered Rose Distress ink and brown Inktense pencil. The sentiment was inked around the edges with Vintage Photo Distress ink. More of the little puffy hearts were added for the steam. The coffee title was spelled out with chipboard circles.


The next two page spread features Fwiver who needs to be surrounded by Caution tape because he is unsupervised and filled with coffee. Tworki was coloured and fussy cut like his friend, Tworki.


The background was done with brown and caramel acrylic paint applied to the gesso background with a brayer. Rectangles of dark brown corrugated cardstock as well as the embossed coffee bean paper which I used on an earlier page. Two little orange tickets were stamped with the word Sorry and tucked into the coffee cup cluster. Two copies of a server's pad were reduced and layered behind Fwiver. Pieces of die cut border were added around the edges of the two pages.


The sentiment was printed on white and matted with black cardstock before being added to the coffee mug. White paint dots were added to brown sticker letters to create the title.The mug was coloured with Peeled Paint Distress ink and green Inktense pencil activated with water. Caution washi tape and a small green cup brad, plus a doodled border finished off the spread.


The last spread features Screaming Me Me who is quite upset about spilled coffee. He was coloured and matted the same as the other two.


The background began with splotchy designer paper being adhered to the gessoed background. Vintage Photo re-inker was dripped along the top edge and down the pages (spilled coffee, after all). Additional pattern was added with Tree branch Archival ink and a drip stamp from Ryn and a grid patterned stamp. Coffee bean patterned paper was torn and added to each page. Torn paper towel was added behind the mug, as well as under Me Me. Bits of that same die cut border were adhered under the mug and on the right edge of the spread.


The mug was coloured with Mustard Seed Distress ink and a light brown Inktense pencil. Steam was added in the form of clock hands. The sentiment was inked around with Vintage Photo Distress ink before it was matted with black. The title was added with stickers and outlined with black pen.To complete the pages, a border was doodled, a cup buttton and metal spoon, and a pair of heart stickers were added.

Thanks for joining Tworki, Fwiver, Me Me, and me today. Stay tuned for the final installment of these posts about the Coffee Monsters. I'm excited to see it finished!

Life is good; so is art.
Bonnie

Wednesday, June 03, 2015

Red Riding Hood ~ Sweet Pea Stamps ATB


Hi everyone. I haven't made an altered trading block (ATB) for a little while and I still had some blanks which I had purchased from Joggles. As soon as I spotted these adorable Red Riding Hood images from Ching-Chou Kuik at Sweet Pea Stamps, I just knew that they would be awesome for this project. The image is called Plate 65 and is a bit of a departure from her other images. Same sweet faces, though!


I coloured each of the four images with Prismacolor and Polychromos pencils. They were delightful to colour. I think I might have to do a domino book with them soon. Once coloured they were each fussy cut leaving a narrow white border and then matted them with black cardstock. I wanted them to pop against the background and this usually does the trick.


The block, from Joggles, comes in two pieces cut from white mat board and scored where necessary. I spritzed the two sections with Bachelor Button Blue, yellow Rose of Texas, and Freaky Frankenlime Lindy's Starburst Sprays. The shimmer from the mica is yummy. I edged all sides of both pieces with Permanent Green Olive Big Brush pen. Each face was then edged with two shades of blue Gelatos to act as a frame. Hero Arts Painted Circle was stamped on each face with Jet Black Archival. Joggles Sparks stamp and splatter dots were added with Forget-Me-Not Archival ink.


The four little Red Riding Hoods were added to the side faces along with a die cut branch, fence, or grass. Three of these were cut from green and black cardstock and then layered to create a shadow. It also allowed the green to be seen more easily. Once each sweetie was placed, black embossing paste was scraped through TCW's Halftone Borders stencil with a palette knife.


One of the sentiments that comes with these images was used to create the title on the top face of the block. It was printed on white cardstock, torn around, and matted with a torn layer of black. A wooden hand cutout was inked black and added with a tiny blue gem for a cufflink. A small wooden house was sprayed with the same Starburst spray used before and it was added with Patina Stickles squeezed into the heart cutout.

Thanks so much for stopping by today. I had so much fun creating this ATB and colouring these sweet Little Red Riding Hood images from Ching-Chou Kuik. If you head over to Sweet Pea Stamps, you can find this one plus check out all of the other fabulous images by her as well as the other talented artists. I'd love to see what you create!

Life is good; so is art.
Bonnie

Monday, June 01, 2015

Rick St. Dennis Progressive Challenge ~ Mr. Tea


Hi everyone. It's time for the next part of the Progressive Challenge on Rick St. Dennis' Sparkle and Glitter blog. For those who played along with the last part, you will have already received this month's image, an Alice in Wonderland themed one called Mr. Tea. He comes both with and without a fun sentiment. If you didn't play along, you can purchase this image at Rick's Zibbet shop. These two make me laugh!


I coloured Mr. Tea and the dormouse with Prismacolor and Polychromos pencils, adding Glossy Accents to Mr. Tea's eyes. The image was then fussy cut leaving a narrow white border and matted with black cardstock before being popped up on foam squares to add dimension.


The background began as a 6 x 8 inch piece of mixed media paper which was spritzed with Hottie Patottie Hot Pink, Witch's Potion Purple, and Yellow Rose of Texas Lindy's Starburst sprays. The purple was spritzed through memory Box's Alpha Crumbled stencil. Drips of black ink were dropped onto the background and then the runs were moved around with the TH spritzer tool. Black embossing paste was scraped through a grid stencil using a palette knife.


The first word of the sentiment was created by adding patterned chipboard letters to a corrugated tag. Black Big Brush pen was added to the edges and a length of dotty pink ribbon used as a topper. A small teacup brad and a little cheesecloth steam were used to accent the corner.


The second word of the sentiment was created with Idea-ology Alpha Parts letters dotted with white paint pen. To continue the tea party theme, a small doily was added beneath the image. Harlequin washi tape adhered to white cardstock making it more opaque was added as a border to each side. Black Fude ball pen was used to outline next to it.


Three punched photo corners were placed in the corners and three faceted teal gems finished the lower left corner. The page was completed by adding a black cardstock mat to frame it and provide contrast to the busy border.

Thanks for joining Mr. Tea, Dormouse, and me today. We're so appreciative that you took the time to do that. When you get a chance, pop by the Sparkle and Glitter blog to see the rest of Team A's fabulous creations with this fun image. Team B will be along mid-month to inspire you more. We would love to see what you create. It's always so fun to see what we all do with the same image.

Life is good; so is art.
Bonnie

All You Need is Love ~ One Sweet Challenge June project


Hi there! I cannot believe that it is June already. Wasn't it just February? Yikes. With a new month, we have a new challenge theme at One Sweet Challenge.
featuring images from Sweet Pea Stamps. This time, the theme is Dies and/or Punches...easy peasy. For most of us, that's a go-to addition to many projects.


I chose to play with an image from an artist who was new to me. Star Wand by Lemon Shortbread is so adorable. Check out her beautiful face and that flowy hair. I saw her and had to colour her. It may be my first Lemon Shortbread image but certainly not my last! I coloured Star with Prismacolor and Polychromos pencils, adding a little puffy gel pen to her wand star. I fussy cut her leaving a narrow white border and then matted her with black cardstock so she would pop against the background. Star was then popped up on foam squares and asked to wait for the background to be completed.


The background began as a 6 x 8 inch rectangle of mixed media cardstock to which I applied Worn Lipstick, Spiced Marmalade, and Scattered Straw Distress ink in layers to achieve depth. Water was spritzed and flicked over the background so that the colour was removed in places. Solid hearts were die cut from patterned and text paper and then edged with Distress inks. These were then adhered to the background and outlined with black pen. Three lengths of washi tape were added both to give Star a place to stand and to add pattern to the spread. Another heart was cut from black cardstock using the Sizzix die, Scribbles and Splats. This provides good contrast between the softer coloured hearts and the black as well as the solid versus the lined heart.


The first four words of the sentiment were stamped with Jet Black Archival ink and the word LOVE was spelled out with stickers. More texture was added to the background with White Embossing Paste through TCW's Halftone Borders stencil using a palette knife. A doodled border, a little outlining, and a black mat finished off the piece.

Thanks for joining Star and me today. To get a peek at the other amazing projects by my talented One Sweet Challenge teamies, pop over to the OSC blog. We would love to have you join us for our Dies and/or Punches Challenge. You have the whole month of June to enter!

Life is good; so is art.
Bonnie