Tuesday, October 27, 2015

new release at The East Wind


Hi everyone. There's another new release at The East Wind today and I was able to play along. It's an Unkytoon image called Sit Down and Doing Nothing. She's just relaxing on her broom along with her little furry sidekick. I coloured them with a mix of Prismacolor and Polychromos pencils. They were then fussy cut leaving a narrow white border, matted in black cardstock, and popped up on foam tape.


The background was created with Dried Marigold, Scattered Straw, and Worn Lipstick blended together. Stamping was done using a script stamp and Coffee Archival ink as well as a Joggles background stamp using brilliance Rocket Red Gold which has a gorgeous shimmer. Stencilling was done with Jet Black Archival sponged through Memory Box's Alpha Crumbled stencil. White embossing paste was scraped through a harlequin stencil and shaded on one side with a Stabilo pencil. Dylusions Black Marble paint was used to create bottle top rings and gift card lines.

To complete the piece, a black border was doodles around the outside edges. The lettering was stamped onto the background and doodled around with  a black and a white pen. Black Big Brush pen was used to edge the background before it was matted with black cardstock to frame it.

Thanks for stopping by today. To see other creations made by my talented teamies, pop over to The East Wind Facebook group where they will be posted throughout the day. We would love to see what you create with her, too.

Life is good; so is art.
Bonnie

Wednesday, October 21, 2015

Day 21 of the 31 Days of Halloween ~ Rick St. Dennis' Airless Chambers


It's that time again for Rick St. Dennis' Airless Chambers Crew to join in the creepiest bloghop of the year, the 31 days of Halloween, organized by Smeared Ink. Today it's my turn to post on the Airless Chambers blog for Day 21.


I have a mixed media piece featuring two of Rick's wonderful images, Dancing with the Starz and Flying High. They make quite a team and both seemed to fit the sentiment. They were coloured with Prismacolor and Polychromos pencils and then fussy cut leaving a narrow white border. They were each matted with black cardstock before being trimmed out again and popped up on foam tape.

The 6 x 8 rectangle of mixed media paper which forms the substrate was spritzed with water and then sprinkled with Orange, Lemon, and Scarlet Brusho crystals. The background was tilted various ways so that the colours would run and blend before they were allowed to dry. Stars were die cut from black cardstock and scattered across the background. Inky dots were added with a Joggles background stamp and Jet Black Archival. The edges of the background were lined with Black Big Brush pen before it was mounted on black cardstock to frame it.

The sentiment was computer generated and printed onto white cardstock. The letters were filled in with red marker and the words were matted with black and popped up on foam tape. An enamel heart was adhered beside the last two words for emphasis and balance.

Thanks for joining us today. My witchy friend, her cohorts and I appreciate your visit.

Life is good; so is art.
Bonnie

Monday, October 19, 2015

One Sweet Challenge reminder Post ~ Autumn Colours


Hi everyone! It's time for the One Sweet Challenge Mid-October reminder post. Our themes this month are either All Souls' Day or Autumn Colours which is the one I chose to feature. Autumn is my favourite season and I love how it's a feast for the senses, including the eyes. The trees here are absolutely breath-taking right now.


I chose to feature Holly Durr's image called Longing which can be found at Sweet Pea Stamps. I coloured the image with a mix of Prismacolor and Polychromos pencils. It was then fussy cut leaving a narrow white border, matted in black, and trimmed out again. Foam tape was added to the back to create dimension and shadow.


The 6 x 8 inch mixed media paper rectangle was colourized with Scattered Straw, Spiced Marmalade, and orn Lipstick Distress inks applied with blending tools. Jet Black Archival ink was sponged through Colorbox's Rounded stencil to create the circles. Joggles Faux Latin text stamp was applied to the background with Coffee Archival ink and Stampendous Mish Mesh stamp was added with Orange Blossom Archival ink. White gesso bottle lid rings and black specks were added to the mix. A length of burlap was adhered across the background and a wide and glittery pumpkin themed ribbon was added over that.


Once the image was adhered, a segment of black punched border was added to the bottom left corner. Three black triangles balanced out the other corners. The letters for the word Autumn are Thickers. Nature's Grand Finale was computer generated, trimmed out, and popped up on foam. The other part of the scalloped border was tucked underneath it to give it more visual weight and emphasis. To complete the piece, Orange Big Brush pen was used around the outside edges of the background and a black cardstock mat was used to frame it.

Thanks for stopping by today. To see the other fabulous inspiration pieces by my talented teamies, be sure to pop by the One Sweet Challenge blog. We would love to have you play along with us before the end of the challenge. Plan a stop by Sweet Pea Stamps...you are sure to be inspired by the huge variety of images Lynette has available there.

Life is good; so is art.
Bonnie

Thursday, October 15, 2015

Halloween ~ The East Wind Challenge #41


Hi everyone. We are beginning a new challenge on The East Wind Challenge Blog which runs until October 25. The theme for Challenge #41 is Halloween so we are looking for any project which is Halloween related. I chose to do another mixed media background to feature the lovely Lucy Loo Glamzombie.


I coloured Lucy Loo with a mix of Prismacolor and Polychromos pencils adding green shading to give her a ghoulish glow. She was then fussy cut leaving a narrow white border and then matted in black for contrast against the background. She was popped up on foam tape so that a spooky shadow would surround her once she was adhered to the background.


The 6 x 8 mixed media paper background was sprayed with Yellow Rose of Texas and Marigold Yellow Orange Lindy's Starburst sprays. Love that shimmer from the mica in those sprays. Hag's Wart Orange was then sprayed through the Dylusions Blocks stencil and it was also flipped over to create more pattern when it was used as a stamp. Autumn's Maple Crimson Starburst spray was used to drip the nasty red from the top of the background using a paintbrush. The black strip of cardstock was patterned with Dylusions white paint and a runners stencil from Coffee Break Designs. That's the fast food that Glamzombie hates...people who run! The little haunted house was fussy cut from designer paper. Coloured pencil and black pen doodling were added to liven it up a bit.


The computer generated saying was printed on white cardstock, trimmed out and matted with black cardstock. Each word was popped up on foam tape to emphasize it and create dimension. Small bats were die cut from black and scattered around the sky. To complete the piece, a black mat was added to the background to frame it and keep the eye within that rectangle.

Thanks for joining Lucy Loo Glamzombie and me today. We are delighted that you did. To see what the rest of The East Wind Blog Dt members cooked up for this Halloween Challenge, pop over to The East Wind Challenge blog. We would love to have you play along with us!

Life is good; so is art.
Bonnie


Wednesday, October 07, 2015

Airless Chambers post ~ 31 Days of Halloween Day 7


Hi there! Rick St. Dennis' Airless Chambers is participating in Smeared Ink's 31 Days of Halloween Blog Hop again this year. Members of Rick's EDT are taking turns posting Halloween or Day of the Dead projects each day for all of October on the AC blog. Today is the first of my two posts. I chose to feature Bratty Lil Witch found in Rick's Zibbet shop.


Bratty and her wee friend were coloured with Prismacolor and Polychromos pencils. They were fussy cut leaving a narrow white border and then matted with black cardstock which provides a wonderful contrast with the background. They were then popped up on foam tape to create a shadow and add dimension.


The background, a 6 x 8 inch rectangle of mixed media paper, was inked with Straw, Dried Marigold, and Worn Lipstick Distress inks to create a blended background. One of the Mish Mesh stamps from Stampendous was used with Orange Blossom Archival ink to stamp texture on the background. Black Archival ink was sponged through Dina Wakley's Plastic Canvas stencil and white embossing paste was scraped through TCW's Netting stencil. Dylusions Black Marble paint was added to the background with bottle lids to make rings and a plastic gift card to make the lines.


Before Bratty was placed on the background, torn patterned paper with text and crossed bones was added in three places. The first place gave her a place to stand, grounding her so she wasn't floating. The computer generated sentiment was printed on white cardstock and Sharpie orange and purple pens were used to colour in the open parts. The words were then matted in black and popped up on foam tape. Black and black and white washi tape semi-circles were punched and added to the top and bottom of the background. Black Big Brush pen was used to edge the background and a black cardstock mat was adhered to the back of the page.

Thanks for stopping by today. I'm always happy to visit with you and Bratty...well, Bratty is Bratty. Be sure and stop by the Airless Chambers blog each day of October to see the other awesome projects by the EDT, all using images from Rick's creative brain! Follow the hop at Smeared Ink, too, and you'll be eligible for cool prizes.

Life is good; so is art.
Bonnie

Tuesday, October 06, 2015

Sweet Pea Stamps Facebook Progressive Challenge Part 2


Hi there!Part 2 of the Sweet Pea Stamps Progressive Challenge  has begun on Sweet Pea Stamps Friends & Fans Facebook group. If you played along with Part 1, you will already have received the adorable image we are using called A Clown For You by Katerina Koukiotis. If you didn't play along before, you can still purchase this sweetie at Sweet Pea Stamps. I think it would be so fun on a birthday invitation.


I coloured him with a mix of Prismacolor and Polychromos pencils and fussy cut him leaving a narrow white border. He was then matted with black cardstock before being trimmed out and popped up on foam tape. I love him in bright colours but think he would be sweet in pastels or vintage tones as well.


The 6 x 8 inch mixed media paper background had Cut Grass and Fresh Lime Dylusions paint scraped onto it with a palette knife. It was allowed to dry  before Jet Black Archival ink was sponged through Dylusions Letter Jumble stencil. White paint pen was used to transfer the circular patterns from Americana's Kaleidoscope Border stencil and black pen was doodled around the design. Black and white rings were created with Dylusions paint and bottle lids. White embossing paste was scraped through Dina Wakley's Plastic Canvas stencil. To create a platform for the wee guy, lengths of blue starry washi tape were adhered to white cardstock and stacked overlapping slightly. A black mat was added to the stand.


Yellow fishtail flags were hand cut from stencilled and sprayed scraps. These were outlined and faux stitched before being glued down. Small punched photo corners were added to opposite corners. The computer generated sentiment was printed on white cardstock, timmed out, and matted with black. Foam tape was added to the back of these words to create dimension and shadow. To finish off the page, black Big Brush pen was used to edge the background before it was matted with black cardstock.

Thanks for stopping by today. I hope this wee guy gave you a smile. Pop by the Sweet Pea Friends & Fans Facebook page to see what others on the DT and many of our friends do with this adorable image. We can't wait to see what you do!

Life is good; so is art.
Bonnie

Monday, October 05, 2015

Fall Colours or All Souls' Day ~ One Sweet Challenge October theme


Hi everyone! It's the first Monday of the month and that means that a brand new challenge is beginning for One Sweet Challenge. Our October theme is Fall Colours or All Souls Day. Autumn is my favourite season so that's what I went with for my mixed media page. I love the fabulous colours of the trees and bushes, especially the maples and sumacs.


I chose to feature Molly Harrison's Star and Moon Fairy from Sweet Pea Stamps colouring her with my Prismacolor and Polychromos pencils. I used gel pens to colour the tiny dots on her skirt, hair, and on the moon. Star Fairy was cut out leaving a narrow white border and was then matted with brown cardstock. It was then trimmed out again and popped up on foam tape.


The background started as a 6 x 8 inch rectangle of mixed media paper. Yellow Rose of Texas and Marigold Yellow Orange Lindy's Starburst sprays were spritzed on the background. Hag's Wart orange was sprayed through Dylusions Blocks stencil and then it was flipped and cleaned off on another area. Drips were encouraged by tilting the background. Using my mop-up atcs and a maple leaf punch, I cut fall coloured leaves which shimmer because of the mica in the sprays. These were adhered to the background and popped up on foam to overlap the base of Star Fairy's skirt.


The word Autumn was created with Idea-ology AlphaTiles and "the sweetest thing" with an Idea-ology rub-on. A brown Micron pen was used to create a scribbly border and the entire piece was matted with brown cardstock to frame it and add strength to the background.

Thanks for joining Star Fairy and me today. We appreciate your fine company. To see the other amazing projects created by my talented DT teamies, please pop over to the One Sweet Challenge  blog. We would love to have you join us  for our Fall Colours or All Souls' Day Challenge during the month of October.

Life is good; so is art.
Bonnie

Thursday, October 01, 2015

Rick St. Dennis Progressive Challenge Part 2 ~ Alice


Hi again. Since it's the first of the month, it also means that we are starting Part 2 of the Progressive Challenge on the Sparkle and Glitter blog. Those who played along with Part 1 last month will have received this fabulous image by Rick St. Dennis called Alice. I love how he has drawn her and the background with the little hidden treasures like the White Rabbit or the caterpillar is fun to colour.


I coloured this image with my usual mix of Prismacolor and Polychromos pencils. I did add in spots of black Micron pen to give areas like the swirls more contrast and definition. The image was trimmed out along straight lines except where Alice's curls come out of that straight line. That side was fussy cut. The image was matted with black cardstock to frame it and give the eye a place to rest from all that is going on.


The background was kept fairly simple because the image is not. Pale pink and coral sprays were used to create a background with a lot of white space. A little pattern was added using Archival Rocket Red Gold and script and mesh stamps. jet Black Archival ink was sponged through TCW's Halftone borders stencil and white embossing paste was scraped through TCW's Harlequin stencil. Once dry, the harlequins were shaded with Inktense pencil activated with a water brush and then they were outlined on one side. Jet black Archival ink was also used to apply one of the circles from Stampotique's circles cube stamp.


The sentiment from Lewis Carroll's book was computer-generated and stamped onto white cardstock. This was torn around and a black torn piece of cardstock was used to mat it. A black punched photo corner with a tiny triangle of washi tape was adhered to the top right corner and white paint dots were added. A small black die cut and dotted arrow was also added to point to one of three rub-ons. A sketchy border was doodled with black Big brush pen before the black mat was added to the background.

Thanks so much for joining Alice and me today. We love that you did that. To see other inspiration projects from Team A of the EDT, pop over to Rick's Sparkle and Glitter blog. It's so fun to see how many hair colours Alice has...LOL. We can't wait to see what you do with her!

Life is good; so is art.
Bonnie

Always Be Yourself ~ Challenge #40 The East Wind


Hi everyone. Happy October! Today marks the start of a new challenge at The East Wind. This time the theme is 
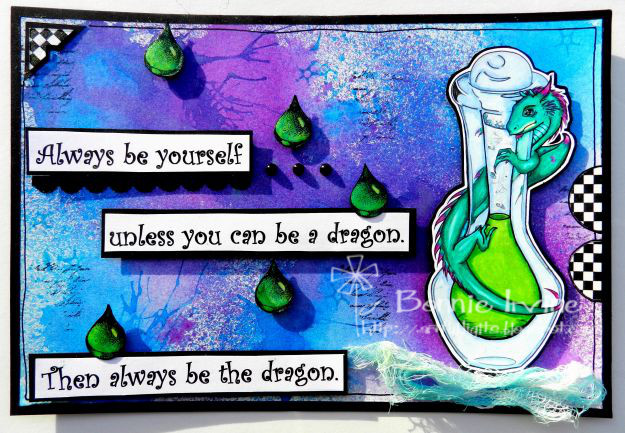
Add Texture which can be done in so many ways...wet or dry embossing, adding fibres, lace, fabric, layers of stencilling, inks, paint, torn edges, just to name a few. On the first challenge of the month, all of the DT use the same image, the one from that month's newsletter. This time, the image is called Dragon's Tear and I LOVE it! I am a huge fan of dragons and was delighted to colour up this little baby.


I coloured him with a mix of Prismacolor and Polychromos pencils, adding Clear Wink of Stella to the liquid, shimmery gel pen to outline the bottle, and Glossy Accents to Baby's eye. I wanted all the shimmer because this is magic! I fussy cut the image leaving a narrow white border and then matted it in black cardstock, trimming it out again. Foam tape was added to the back of the image to add dimension and create a shadow around it when popped up.


The background began with my usual 6 x 8 inch rectangle of mixed media paper to which I added sprinkles of Purple and Turquoise Brusho crystals. Water was spritzed over this and the background was tiled to blend and create runs. Once dry, more crystals were added in a few places and then moved around with the TH Spritzer tool to create the tiny drips. Love that effect. Stamping was added with Forget-Me-Not Archival ink and Joggles Sparkles background stamp. Jet Black Archival ink was applied to a TH script stamp and rolled on here and there.


The computer-generated sentiment was printed onto white cardstock and matted with black. Foam tape was added to the back of each section and three flat pearls became the dots. A length of black punched border was added under the first section for emphasis. Whenever I spray ink, I often use ATC size pieces of white cardstock to mop up the final bits of overspray. I keep this stack handy so that when I want to add a coloured detail I can punch or stamp from these. It gives a different look from using coloured cardstock and seems to fit better with the backgrounds I create. I stamped Ryn's raindrop (or teardrop) stamp onto a green spritzed paper using Black Archival ink and then fussy cut them. Glossy Accents was added to each and foam tape was added to the back. The green ink has mica in it so they shimmer as well as shine. That makes me happy :)

To complete the page, even more texture, besides all of the layers of stencilling and stamping, was added when I adhered some ink sprayed cheesecloth under the bottle. To balance the weight of the image, a checked photo corner matted with black was added to the top left corner and the same washi tape wasd into semi circles and added to the right side to create flow. A black border was doodled around the edge. Black Big brush Pen was used to darken the edges and the background was matted with black cardstock to frame it and provide contrast.

Thanks for joining Baby and me today. We are glad that you did and hope that a little good magic comes your way. To see the rest of the amazing DT creations, pop over to The East Wind Challenge blog. They are yummy. We would love it if you played along with our Add Texture challenge.

Life is good; so is art.
Bonnie