Wednesday, September 27, 2017

Rust and grungy goodness ~ another junk journal page


Hi everyone. A while ago when I was rusting some safety pins to use in my junk journals and other mixed media art, I used a couple of pieces of white cardstock to set the pins on in the sun once they came out of the soaking solution. When they weren't rusting as quickly as I wanted (yes, I'm impatient), I spritzed them with more of the solution and let them dry again on this same paper. Well, the pins turned out fabulous and ...Bonus...the paper they were dried on was equally awesome. Its rusty and grungy with amazing texture and imprinting. I just knew it had to be another page in my current junk journal. I folded it in half and then stitched around the edges, punched my holes for the binding, and then waited to be inspired.


The problem was that I didn't want to cover the rust and grunge and I just knew that I would want to pet the rusty rough texture. Yes, I do that...LOL. Anyway, I decided that a tuck spot on the diagonal would leave more exposed rusty paper so I went with that. I tore a piece of black cardstock to the angle I wanted and then tore a scrap of designer paper to fit inside the black one while leaving a border on both sides and inked the edges. These two pieces were then stitched on my machine along three sides  leaving the inner edge free to create another tuck spot. The pockety tuck spot thingy was adhered to the background along the outer edges so now I had two pockets to stash things for the price of one :) A die cut doily was scored and folded in half so that it could be wrapped around the outer edge, becoming an element on the front and back of this page.


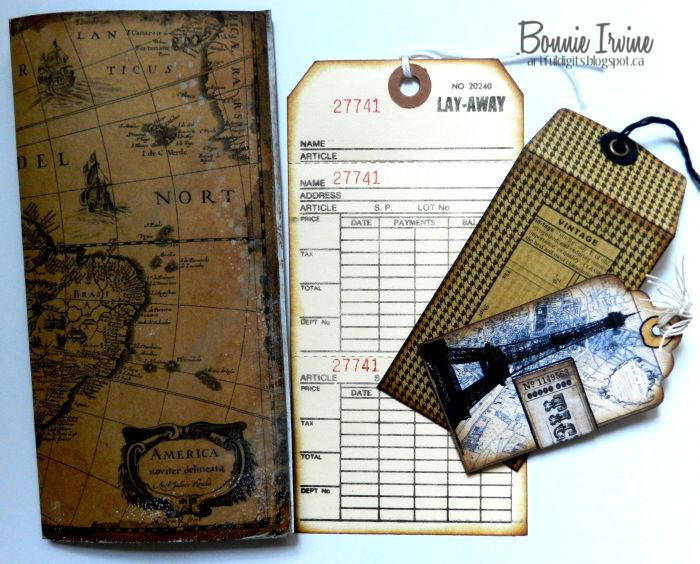
Because I wanted to leave the rust as exposed as possible, I chose two skinny things for the lower pocket and one for the top pocket. A rectangle of map printed on kraft cardstock was inked and folded in half. Inside, gesso was spread over the faded floral pattern to knock it back so it could serve as a journalling spot. A Lay-away tag purchased from J9Scraps was inked on all edges and the back left blank for writing. The little envelope was a Graphics 45 embellie, into which I inserted a small printed tag from Pixel Market. The ticket from Vectoria Designs was wrapped around to the back which still leaves room to write.


The other side of the page is where the imprinting of the rusty pins was most noticeable. I added some circle and punchinella stamping with Coffee Archival to add to the texture and patterning. 


A 2.5 inch black band was cut and layered over with a 2 inch distressed rectangle of the same designer paper from the other side. This was stitched around and then the stack was adhered top and bottom to the background creating a belly band to hold ephemera. An accordion folded, inked, and sewn length of vintage book paper was centered on the band and was then topped with a die cut corrugated heart and a vintage button.


Here is the finished page with the goodies tucked under the band. There is a downloaded Western Union telegram form, a post card, and a railway ticket, all with journalling room on the back. This double page went quickly because most of the heavy lifting was done by the random rusting and imprinting done by nature.

Thanks for visiting today. I appreciate that so much! Who knows where this junk journal will take me next. It's certainly a place for experimenting and re-purposing...love that!

Life is good; so is art.
Bonnie


Monday, September 25, 2017

Another page in my Kraft, Black, & Cream Junk Journal


Hi everyone! It's been a while since I posted a page for my on-going WIP, my kraft, black, and cream junk journal. Sometimes life gets in the way of creating for the sheer pleasure of it. I managed to finish a couple more pages so I'm stealing away some time to share the first one here. Most of my pages are in the vicinity of 5.75 x 8.75 inches in size but I wanted to change that up a little so I chopped the length of this one to 7.25 inches. I like when all the pages are not the same and because these are unbound, I can go back and throw in some odd sizes any time I want. I added a punched border on the edge of the page before I stitched around the kraft background and inked the edges with Coffee Archival Ink. Black cardstock reinforcements were punched and adhered around the holes.


The same ink was used to edge the half doily which I used as a tuck spot. It had also been stamped with a Bo Bunny script stamp before it was layered over a strip of selvedge fabric with a fringed edge. I have become quite the hoarder of anything that I think might become an element on a junk journal page...LOL. On top of the doily and fabric strip, I used a scrap of designer paper which already had holes punched on one edge.


I wanted some space for hidden journalling so I folded a 5.5 x 8 inch rectangle of cream cardstock in half and rounded the corners. Coffee archival was used to edge all sides inside and out and faux stitching was added to the front edges only with a sepia Micron pen. I have had this fabulous bee printed burlap trim for ages because I love bee images so I decided to cut a circle around the bee and make it the focal of my little journalling booklet. I layered him over a scrap of  kraft paper with a star punched from it and then coloured in the star once it was adhered to the background. Over that was adhered a scrap of corrugated coffee sleeve inked around the edges with Coffee Archival and scuffed over the corrugation with white gesso. A tiny scrap of cheesecloth bridges the place where the burlap meets the corrugated paper, and an Idea-ology Big Chat sticker provided the word Imagine. The top right corner was finished with punched and inked text stars offset with some black ones to create a shadow effect, as well as three little black enamel dots. A tiny TH paperclip keeps this booklet in place under the tuck spot.


The reverse side of the page was quick and easy. A6 x 6 inch piece of designer paper was cut to fit and the edges were inked with Coffee Archival before it was adhered to the center of the page. Part of the kraft paper which I cut off to change the size of this page was stamped with a ruler stamp using Coffee Archival. This was layered horizontally near the bottom of the page, adhering only the left and right edges to form a band into which I could tuck tags. A strip of corrugated coffee sleeve was inked and adhered over that...love that texture and you can see the slight curve along the top edge.


The larger tag was created by stitching  a rectangle of map paper to one of coffee dyed paper both for stength and to give a journalling spot on the back. Before it was stitched, a music paper scalloped circle was inked and folded over the top edge so it showed front and back. A die cut and embossed butterfly with a threaded button center was adhered to decorate the music circle. The smaller tag was stamped with a second generation text stamp to make the text more faded and uneven. It was stitched around and then inked with Coffee Archival. A tiny envelope was die cut from kraft paper and the heart opening was layered on the back with a scrap of black. The word notes is a TH Chit Chat sticker. A length of lace became the small tag topper and it was held to the larger tag with another paperclip.


The backs of the tags were only embellished with TH rub-ons  to allow lots of space to write.

Thanks for joining me today. I appreciate your stopping by. I have another page for this same junk journal but I will leave that for another post. I am having great fun with this project and am not nearly finished with it yet :)

Life is good; so is art.
Bonnie

Monday, September 18, 2017

Joggles Art Journal Adventure - Week 38 Sneak Peek


Hi everyone. It's my week to choose the prompt for the Joggles Art Journal Adventure and I chose the word Abundance. I'm hoping that people will focus on the wonderful little moments which each day holds, things we often forget to notice or might take for granted. It's easy to get caught up in the negative and what's wrong but I wanted to begin to document some of the things that make me smile or bring me a sense of peace or joy..."ahhhhh" moments. Once I started looking for these things, I began noticing more and more...I could easily have filled a second page and will have this one completely filled in in spite of leaving room to grow.

Anyway, to see the entire page and read about my process as well as seeing step out photos, pop over to the Joggles blog. I'd love it if you did...hmmm, one more thing to add to the list :)

Life is good; so is art.
Bonnie

Friday, September 15, 2017

Sneak Peek of my Joggles DT Post - Cheeky Fairy Tags


Hi everyone! It's my turn to create a DT project for the Joggles blog and above is a sneak peek of part of one tag. I decided to make three tags which I can use in my kraft, cream, and black junk journal which I have been working on for a while now. I used some insect wings from a Joggles Collage sheet combined with Tim Holtz paper dolls to feature on layered tags. I also included some of my previously created ephemera paper elements as embellies. I love how these tags turned out!

To check out the full tutorial as well as step out photos, pop over to the Joggles blog where I take you through my creative process. I'd love it if you did!

Life is good; so is art.
Bonnie

Tuesday, September 12, 2017

Sneak Peek of my LeighSBDesigns Tutorial Tuesday Post


Hi everyone! Today, it's my turn to host Tutorial Tuesday on LeighSBDesigns blog. Recently, Leigh created two amazing images for a contest on Markers! Papers! Digis! Facebook group: one a colouring page and another a single image. Both featured these amazing Tangled Maple Leaves and being a proud Canadian I just couldn't resist using the single image, Tangled Maple Leaf, for my project today.

Above is a sneak peek of my art journal page where I used the leaf image in three different ways. Pop over to the LeighSBDesigns blog to see the full tutorial and step out photos showing my process. When you get a minute, stop by Leigh's Etsy shop as well. You can see her other unique and inspiring designs...and just wait until Friday...oops, can't say more but stay tuned...LOL

Life is good; so is art.
Bonnie

Sunday, September 10, 2017

U-Paint Metal Crafts Has Arrived at Joggles


The Joggles Design Team was delighted to learn that the Joggles shop would be carrying some of the fabulous metal pieces produced by U-Paint Metal Craft, a division of The Frank Morrow Company based in Providence Rhode Island. These metal pieces are detailed and light weight, providing wonderful focals and embellishments for mixed media projects, home décor items, and altered books. As a matter of fact, each team member couldn't wait to create an inspirational project to show you some of the possibilities.


The minute I clapped eyes on the detailed scales on this amazing fish and the cluster of shells, coral, and plants, I knew I wanted to create an under-the-sea themed 8 x 10 inch canvas. The long ridged curved pieces became larger plants for the little fish to swim through. To add colour to the metal shapes, I used Copic markers, alcohol inks, and Art Alchemy Sparks paint which has a wonderful shimmer. I added and subtracted to create shading and highlighting, adding darker colours for the shading and using the ink blending solution to remove ink where I wanted the silver base as the highlight.


The background was created with several Lindy's Stamp Gang Starburst sprays: Delphinium Turquoise, Bachelor Button Blue, and Sassy Sapphire for the water and Opal Sea Oats for the sandy bottom. Joggles Bubble Blast stencilling was added to the water by spritzing more of the Bachelor Button Blue Starburst Spray through it. Once dry, white Sharpie Paint pen was used to scribble inside the bubbles and Inktense pencil activated with water was used to shade many of them. Charcoal pencil was used to outline several as well. Joggles Background Noise - Sparks Cling Mounted Rubber Stamp was inked with Tree Branch Archival to add pattern to the sand. 


Shells and cheesecloth were added to the sand area to create more dimension and texture. Like the metal pieces, they were adhered with E6000 adhesive. 


Shiny little acrylic dew drops were added to the background to create points of shine as the bubbles come out of the fish's mouth.

What a fun mixed media canvas to create! I love these metal shapes and am so excited about the possibilities that the huge variety presents. To see the other wonderful projects created by the DT and featuring these U-Paint Metal pieces, pop over to the Joggles blog to see the joint post where all of them are shared in one place. Everyone did an outstanding job!

Thanks so much for visiting today.
Life is good; so is art.
Bonnie

Monday, September 04, 2017

Joggles Art Journal Adventure ~ Week 36 Sneak Peek


Hi everyone. Once again it's my week to choose the weekly prompt for the Joggles Art Journal Adventure. For Week 36, I'm asking everyone to Wing It. Now that could be literally like featuring anything with wings (butterflies, angels, fairies, airplanes...you get the idea) or you could wing it as part of your process like I did with the background. I wanted to use a cloud mask and ink but only had a vague idea about how to do what I wanted so I made it up...and learned a ton...as I went along :)

Above is a sneak peek of part of the page. To see the rest of the page and also see the step-out photos and explanation of my process, be sure to pop over to the Joggles blog. I cannot wait to see what everyone in the AJA Facebook group creates.

Thanks for popping by!

Life is good; so is art.
Bonnie

Sunday, September 03, 2017

Decorated Paper Clips for my Kraft, Black, and Cream Junk Journal


Hi everyone! Whenever I have  a small window of time, I like to create embellishments for my junk journal. It lets me use up scraps, to finish things by working small, and to have some things ready to go when I have larger blocks of time to create new pages. Plus it's just plain fun! I love working small as a nice change from working on larger pieces of art. I used black 2 inch paper clips and kraft paper cut into 5.75 x 1.5 inch fishtail flags to create the first layer. A smaller flag shape was cut from designer paper to fit inside this kraft layer, leaving a border all around.


All edges of the kraft layers and the designer paper layers were inked with Coffee Archival Ink. A scrap of cheesecloth was also adhered to each designer paper layer, connected in some way to the focal image. Above left, I added a punched corrugated cardboard leaf, a coffee dyed and inked mulberry flower, and a threaded vintage button center. The one on the right has a bird die cut from vintage book text. The bird has a tiny embroidery floss bow and a rhinestone eye. Faux stitching was added to the border of the designer paper flag.


The faux stitching was continued on the left paper clip above. A canvas text printed banner flag was threaded with black and white baker's twine and adhered atop the designer paper. Layered over that is the cheesecloth and a punched corrugated cardboard star. Two brown half pearls finished that design. A small merchandise tag, inked with Coffee Archival Ink before two Idea-ology butterfly rub-ons were added, was adhered to the paper clip on the right. The cheesecloth was tucked under the tag before the tag was glued and also adhered with a brad.


The first of the final two paper clips had brown faux stitching added to the outside edges of the designer paper. A Recollections layered and printed kraft butterfly was adhered over the cheesecloth as the focal for this clip. The last clip has a corrugated cardboard (from a coffee sleeve) die cut heart placed over the cheesecloth and a threaded button adhered on top.

These were a lot of fun to create...so much so that I created a template for both layers to save me measuring each time when I make more. You will see one starring in an upcoming page in my kraft, black, and cream junk journal very soon. Thanks for visiting!

Life is good; so is art.
Bonnie