Tuesday, July 31, 2012

Recycle, Re-Purpose & Re-Invent August Challenge


While one theme for August at Recycle, Re-Purpose & Re-Invent is Frame-it, the other is Anything Goes as long as you have included recycled product(s) on your project. That was all I needed to hear to go wild and crazy! I often have a lot of things in the works on my craft table and my lists tend to get buried in the piles. For example, right now I am working on an atc swap where each person picks the theme for the atc you create for them. I usually try to keep my list on a clipboard so that I can stand it up and not lose it in the creative chaos. The clipboard I use is functional but not funky. ZZzzzzz! I had an ugly old one in the basement that had potential for altering so I hauled it upstairs and let my imagination go.


On the recycled clipboard, I first applied recycled book paper from an old children's book with gel medium. I gessoed over that and then broke out my Neocolor II crayons to colour the background. Then I did my usual messy play to create a background using pan pastels, ink, stencils, punchinella, anything that would create texture. I really don't overthink that part, working quickly and just enjoying the process.


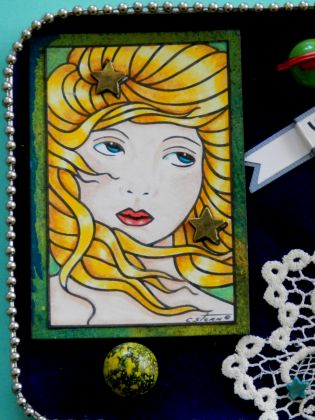
Then I started colouring images from CS Designs to create this fun scene. I actually used six (count 'em) designs for this collage. I wanted something fun to look at when the clipboard was empty... to motivate me to clear up my to-do list. I used my Prismacolor pencils to colour Arabesque, the dancer; Splendour in the Curled Grass; the trees from the Striped Forest collection,; the face from Celestial Goddess; and the Striped circular petal frame for the sun's rays. The sentiment also came from the Striped Forest collection and was mounted on a torn scrap of black packaging. So much fun! I fussy cut them and glued them down with more gel-medium.


I finished off the piece with lots of messy doodling, a little bling on the sun and Arabesque, a recycled button  that became a snail, some zigzag border, a metal play sticker, and some fibres for the hole in the clip. A couple of coats of sealer ensured that everything would stay in place and all watercolour would no longer react to moisture. So fun and quite a change from it's former self. Now this clipboard fits in with the rest of the room and is something I enjoy using. Win-win!

Be sure to check out the other amazing projects from the rest of the design team. They are sure to inspire you to create something wonderful with your recycled bits whether you decide to Frame It or play with Anything Goes. Can't wait to see what you come up with :)

Life is good; so is art.
Bonnie

Nesting Dolls atc


One of the swaps I'm working on right now is a PAT swap at Split Coast Stampers. PAT means pick a theme so each person in the group chooses a theme for the rest of the group to use for her atc. If I chose, for example, Butterflies, then the other four in my group make me a butterfly themed atc. My friend, Paulette, chose Russian Nesting Dolls as her theme in one group. I was so excited because I've been wanting to colour this nesting doll image from CS Designs.


I printed the image in 5 different sizes. That is one of the big advantages of digital images. I used my Prismacolor pencils with OMS to blend the brightest colours I could find. I love how vivid the colours are on most nesting dolls I've seen. I scored a length of black cardstock so that I had five different sections and then fussy cut and glued each doll to a panel. On the internet, I found the Russian words for the numbers one to five, printed them, and mounted each word to blue cardstock. These were adhered to the corner of each panel with a white number sticker giving the translation. The only other addition was the title of the atc, Russian Nesting Dolls. The entire black folded section was mounted on a white backing with inked edges. A tiny paperclip holds it closed.


I kept this atc very plain in order to let the nesting dolls be the stars. The black is a great contrast to the bright colours in the dolls and is repeated in one section of  their outfits. So cute! This one's for you, Paulette. Hope you like your little dolls :)


Thanks for visiting. Come again soon, OK?
Life is good; so is art.
Bonnie

Sunday, July 29, 2012

Fly


The theme this week at Meljen's DT and Challenge blog is Anything Goes so I decided to play along using this sweet digi I won a little while ago. I coloured the Victorian birdcage using my Prismacolor pencils. It was cut out using the TH baroque die, inked around the edges, doodled around, and mounted on black cardstock. The same black cardstock formed the first layer of the background. Two patterned papers from MME's Rosy Lost and Found stack formed the next two layers with a lacy border cut with an MFT die in between. Some bead letters to spell Fly and a blue button threaded with baker's twine finished off this card. Gotta love clean and simple!

I'm off to link up to this challenge. Wanna play, too?
Thanks for stopping by.

Life is good; so is art.
Bonnie

Friday, July 27, 2012

Only a Dreamer SNP hop


Welcome to Stamp N Plus Stamp of the Month Blog Hop!!


If  Beverly sent you over for a visit then you are exactly where you are meant to be. If you just happen to be visiting then you  might want to head over to  the Stamp N Plus blog for the beginning of this fabulous hop! There is Blog Candy for our Hop today. LuAnn is giving away two free stamps of the winner's choice. In order to qualify, please comment on each DT member's blog and become followers of both the Stamp N Plus blog and the Chalk-a-Lot Cafe blog.

For my take on this sweet little dreamer stamp, I decided to paper piece. I stamped the image three times, once on gold for the cloak and hood, once on white cardstock for the arm, wand and sentiment, and the third time on white cardstock for the face and hair. The arm, hand, face and hair were all coloured with Prismacolor pencils.

The sentiment layer was cut out with a die, matted on black, and doodled with faux stitching. The stars were coloured with gold gel pen. A metallic gold ribbon was layered over one side of the background paper from DCWV's Timeless Type Stack. A big blingy brad was added to the center of the arrow turn, Stickles to the butterfly, and flowers to the corner.

I finished off the card with a swipe of  Krylon gold leafing pen on all outside edges.

Now it's time to visit  Melissa and then the rest of the DT to check out their awesome projects using this stamp.

If you get lost along the hop here is the complete line up:
Beverly Montez- http://sugarstamper.blogspot.com/
Bonnie Irvine-http://artfuldigits.blogspot.com
Melissa Pinter-http://pinkpolkadotscrapping.blogspot.com
Kathy Hering-http://khering.blogspot.com
Tina Keller (Crafty and Green)-http://craftyandgreen.blogspot.com
Paulette Akagi-http://paulettesapaper-artzy.blogspot.com/
Jackie- http://papermoments.blogspot.com/
Cindy Groh-http://cre8ivecindy.blogspot.com/
Julie Ericksen - http://julesericksen.blogspot.com

Thanks for hopping by.
Life is good; so is art.
Bonnie

Wednesday, July 25, 2012

SNP - Otto's checking in


This gargoyle stamp from Stamp N Plus just cracks me up. I love gargoyles to begin with and Otto has the funniest expression on his face. He looks so casual and friendly, unlike many of his friends who look fierce. Maybe all gargoyles look this way when they are off duty. Anyway, that's how this card came to be created.


I had the perfect paper for Otto's background. It's a night skyline from DCWV's Downtown Loft stack. Otto was coloured with Prismacolor pencils, using OMS to blend. His glowy eyeballs are bling, coloured with an alcohol marker, and his sparkly white teeth are gel pen. Once he was perched on his building, he needed a starry sky and a sentiment generated on the computer, faux stitched and popped up on foam tape. Two tiny gold brads decorate each banner. A little Walnut Distress ink around the edges finished off this fun card. Easy-peasy!

I like him...he makes me smile. I hope he does the same for you.

Life is good; so is art...and so is smiling :)
Bonnie

Tuesday, July 24, 2012

A message from Miss Mouse


Hey, I had time for a just-for-fun project today so I decided to make an atc since that's the current theme at Meljen's DT and Challenges blog. I haven't made that many atcs lately and I had forgotten how fun they are. This is a good thing because I have a bunch to do for a swap I'm in.

For this atc, I started with Meljen's Designs Hickory Dickory Mouse digi printed on white cardstock. I coloured Miss Mouse and her clock with my Prismacolor pencils and used a little OMS to blend. Some tiny black flat back pearls decorated the clock face and added a bit of dimension. The edges of the image piece were inked.  It was then mounted on dark brown cardstock and layered with foam tape.. I reused some packaging from some stickers I had purchased to make the foundation of this card. Some of that packaging is so darn cute and just the right weight, too.A little inking around the edges, a sticker,  and I called this atc done!

Not only did I get to colour a sweet image but creating this atc has put me in the mood to do more which is exactly what I hoped would happen. It's like that chip commercial...bet you can't eat (make) just one :)

Thanks for visiting today. I hope you find time in your day to just play and like Miss Mouse says,  "Relax". I'm off to link up to Meljen's challenge blog.

Life is good; so is art.
Bonnie

Monday, July 23, 2012

AWNB - Just Clowning Around Week 2


I love art dolls! And I love harlequins! And...I love Chris Stern's images! So this week I was in Heaven because I was able to combine all three. This is the second week of our Anything Goes and Just Clowning Around challenges at Art With No Boundaries and an art doll was definitely calling my name.

I coloured the square harlequin image with my Prismacolor pencils, using OMS to blend. Then I cut out the image and layered it over another piece of cardstock for strength. Browsing through some body patterns from my stash, I came up with a basic shape for her arms, legs, and body and drew a tunic, tights, and shoes to fit the jester theme I saw in my head.  The clothes were cut out and glued to text paper. The hands were cut from white cardstock and coloured to match the face. The tunic has gold acrylic paint lightly stenciled over a harlequin diamond pattern. The edges of the clothes were inked to create some roundness. The tiny jingle bells come from my stash and the heart on her sleeve was hand cut to match the gold edging and bells and to repeat the hearts on her cheeks. Tiny resin roses were coloured with alcohol marker and glued to the toes of her shoes.

Next came the choosing of the Spirelli shape for her collar from the selection of shapes Chris designed in the Spirelli Manual cut kit. I printed the oval wide Spirelli shape on the back of shiny red cardstock, cut it out and then cut a hole in the center, This Spirelli shape was wrapped with thin hemp cord and bling was added to each point at  Jester's request, of course.


Now Jester needed a hat. The red and light text cardstocks were glued together and triangles were cut and curled around a pencil. These were glued to the back of her head, slightly overlapping each other and becoming shorter at the sides. Bling was added to the point of each triangle. A simple neck was cut and coloured to go through the hole in the Spirelli collar.

Hmmm, something was missing. She needed a scepter! Lengths of black and gold ribbon were cut and added to a stick pin made with a heart bead, spacer beads and a large red bead. This was pushed through a foam square on the back of her hand. And Jester came alive! It must be the magic in her scepter :)


Thanks for stopping by to meet Jester today. Be sure to check out the amazing creations by the rest of the CS Designs team. They are spectacular! I hope you join us in this challenge at Art With No Boundaries. We so enjoy your creations!

Life is good; so is art.


Bonnie

Wednesday, July 18, 2012

Hold on Tight


I love this crazy stamp from Stamp N Plus Scrap N of a little girl in a frilly dress riding an ostrich. It makes me wonder what circumstances led up to this situation and then my imagination runs free. How fun is that ! Anyway, it seemed a perfect stamp for the sentiment. Sometimes when things are a little out of whack or out of our control, the best thing to do is to hang on tight and ride it out :)

I stamped the image on white cardstock and coloured it with Prismacolor pencils. A little white pen was added to the neck and tail feathers and a little glitter pen to the edges of her dress...after all, it is a special occasion.  The image was then cut out with an oval die, inked around the edge, and matted on black and then pink cardstock. Foam dots were used between layers for dimension. The sentiment was computer generated, cut out with a template, and matted with black cardstock. Four little brads and some doodling finished it off.

The background harlequin paper came from a matstack so old that the cover is gone. It was matted with black and then pierced in the corners to add another detail. Flat back pearls were placed in the corners next to the piercing. Two more layers of pink and black cardstock were added to frame up the background paper. The white border of the actual card base was left showing to pick up on the white in the center of the card.

Thanks for visiting with me today. I'm always glad to see you. Now go put on a frilly pink dress and ride your favourite ostrich :)

Life is good; so is art.
Bonnie

Monday, July 16, 2012

AWNB Just Clowning Around Challenge


For Art With No Boundaries' new fortnight challenge, the themes are Anything Goes with the bonus round of Just Clowning Around. . This week I was able to play with the new CS Designs oval harlequin digital image and the manuel cut spirelli templates. What a wonderful combination! I love harlequins and this one is a beauty. Plus there are so many spirelli templates that it's always a tough choice.

When I create, I usually start by colouring the image first. Then it more or less whispers to me where to take the rest of the design. I might have a general idea before I start but the face usually gives me a push in a certain direction. To colour her face, I used my Prismacolor pencils with a little OMS to blend. Once the face was finished, I had this vision of a harlequin suit with a big ruffled collar. That determined the spirelli design I used (Solarflare) and wrapped with sparkly embroidery floss. She also needed bling on the points of her neck ruffle to make it more festive and elegant.  To suggest clothing, I printed a harlequin diamond pattern on the computer and chose tiny white buttons for the front.


 For the foundation, I decided to use a canvas in order to create an art journal type of background since a canvas holds up well to all of the mediums and layers I use. I wanted it to be messy and gray with lots of texture but it couldn't distract from her outfit and lovely face. I started out with gray acrylic paint on an 8"x10" canvas. Then I stippled white acrylic over a doily. Next I just started playing with anything that inspired me from my bin of textures: spray ink  and acrylic over stencils (at least 3 or 4), through punchinella, and over netting; dry-brushing; stamping randomly with various stamps on my table. For this, you don't want anything with a distinct shape since that will catch your eye and distract from the image. I used primarily grays, white, and black with a little silver and copper thrown in here and there.


This is what the canvas looked like before I layered the harlequin image over it. There are no rules so it's a very free and intuitive process.

Once everything was adhered to the canvas, I gave her the final touches: some glittery butterflies with bling bodies; the title, Mystique, and its definition because it seems to fit her expression; some foil spirals; and a great big organza bow under Mystique's chin. She and I were both happy with the finished piece, and I certainly enjoyed the process. I know this lovely face and I will meet again many times. She's very versatile.

Come join in the fun this week at Art With No Boundaries. Be sure to check out the projects done by the rest of the DT. They are sure to inspire you to play in this challenge.

Life is good; so is art.
Bonnie

Saturday, July 14, 2012

Roses are pink...


Here's another example of using multiples of the same smaller image to create an eye-catching card. This time I stamped three of this rose image from Stamp N Plus Scrap N on white cardstock. It's a great way to use up some of those scraps of white I always have. I coloured each image with my Prismacolor pencils using a little OMS to blend. The same textured paper was used to mat them as was used on the background and foam tape was added to the backs.

A piece of pink and white striped paper from Ye Olde Scrapbox was layered over the brown after I cut a white scallop border to tuck underneath. It seemed to need that extra decoration and also helped to tie in the white from the image pieces and the card.

The small tag was stamped with a Stamp N Plus sentiment. Doodled stitching, a pink brad, and some ink around the edges finished the tag. Again, a clean and simple card which really allows the rose images to take center stage.

Thanks for visiting my little rose garden :) Come by any time.

Life is good; so is art.
Bonnie

Wednesday, July 11, 2012

Outstanding!


I am cat-crazy in case you didn't notice and this quirky little stamp which looks hand drawn by a child was impossible to resist. It's called Triangle Kitty and can be found at Stamp N Plus Scrap N. I stamped 4 images on white cardstock which I then coloured with my Prisma pencils. Using multiples of the same image is a great way to use a smaller stamp effectively on a card.

 I cut the images into rectangles and matted them on black cardstock. The background paper was from my scrapbox. The sentiment was computer generated and also mounted on black. I used  four little pink brads and knotted a piece of pink ribbon for the embellies.

Such a simple card but it works because of the bright colours, white space, high contrast, and mostly, because of the cute image. It makes me smile. Hope it does the same for you.

Thanks for stopping by.

Life is good; so is art.

Tuesday, July 10, 2012

AWNB Summer Skies Week 2

This is Week 2 of our Anything Goes/Summer Skies Challenge at Art With No Boundaries. This week I played with the Cosmo Wide Panel image from CS Designs.. She has the most haunting expression on her beautiful face and I love colouring flowy hair.


The foundation for this piece is a raw wood framed mirror from IKEA that's just been waiting to be altered. The entire frame was covered in black gesso and then watery acrylic paint was flicked on by tapping a toothbrush over it. If you flick the toothbrush with your thumb you get smaller dots but if you tap it, you get larger rounder dots.

For this piece, I imagined Cosmo as the guardian of the earth with the desire to bring harmony and order to our universe. Those two words come from the definition of Cosmos. I fussy cut an image of the earth out of an old school atlas (1961) and glued it to the upper right of the mirror frame so that she would be gazing upon it from the night sky. A small tag with a foam letter e was placed on top of the image.


Cosmo was coloured with Prismacolor pencils using OMS to blend. Her hair colour is darker this time and her eyes are brilliant green. Her image was mounted on teal cardstock and then layered over pices of drywall tape. I really like the texture this gives and also the idea of a net...maybe a safety net or perhaps she used it to catch the stars in her hair. I used black marker to colour over an embossing folder in order to achieve some texture in the image background.

Cosmo knows that time is of the essence in achieving harmony and order. The watch came from my stash of charms and the ball chain from that toolbox raid a few weeks ago. The silver stars are buttons with the shanks cut off. The computer generated words are printed on swirly vellum.

Do you think Cosmo looks worried about her favourite planet? Dismayed or wistful? Or is that just my imagination carrying me away again?

Thanks for joining me on this journey. I hope you will join our challenges at Art With No Boundaries in either the Anything Goes or Summer Skies category. I always look forward to seeing your creativity in action.

Life is good; so is art.

Bonnie

Sunday, July 08, 2012

Butterfly atc

Wow! it's been ages since I made an atc. I'd forgotten how fun they are to create. I'm in a swap called Butterflies Everywhere on Split Coast Stampers. One of the categories is atcs . Butterflies and atcs...how could I resist?


I used some paper I've had for ages for the background. It's  from the Butterflies & Blossoms Stack from DCWV. I used very thin silver cord to outline the stripe  with the printed butterflies. Then I stamped a Lockhart butterfly stamp with Memento Rich Cocoa ink on white cardstock and coloured it with my Prismacolor Pencils. The dots which appear white in the photo are actually very glittery. Dots  of Glossy Accents were covered in Stamp N Plus' Opalescent glitter which is super fine and very shiny. Wish I could have captured that for you. I wanted those dots to repeat the shininess of the silver dots on the blue paper. Anyway, Ms. Butterfly was popped up on foam dots both for dimension and because she is the star of the show :)

Paper flowers were Glimmer Misted to match the butterfly. A shiny bead was added to the center of the layered flower and two punched sprigs to the bottom. The words were computer generated, mounted on brown and silver, and popped up on foam dots. The whole atc is very glowy.


I have a quirky thing (among many) about finishing the backs of my atcs. My go-to system is to make a small pocket on the back. A tag is punched and decorated on one side with my swap info on the other side. It's kind of a little bonus surprise for my swap-mates and it finishes off the card so it's pretty on both sides.

Well, thanks for visiting. Hope you get some crafty time today.

Life is good; so is art.

Bonnie

Saturday, July 07, 2012

On a Krafty Note


This simple card was a lot of fun to make. I used one of the iris fold stamps from Stamp N Plus to create the opening and show me where to place my music note strips. Easy-peasy but it looks so complicated. Love that!

I rounded the edges of the black cardstock and glued it down on some kraft cardstock cut to size. Then I stamped the Stamp N Plus sentiment, Just a Note, in the opening and faux stitched with my Micron pen. I used tiny dots of Black Stickles to emphasize the letter dots. The kraft cardstock piece got its corners rounded and faux stitching was added to the edges to repeat the other stitching.

 Before the kraft was adhered to the card leaving a little border of white still showing, I attached the music brad so that the legs would be hidden when the kraft piece was glued down. three little heart buttons and ahemp bow were attached to the corner to add some more detail. Simple, quick, fun. Can't beat that!

Thanks for stopping by. I appreciate that!

Life is good; so is art.
Bonnie

Wednesday, July 04, 2012

AWNB's Cosmo's Dream


For this Fortnight's challenge at Art With No Boundaries, the CS Designs DT was able to work with the lovely Cosmo digital image. I am crazy about this image. Her eyes are so expressive and her hair is a treat to colour. Plus I am a star collector. Thank you, Chris! Our new challenge themes are Anything Goes and Summer Skies (bonus round).

For this project, I started with a 12 inch round canvas which I painted and then sponged with two colours of acrylic paint. The moon rays were spritzed with glittery gold ink through a stencil to lightly suggest the glow. More of the same mist was spritzed over the rest of the canvas. The moon was sponged with two colours of acrylic over a circle of watercolour paper. The edges were inked to show the roundness. Cheesecloth was roughly cut, spray inked and dabbed with glitter glue here and there to create clouds across and behind the moon. The stars are bling glued over smears of glitter glue to create a halo effect.


Cosmo was coloured with Prismacolor pencils using OMS to blend. The stars were watercoloured with mica paint. I added some tiny bling to her eyes because the moon is creating quite the shine. Whenever I create a piece like this, I imagine who the character is and the story surrounding her. I chose this quote by Kit Williams from one of his children's books. As soon as I read it, I knew it was describing my vision of Cosmo with her pale and beautiful face and the tresses of her hair reaching out to make the constellations. I coloured her hair with extra strong highlights to make her seem as if she was glowing. She must be some kind of goddess watching over the night sky. The quote was printed on old fragile book paper and then singed around the edges (from the heat of the sun). Both the moon and the quote are popped up on dimensionals to create depth.


Finally, I added Scrabble tiles to spell out the word dream. She certainly looks dreamy or maybe she is just part of my dream. Either way, she's mesmerizing.

Thanks for visiting Cosmo and me. I hope you will play in our Art With No Boundaries challenge. I really look forward to checking out your creations and visiting your blogs. Check out the amazing designs by the rest of the DT and be sure to welcome our newest DT member, Beverly Gotthardt.

Life is good; so is art.


Bonnie

RR &R July Challenge


Welcome to our new DT member, Beverly Gotthardt, at Recycle, Re-Purpose & Re-Invent. She's an awesome addition to our team. Be sure to visit her blog as well as those of my other teamies.


For July's Challenge at Recycle, Re-Purpose & Re-Invent, the theme is Anything Goes as long as you use something recycled on your piece. Remember to identify what is recycled or repurposed when you write your post. I used I used this stunning digital images of Cosmo by Chris Stern at CS Designs  to play with this time. I am wild about her. Her face is beautiful, her expression intriging, and her eyes just pull me in.

I used a metal gift card case left over from a Christmas present as the foundation for this piece. I layered the background with dark blue felt for the night sky. I wanted to create the planets and universe for this piece. I used a recycled piece of a hand-embroidered doily for the moon, and took apart an old pair of earrings for the scattered turquoise stars.


Cosmo was coloured with Prismacolor pencils using OMS to blend. Star charms from an old bracelet were used in her hair once the loops were cut off. She was mounted on a piece of  painted and faux finished watercolour paper left over from another project.

Then came her planets. When we first moved to this house which is an oldie but goodie, we were digging to expand the flower beds. We came across a bunch of marbles buried in the dirt with a few other tiny toys. So charmimg! Cosmo's planets are three of those marbles. A binder ring from my old school stash was used for the ring on the green and red planet. Because the blue and green marble looks like the planet earth, I placed a #3 metal tab next to it...third planet from the sun. In my imagination, Cosmo is looking with wonder at this huge and spectacular universe which explains the banner.

Finally, to frame the whole collage and add sparkle, more of that ball trim from the toolbox was glued to the edge of the metal case. Lots of recycling and re-purposing on this project. That combined with the gorgeous image was what made it so fun to create. I hope you will join this month's challenge at Recycle, Re-Purpose & Re-Invent. It's so fun to see the inventive ways you use things.

Thanks for visiting my little piece of the universe :)

Life is good; so is art.
Bonnie

Birthday Wishes

Happy 4th of July to my American friends!


Lots of celebrations this week...Canada Day, my husband's b-day, and Independence Day! To celebrate, I made this simple little card using Patti's Kids large birthday in envelope stamp from Stamp N Plus. It's such a fun image to play with.

I coloured the hand, cupcake, and envie with my Prisma pencils. The balloons were paper pieced with the middle one popped up on foam tape for added dimension. The image was cut out with a Spellbinders die, matted in black, and doodled around with a Micron pen.

The background consists of a scrapbox patterned paper, matted on black, with two rows of ribbon adhered under the focal. The image was popped up on foam tape and a satin ribbon pull was added. Three glittery brads were added to allow the image piece to tuck into the corner.

Clean and simple, and I got my colour fix :)

Enjoy the celebrations, wherever you are. There's always something to celebrate and be grateful for!
Thanks for visiting. Remember to check out the Anything Goes Challenge on the Stamp N Plus Scrap N blog. We have some cool entries already :)

Life is good; so is art.
Bonnie

Tuesday, July 03, 2012

Stamp N Plus July Challenge


I can't believe we are starting our second Stamp N Plus challenge already. Thanks to all of you who participated in the first one.  It was exciting to see all that talent and creativity right there in black & white :) To check out the winners , visit the Stamp N Plus blog.

This month's challenge is Anything Goes. This is the last month where you can enter without using a SNP stamp. The DT went all out to show you a small part of the selection of stamps SNP has to offer. Be sure to check out their cards.


I chose to feature this funky shoe stamp which you can find here. I love the detail in this stamp...lots of opportunity to go crazy with colour! Prismacolor pencils were used to bring this shoe to life. Then the image was fussy cut, matted on black, and again on white cardstock to set it off against the busy background.

The background pieces were all mounted on black cardstock as well since they were close in colour and needed to be "outlined". All came from my scrapbox...yup, still digging in there. The stitching on the left side was done with black embroidery floss through holes made with a piercer. The sentiments were written on the computer with faux stitching doodled on the tag and tiny brads added to the other word strip. The final touches were a bit of black satin ribbon on the tag and some flat back pearls in opposite corners of the card front.

I hope this card gives you your daily dose of colour...kind of like sunshine. It certainly gave me mine.
Thanks for visiting. I hope to see your creation linked to this month's challenge. I just love to see what you've been doing.

Life is good; so is art.
Bonnie