Showing posts with label collage. Show all posts
Tuesday, April 21, 2020
Quirky Cats Artist Trading Cards - inspired by a Vera Lane Studio collage sheet
Hi everyone! Did you see the new collage sheet which was released by Vera Lane Studio last week? It's called Quirky Cats and comes with two collage sheets of wonderfully coloured cats and a few bird friends. They are quick to cut out and come in various colour combinations and sizes. I am smitten! I decided to make a trio of artist trading cards featuring a few of the images.
The first one combines one of the smallest cats and his bird friend who I placed on top of his head. The background is an ATC (2.5x3.5) card which I used to mop up overspray from a Lindy's session. Stamping and doodled stencilling plus a piece of washi to ground them added to the design.
The second ATC started as a remnant from a gel printing session using acrylic paint topped with a stencil. Doodling was added to the circles and a little stamping was scattered across the card. Washi tape grounded one of the medium cats and his birdie friend.
The third ATC features one of the largest cat images. The background started as another inky mop-up card. Stamping and doodled stencilling added patter and washi tape grounded the Quirky cat. Like all of the others, Black Big Brush Pen edging, a doodled border, and a puffy heart sticker were added to finish the design. The sayings,like the images, were popped up on foam tape to add dimension.
Once again, thanks for joining the Quirky Cats and me today.To check out the other fabulous collage sheets and images by Janet Klein, be sure to stop by the Vera Lane Studio Etsy shop. While you are virtually out and about, pop by the Vera Lane Studio Facebook group where there is daily inspiration and awesome peeps!
Life is good; so is art.
Bonnie
Thursday, February 13, 2020
Pretty Little Tags
Hi everyone! I've had these pretty translucent stickers from Paper Game Co. in my stash for a while and decided it was high time I made something with them. They are fairly small under 1.75 inches at their longest points so I thought that smaller scale tags would suit them well. I have an old Marvy Uchida punch with a nicely shaped top that cuts tags 1.75 x 2.25 inches so I used that on some tan coloured textured cardstock.
I started by stamping the punched tags with a text stamp using coffee Archival Ink and not much pressure to get a lighter effect. The edges of the tag were darkened with the same ink to create an aged look.
One of the translucent stickers was then placed over the book text. I love that you can see the text through the flowers. A hole was punched at the top of each tag and string was feed through to finish them off.
When I am playing and experimenting, I sometimes find it hard to stop. There's often that little nagging "what would happen if..." and that's how the last tag came to be. It's a 2.25 x 4.75 manila tag stamped with the same script stamp and ink. A layer of cheesecloth was adhered before the book text was layered on top. White gesso was used over the text to push it into the background before the sticker, this time with a bird as well as flowers, was layered on top. Because I had extra real estate, I added a Tracie Fox number label, a strip of music paper, and a Chit Chat sticker. I can see that a number of other tags in the same style might be calling my name :) After all, you can't just have one...LOL
Thanks for stopping by.
Life is good; so is art.
Bonnie
Thursday, February 06, 2020
Junk Journal Collage Tags
Hi everyone! I found a bunch of kraft cardstock tags when I was sorting through a bin and decided they would be great for collage style tags. It's always good to try to use up those scraps of papers and other bits and bobs before they take over the room :) Besides, this is one of my favourite ways to play.
I also had some translucent stickers I had purchased some time ago from Papergame and, although I had used some, I still had many that are too beautiful to hide away in a bin. I thought they would make awesome focals on these collaged tags...and I was right.
I also found an American Crafts Knockout punch which I haven't used in years. It punches 5 tiny stars in a row so I used it on the tops and sides of vintage book paper. Then I backed the star area with a scrap of black and inked the front edges. I think it might be my new favourite embellie. While I was punching, I used it on another scrap of black and adhered the punched out stars to the heart and two corners of the one tag. The stars are 3/8 inch at the widest...so cute.
Some of the tags have fussy cut butterflies. I have a little bin of these already pre-cut so all I do is ink the edges with black Big Brush pen. I inked many of the collage paper edges as well as the outside edges of the tag with Coffee Archival Ink.
I finished each with a faux stitched border and outlining of the individual papers because I like that look. It highlights all of the different papers and layers. A little string topper for each and I called them done. I will likely add a word to a few like the one above when I decide where they are going and can choose a word that fits.
Thanks for stopping by today. I appreciate that kindness. I'll be back in a few days with another set of smaller tags. I think I could make tags all day every day...LOL. Somebody stop me..ha!
Life is good; so is art.
Bonnie
Tuesday, January 28, 2020
Twinchie Book ~ inspired by a Vera Lane Studio collage sheet
front and back cover
pages 1 and 2
I found the most groan-worthy puns about cats that I could and featured one on the left hand page with a collage cat on the right page.
pages 3 and 4
The backgrounds began as scraps of gel plate pages or ink sprayed pages. Even if the background is too awful to use in its entirety, there are often some good twinchie sections which can be salvaged.
pages 5 and 6
Additional stamping, paper scraps, or music/book text were added along with some stencilling.
pages 7 and 8
Washi tape helped ground the cats and was continued onto the opposite page to unify the spread.
pages 9 and 10
The cats were all fussy cut, matted with black, and fussy cut again leaving a narrow black border. They were each embellished with Stickled or Nuvo Drops noses, black gem eyes, and often with puffy heart stickers, pearls or Nuvo Drops on their collars, and punched flowers for the cover cats.
pages 11 and 12
The terrible puns were printed onto white cardstock using the VLS Baby Powder font and matted with black. A border was doodled on all the inside pages, and each page was edged with black Big Brush pen to provide a frame. The book was held together with tiny rings by Idea-ology.
my little alligator mouth 2x2 book
Thanks for joining all of the punny Fat Cats and me today. We do appreciate that. Be sure to check out the other adorable collage sheets as well as the plethora of images in the Vera Lane Studio Etsy shop. There are so many other twinchie books rattling around in my brain...I'd love to see what you come up with :) Pop any of your Vera Lane Studio projects onto our VLS Facebook group page. We love the inspiration!
Life is good; so is art!
Bonnie
Tuesday, January 14, 2020
Make a Wish Tag ~ Inspired by a Vera Lane Studio image
Hi everyone! For my second Vera Lane Studio project today, I decided to make a tag featuring one of the sweet Wish Fairy images. I love the serene expression on her face, her beautiful wings, and wonderful hat. She makes me smile!
I coloured Wish Fairy with Prismacolor and Polychromos pencils. Her wings were done with the same colours of pencils as in the rest of her but I added white over the top to blend the colours into each other for a bit of a magical effect.
The background began with a textured and mottled blue paper from which I cut a #8 size tag. Vintage music paper edged with Coffee Archival Ink was layered vertically over the blue and a piece of white doily was adhered overlapping that. To give Wish Fairy a place to stand and tie in the blues from her hat and dress, a piece of marbled printed paper was torn and adhered horizontally toward the bottom of the page. The Idea-ology Small Talk sticker was layered over the blue strip.
To finish the tag, black pen was used to outline the layers and doodle a border around the outside. The edges were inked with Coffee Archival and edged with black Big Brush Pen. Green and blue twine were combined to make the topper, again pulling the colours from the image to unify the tag.
Thanks for joining Wish Fairy and me today. That was kind of you! When you get a chance, be sure to pop by the Vera Lane Studio Etsy shop as well as the Vera Lane Studio Facebook group, both great places to hang out and be inspired.
Life is good; so is art.
Bonnie
Tuesday, January 07, 2020
ATCoins ~ inspired by a Vera Lane Studio collage sheet
Hi everyone! When I have scraps left from backgrounds I have created or patterned paper I have used for other projects, I always check to see if they are big enough to cut an artist trading coin or artist trading card from. I keep a stack of pre-cut backgrounds for both of these so when I want to create something quick and fun, I'm half way there. Today I am sharing two coins featuring images from a Vera Lane Studio collage sheet called Fun Collage.
I fussy cut the three small images from the same sheet leaving my usual white border. These were then matted with black. Foam tape was attached to the bird and the girl to add dimension and shadow. To ground the images, a torn piece of washi tape was added to the pink coin and a die cut arrow was added to the green one.
Stencilled Xs or stamped dots were added to create more interest. Chit Chat Stickers matted with black and popped up on foam tape were added and a doodled border finished them off. So simple...so cute!
Thanks for stopping by! That was awesome of you! Check out the other collage sheets at the Vera Lane Studio Etsy shop. They are a fabulous time saver and there's a wonderful selection so the possibilities are endless! We would love to have you visit our Vera Lane Studio Facebook group, too, when you get a minute. It's filled with daily inspiration and wonderful people!
Life is good; so is art.
Bonnie
Tuesday, December 24, 2019
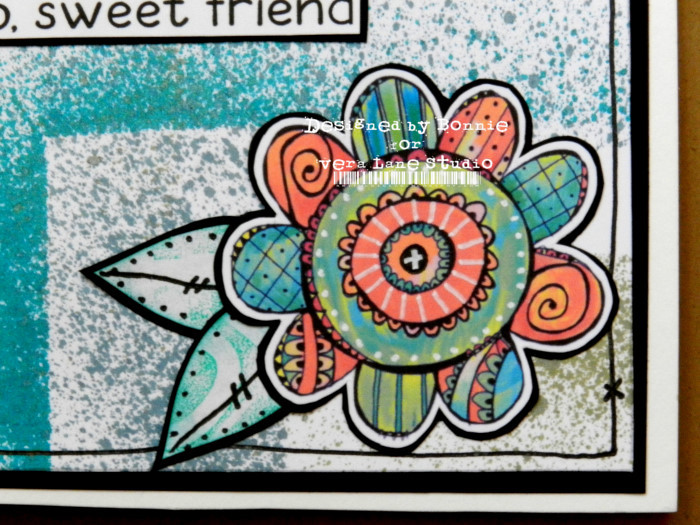
Hello, sweet friend card ~ inspired by a Vera Lane Studio collage sheet
Hi everyone! My second DT project today for Vera lane Studio is a quick and easy "thinking of you" type of card. This would make an adorable gift if you made a set of them. They would also be wonderful to have on hand when you want to send a little note to a friend. The card features one of the fabulous pre-coloured images from the Doodle Flower Stamp and Collage Sheet. If the colour palettes don't fit what you are creating, there is an uncoloured digi in the set for you to colour as you wish. Love that!
I fussy cut one of the pre-coloured flowers, leaving a white border, and matting it with black. I added a few extra white details with a Posca pen both because I like to add my own voice and to help pick up the white spaces left in the background. I also cut out two leaves from a scrap of gel printed paper, matting them with black and adding black doodles to tie in with the flower.
The background was simply a rectangle cut from a paper I had used to catch the over-spray from Lindy's Starburst sprays. I chose the section I wanted, cut it to fit the black mat, and doodled a simple border around the outside edge. The sentiment was printed onto white cardstock and matted with black to frame it. I love the results and how quickly the card came together.
Thanks for stopping by today. I appreciate that, especially during such a busy time of year. When you get a bit of a break, be sure to stop by the Vera Lane Studio Etsy shop and the Vera Lane Studio Facebook group to catch up and gather some inspiration for crafting when life settles into its quiter routine again.
Life is good; so is art.
Bonnie
Monday, December 02, 2019
Joggles Art Journal Adventure ~ Week 48 ~ Cozy
Hi everyone! It's Week 48 of the Joggles Art Journal Adventure and our prompt for this week is cozy. Cozy can look different ways for different people, can take different forms, and have different components but I think the feeling it brings is similar across the board. I decided to construct a scene that had many of the components that evoke that cozy feeling in me. It's a place I'd like to hang out, especially as the weather gets colder and nastier outside.
The first thing I wanted was a sunny room with wide white baseboards and wood floors. I used watercolour and Neocolor II crayons to create the floor, and lined it with a black pen to create the boards. The walls were coloured by smushing Antique Linen Distress Oxide on my craft sheet, spritzing with water, and dipping the top of the page into the puddles. Painters' tape protected either the floor or the walls when I was working on the opposite area. The walls were shaded with Inktense pencils activated with water.
Next I needed a comfy chair for Parker, my gray cat, and me to curl up in. I placed it next to a bookshelf filled with lovely hardcover books. I placed a window ( a die cut) above the bookcase so I could get lots of light and see the big fat flakes outside.
Beside the chair. I have a stack of books, my reading glasses, and a steamy cup of coffee in my favourite mug. On the back of the chair is a knitted throw to keep Parker and me warm, should we need it. Behind the chair is one of my art journal pages framed and displayed to make me smile.
On the other side of the chair is a cozy knitted basket for Molly, my black and white cat, to curl up in. All of the collaged elements except the picture hanging on the wall were elements from several digital collage packs from ATArtDigital, an Etsy seller. All were fussy cut and the gray cat, throw, book stack, and basket were popped up on foam tape to add dimension to the piece. The wording came from Idea-ology Small Chat Stickers.
Thanks for joining Parker, Molly, and me in our cozy space. I can't wait to be invited into yours if you take up the Week 48 Cozy challenge.
Life is good; so is art.
Bonnie
Sunday, December 01, 2019
Scrappy Kraft tags
Hi everyone! I raided my scrap box again to decorate some tags die cut from kraft cardstock. I love collaging with scraps, although I'm building up enough of a stash that I think I'm going to have to send out some happy mail so I can create more. My joy comes more from the process of creating them than from actually using them :)
The two larger tags were die cut using a 3 x 4.5 die from Poppy Stamps with pinpoint detail around the edges. The other 4 were cut with a Paper Smooches die which is about 2x3 inches in size. All 6 tags were inked around the outside edges with Coffee Archival Ink. The four smaller tags were faux stitched around the outside edges to create a border.
Scraps of various sizes and shapes were layered onto each tag after they were edged with Coffee Archival Ink to help the layers stand out. Threaded buttons were added as well as punched reinforcements for the front and back. Fine cord was used as toppers for each of the tags.
Thanks for popping by today. That was awesome of you. I have several more tags and embellies to share with you later in the week so stay tuned...LOL
Life is good; so is art.
Bonnie
Tuesday, November 26, 2019
Planner Girl Artist Trading Coins ~ Inspired by Vera Lane Studio collage sheets
Hi everyone! Last week, Vera Lane Studio released a wonderful set of collage sheets called Planner Girl. One sheet has fabulous planner accessories and embellies. The other sheet in the set is two slightly larger groups of wonderful images with no words attached to them. This second sheet is the one I pulled from to create a set of 4 artist trading coins. These could also be used in your planner if a paper clip was attached to the back or if they were adhered directly to your page. They are cute as can be!
These girls were fussy cut leaving my standard narrow white border, and matted with black. They were each popped up with foam tape to add some dimension to these little 2.5 inch circles. Little gems and enamel dots were added to the hats, clothing, and eyes to add my own artistic voice to these already gorgeous collage images. I think that's my favourite part of making these.
The backgrounds were punched from gel printed or spray inked scraps from previous projects. A chipboard backing was also punched and added to the atcoin to add strength to it.
The wording for each coin was added with a ChitChat Sticker. The edges of each coin were inked with Archival Inks and either stamping with Archival Ink or Ranger Texture Paste added through a stencil were added. A black border was added to each coin with Pitt Pen using a different style for each.
Thanks for joining the Planner Girls and me today. To check out these beauties and the other amazing collage sheets and images available, be sure to drop by the Vera Lane Studio Etsy shop. Stop by the Vera Lane Studio Facebook group while you're at it to see other amazing projects using these Planner Girls. There's always something new and inspiring in our FB group!
Life is good; so is art.
Bonnie
Monday, November 25, 2019
Joggles Art Journal Adventure Week 47 ~ Squares and/or Rectangles
Hi everyone! It's Week 47 of the Joggles Art Journal Adventure and the prompt this week is Rectangles and/or Squares. We are challenged to create a project which features those shapes. I thought about creating a page in the Piet Mondrian style of art but decided I wanted more of a random collage effect.
I pulled a bunch of scraps from my stash which I thought would play well together and then prepared the 6x8 inch background by spraying it with Lindy's Creme Brule Cream Starburst Spray. Once it was dry, Gathered Twigs Distress Oxide was added lightly through Carabelle Studio Cosmic Cubes stencil.
The scraps were cut into rectangles or squares and auditioned on the background, placing the long vertical pieces first to anchor the rest. The rectangles and squares which were more on the plain side were embossed with folders to add texture and interest. All of the shapes are connected through overlapping and layering to create unity. They were all edged with Coffee Archival Ink and were outlined with brown Sharpie. Hand stitching was added in three places with black crewel thread, creating a visual triangle. Three pieces of the same spritzed text paper as well as black cardstock emphasized this triangle, keeping the eye moving around the collages pieces.
To complete the page, the edges of the background were edged with Gathered Twigs Distress Ink as well as Coffee Archival ink. The wording came from Tim Holtz Big Chat Stickers. Black pen was used to create a simple border close to the edges before it was adhered to the black background.
Thanks for visiting today. I appreciate that. If you get a chance, pop by the Joggles Art Journal Adventure Facebook group to see what the others in our creative group do with this prompt. We only have 5 more weeks to finish the year!
Life is good; so is art.
Bonnie
Thursday, November 21, 2019
Altered tags
Hi everyone! I had this tag pad from K&Company kicking around for ages. I had already used all the ones I really liked and was left with a bunch that were OK but not really my style. They sat neglected for so long that finally I decided to alter them, keeping the parts I liked about each but changing the parts I was less fond of. Now, I love them and can see myself or someone else using them.
First I added scraps of patterned paper to cover the sections or details I didn't care for or to create a different colour story.
The front and back edges were darkened with Coffee Archival Ink and faux stitching was added with brown Sharpie pen. Reinforcement circles were punched from kraft or coordinating cardstock and edged with Coffee Archival Ink before being glued on to the front and back.
To finish them off, words from TH ChitChat Stickers were inked around with Walnut Big Brush Pen and adhered to the tag fronts. The good news is that I went from 10 tags I would never use to 10 tags I love. The bonus is that I used up more scraps and bits from my stash. And...I had great fun collaging them.
Thanks for joining me today. I appreciate that. Do you have anything kicking around your stash that you can alter to make something you like? Have a play! It'll be worth it :)
Life is good; so is art.
Bonnie
Subscribe to:
Posts (Atom)