Saturday, February 09, 2019
Guest Design Projects Week 2 for Vera Lane Studio
Hi everyone! Today I am sharing two Guest Designer projects made with the new Vera Lane Studio digi set called Birthdays. The set contains a boy and a girl as well as a sweet saying, all of which can be used together or separately depending upon your needs.
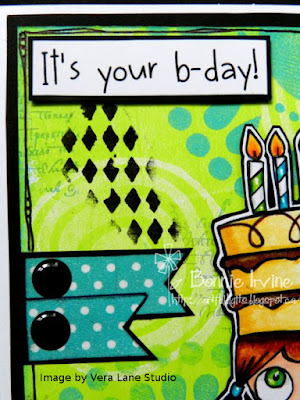
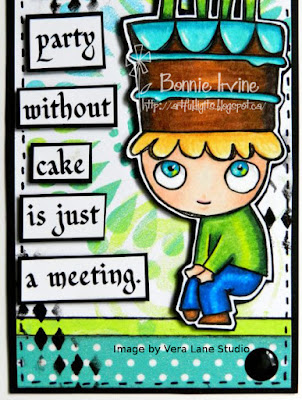
I created a birthday card with the adorable girl as well as a tag featuring the cute little guy. I love doing two projects at once because you only have to think once...LOL
I coloured both images with Prismacolor and Polychromos pencils, adding white Posca paint pen dots to Birthday Girl's dress and their eyes.
Both were fussy cut leaving a narrow white border, matted to black cardstock, and fussy cut again leaving a narrow black border. Foam tape was applied to the backs of the images to add dimension and natural shadow.
Both the tag and card backgrounds were created at the same time using the same colours and mediums. I started with the card background first. Brilliant Yellow Green Liquitex paint was brayered onto my gel plate and then Joggles Teardrops in the Round Foam stamp was applied to the painty plate to remove some of the colour here and there. The card front was then pressed to the gel plate and a print was pulled which had white spaces in the shape of the foam stamp design. As I lifted paint from the plate with the foam stamp, I applied the painty foam stamp to the white cardstock tag to begin the tag background. That way no paint is wasted and you end up with a two-fer...two backgrounds for the price of one :)
The next step was to apply some turquoise pattern over the yellow green. Bright Aqua Green Liquitex Acrylic paint was brayered across the gel plate in a thin even coat. This was then used as a "stamp pad". Joggles Wonky Layered Circle foam stamp was loaded with a thin even coat of Aqua Green paint from the gel plate and then pressed over the previously yellow green printed background. The paint was brayered smooth in between each stamping to get even coverage and a crisper image. The same step was done to the white tag, printing the turquoise circle over the green ones from earlier. Such a simple process and I love how the two backgrounds look different depending upon the background colour.
The card front was then stamped with an Indigo Blu text stamp using Garden Patina Archival Ink. Black gesso was pounced through the harlequin section of Stamperia Steampunk Man stencil. Two pieces of turquoise dotty washi tape were overlapped and matted with black cardstock before being adhered on the left side of the card. Two enamel dots accented the washi flags. The tag had the same dotty washi tape, topped with a thin strip of the card background print adhered above it. This gave Birthday Boy a place to stand. Before he was adhered to the tag, the same Stamperia harlequin stencil design was applied to the background. I love the contrast the black provides and how it makes the other colours pop. A black enamel dot was also used to accent this washi.
The sentiment on the card front was created using the Vera Lane Studio Baby Powder font. I love this font so much! Both sentiments were printed onto white cardstock, cut into sections or individual words, and matted with black. Foam tape was used to op them up. Both projects were then given a doodled border and matted with black cardstock to frame them. The finishing touches of adhering the decorated card front to the white base and adding ribbon as a tag topper were done to complete the two projects.
Thanks so much for joining Birthday Girl, Birthday Boy, and me today. To see more projects using these adorable images, be sure to stop by the Vera Lane Studio Facebook group. The talented Design Team has been creating with them all week and there are also inspiring projects created by the VLS community. When you have a minute, pop by the Vera Lane Studio Etsy shop, too. There is a huge selection of fabulous images and collage sheets that will surely spark your mojo.
Life is good; so is art.
Bonnie
Subscribe to:
Post Comments (Atom)


No comments:
Post a Comment