Showing posts with label altered canvas. Show all posts
Sunday, September 10, 2017
U-Paint Metal Crafts Has Arrived at Joggles
The Joggles Design Team was delighted to learn that the Joggles shop would be carrying some of the fabulous metal pieces produced by U-Paint Metal Craft, a division of The Frank Morrow Company based in Providence Rhode Island. These metal pieces are detailed and light weight, providing wonderful focals and embellishments for mixed media projects, home décor items, and altered books. As a matter of fact, each team member couldn't wait to create an inspirational project to show you some of the possibilities.
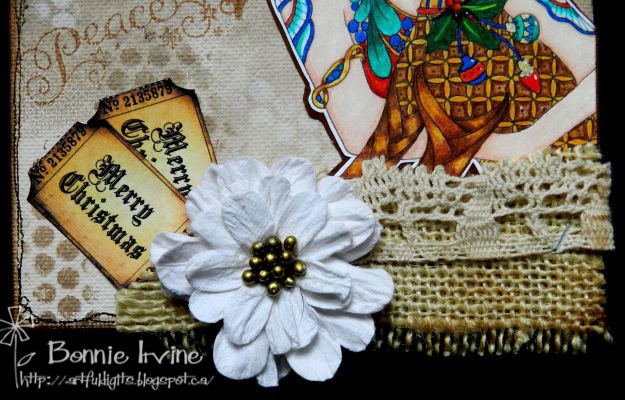
The minute I clapped eyes on the detailed scales on this amazing fish and the cluster of shells, coral, and plants, I knew I wanted to create an under-the-sea themed 8 x 10 inch canvas. The long ridged curved pieces became larger plants for the little fish to swim through. To add colour to the metal shapes, I used Copic markers, alcohol inks, and Art Alchemy Sparks paint which has a wonderful shimmer. I added and subtracted to create shading and highlighting, adding darker colours for the shading and using the ink blending solution to remove ink where I wanted the silver base as the highlight.
The background was created with several Lindy's Stamp Gang Starburst sprays: Delphinium Turquoise, Bachelor Button Blue, and Sassy Sapphire for the water and Opal Sea Oats for the sandy bottom. Joggles Bubble Blast stencilling was added to the water by spritzing more of the Bachelor Button Blue Starburst Spray through it. Once dry, white Sharpie Paint pen was used to scribble inside the bubbles and Inktense pencil activated with water was used to shade many of them. Charcoal pencil was used to outline several as well. Joggles Background Noise - Sparks Cling Mounted Rubber Stamp was inked with Tree Branch Archival to add pattern to the sand.
Shells and cheesecloth were added to the sand area to create more dimension and texture. Like the metal pieces, they were adhered with E6000 adhesive.
Shiny little acrylic dew drops were added to the background to create points of shine as the bubbles come out of the fish's mouth.
What a fun mixed media canvas to create! I love these metal shapes and am so excited about the possibilities that the huge variety presents. To see the other wonderful projects created by the DT and featuring these U-Paint Metal pieces, pop over to the Joggles blog to see the joint post where all of them are shared in one place. Everyone did an outstanding job!
Thanks so much for visiting today.
Life is good; so is art.
Bonnie
Friday, November 18, 2016
Joggles Blog Post ~ Sneak Peek
Hi everyone. It's my turn to post a DT project on the Joggles blog today. I created a mixed media canvas featuring a face created with the Joggles/Margaret Applin Fearless Face Stencil System...love that set of stencils and all of the possibilities it presents! I also used some of the Joggles Foam Stamps and my Gel Press Plate. I would love to see you over there to check out the step-out photos of the full project and tutorial!
Life is good; so is art.
Bonnie
Wednesday, October 08, 2014
Step Off the Path ~ eP sneak peek
Hi there! It's my turn to post on the eP blog today and I created a fun mixed media canvas featuring a Wendy Vecchi sentiment and two of Dina Wakley's Scribbly Birds. If you want to see more than this little sneak peek, you'll have to visit the eclectic Paperie blog.
Hope you will!
Life is good; so is art.
Bonnie
Monday, June 23, 2014
eclectic Paperie and Add a Little Dazzle Blog Hop
Welcome to our joint blog hop with Add a Little Dazzle. We are so excited to partner with them and have had so much fun playing with their products. They have a beautiful collection of metal sheets, in a variety of colors, that are perfect for mixed media projects.. We have two amazing days of inspirational projects so make sure to stop by tomorrow.
First we’d like to share a little bit about the two companies…
We specialize in an exclusive line of craft metal sheets that helps you take your crafting to the next level. Whether you are a seasoned or new crafter, our craft metal sheets will help you create unique projects that will make you stand out among the crowd. Are you ready to take your crafting to the next level? Add a Little Dazzle Craft Metal Sheets will help you turn the ordinary into the extraordinary.
Prize Alert!
Make sure to stop by and visit each of the Design Team Blogs for a chance to win 1 of 2 prize packages from eclectic Paperie and Add a Little Dazzle valued at $25. You have until Friday, June 27th to enter. The winners will be announced on both blogs on Saturday, June 28th. You must leave a comment on all blogs.
So Are You Ready for Some Amazing Inspiration?
I created a Steampunk altered canvas for my project using 4 different colours of the Add a Dazzle Craft Metal Sheets. I embossed a piece of Black Diamond with a Tim Holtz Sizzix diamond plate folder and cut it into two random shapes layering it with some scraps of designer paper in two different prints. All four pieces were adhered to the canvas with Scor tape. Stamping was done on the large piece of designer paper with Coffee Archival ink and Wendy Vecchi 's Mesh Background stamp as well as a Tim Holtz splatter stamp and text one. Jet Black Archival ink was used to add a little more texture using one of Dina Wakley's Textures stamps.
The heart was die cut twice: once from black cardstock and once from a Brushed Copper metal sheet which had been embossed with the Tim Holtz Sizzix Riveted Metal folder. This metal embosses and cuts like butter...love it! Gears were cut with Tim Holtz dies from Diamond Black, Golden Glimmer, and silver which is the reverse of the metal sheets. The copper coloured gears were cut from scraps of the heart embossed metal.
The Tim Holtz Daydream face of the my gear-head woman was stamped with Pale Ochre Archival ink onto white cardstock and coloured with Prismacolor pencils before she was fussy cut and adhered to the background. Some gears were then adhered as her hair and three to the opposite corner to create balance.
The butterfly was fussy cut from another scrap of designer paper and popped up on foam tape. To help the red make more sense in the piece, two lengths of red grosgrain ribbon were added under the chin and a few red rhinestones were added to the gears.
The lettering for "Follow Your Heart" is a mix of stickers. The ampersand is an Idea-ology Ransom Parts letter and the "Leave Ordinary Behind" comes from the TH Random Quotes stamp set. It was stamped with Versamark and embossed in black before being torn around and inked with Black Soot Distress ink.
Thanks for hopping by today. To continue the hop, visit Kim Schofield's blog and see her fabulous make. Remember to leave a comment on each blog for a chance to win. Tune in again tomorrow for part 2 of this fun blog hop from eclectic Paperie and Add a Little Dazzle.
Life is good; so is art.
Bonnie
Bonnie
Here are the links for the Day 1 hop:
Monica Weaverwww.addalittledazzle.com
Bonnie Irvine - http://www.artfuldigits.blogspot.com/ (ME)Kim Schofield – http://paperiepetals.blogspot.com
Martha Lucia Gomez- www.stampartpapel.com
Sherry Cheever - http://sherrycheever.blogs.splitcoaststampers.com/
Sue Lelli - http://suelelli.blogspot.com/
Toni Burrows - http://craftdabbler-toni.blogspot.com/
Adriana Templeton - http://www.scrappygoddess.blogspot.com/
Sue Lelli - http://suelelli.blogspot.com/
Toni Burrows - http://craftdabbler-toni.blogspot.com/
Adriana Templeton - http://www.scrappygoddess.blogspot.com/
Thursday, May 15, 2014
The East Wind Challenge #7 ~ Bride of May Altered Canvas
Hi everyone! We are beginning a new challenge at The East Wind today and the theme is Bride of May. I don't think I have ever done a wedding themed project before so this was certainly something unusual for me...and definitely fun.
I chose to play with the Flowery Bride image and a flat canvas for this challenge. I love the folds of her dress, her sweet hair with all of the flowers, and those big eyes. I coloured her with Prismacolor pencils and fussy cut her leaving a narrow white border to allow her to stand out against the black background. Foam tape was added to her back to increase dimension.
There are three papers layered onto the background. Both the black printed paper and the gray scrolly paper hidden behind the flowers and lace are from a very old black and white pad whose name has gone missing. The vintage music paper sandwiched between the gray and black ones is a thrift store find whose edges were darkened with Vintage Photo Distress ink. The black paper was fussy cut around the words to create a more interesting pattern. The same music paper was used to die cut the hearts and the oval for the sentiment which is a rub-on. Black brads affixed the sentiment oval to the black layer before it was adhered to the other layers. Two scroll flourishes, one light and one dark and also rub-ons, were transferred to the black and to the music papers.
A length of gorgeous lace was adhered across the top right corner to tie in with the wedding theme as well as the diagonal elements. Three paper flowers and three leaves were added to that same corner to repeat the colours of her bouquet and provide some balance for the image. Two black resin flowers were added to the cluster to provide contrast with the red and cream and pop a little black into the upper corner.
Three lengths of pearl tape were adhered to the opposite corner. Three rhinestones were glued to the top left corner (diamonds and weddings seem to go together) and another one dotted the i in kiss at the bottom right. Again, this emphasizes the diagonal lines in the design.
Thanks so much for visiting today. I always appreciate that you take the time to do that. When you get a minute, pop over to The East Wind blog to see the amazing Bride of May themed creations by the rest of my talented teamies. We would love it if you played along with us for Challenge #7!
I am entering this altered canvas in the following challenges:
The Paper Shelter ~ #158 Girly Girl
Paper Pretties ~ PWC310 Embellish
Inky Impressions ~ #159 Flower Power
Divas By Design ~ Anything But a Card (Altered Canvas)
Creative Moments ~ #12 Bingo (Flower/sentiment/more than 2 layers)
Crafting With Dragonflies ~ #26 Celebration
Time Out Challenges ~ #5 Time Flies, Love Lasts
Monday, December 16, 2013
Merry Christmas canvas ~ CYP Challenge193
We have a bit of a change of pace at Craft Your Passion Challenges this week. Our Challenge theme is Christmas ABC...Anything but a card. It could be a gift box, decoration, present for someone, whatever. It doesn't have to be a papercraft project either. Love that! Our fabulous sponsor this week is Whimsy Stamps but we were allowed to choose any image from our stash so I chose to play with a Norma J Burnell image from Sweet Pea Stamps. I love her images because they are so detailed and tangly...so fun to colour. This one is called Holly and Mistletoe. I coloured her and her friends with Prismacolor pencils and then fuusy cut her leaving a narrow white border. She was matted on brown cardstock and another narrow border was cut to help her stand out from the background. The vibrant colours on the image next to the neutrals on the canvas make me happy.
I applied Nougat and Mocha Mousse Fresco paints to the 5 x 7" canvas with a piece of Cut n Dry foam to get a blended effect. Once that was dry, I tapped more Mocha Mousse through the TCW Spinning Tops stencil. Nougat was pounced on using a stencil brush and TCW's Mini Punchinella stencil. The same stencil was used to apply both colours as a brush mix. The word Peace is a stamp from my stash...I can't remember the maker. I used Chestnut Roan Chalk Ink to apply it randomly to the background.
Once Holly and friends were adhered to the canvas, a scrap of frayed burlap was glued to the bottom right corner to blend the image into the background. A piece of trim was stapled over the top of the burlap and both were scuffed with the Chestnut Roan ink. An Artisan Flower from pink paislee was adhered onto the burlap and two Christmas tickets from Vectoria Designs were tucked into the grouping. To create some balance another burlap scrap was adhered to the top left of the canvas and a TH corner piece was placed over that.
Snowflakes were cut from kraft paper which I had used to clean off a white sprayed stencil. It gave a fun texture and pattern to the flakes. The larger punch is Recollections and the smaller is Martha Stewart. Both had Chestnut Roan applied to the edges for contrast and grunge. A large white snowflake was added to the bigger of the two sizes and white threaded buttons were added to the smaller flakes. A sparkly snowflake button with the shank removed was popped up on foam dots and added near the smaller flakes. The final touches were the doodling done with a sepia Micron pen and the edging of the canvas which was done with the Chestnut Roan ink.
That completes my little Christmas Anything But a Card project. Thank you so much for dropping by today to meet Holly and Mistletoe. I truly appreciate your visits and wonderful comments. If you get a chance, pop by the Craft Your Passion Challenges blog to see the fabulous creations from the rest of our talented team. I hope you will join us for this challenge. After this one we are taking a week's holiday so we'll see you again on December 30. If you celebrate Christmas, I hope you have a lovely one!
I am entering this project in the following challenges:
Allsorts ~ #237 Snowflakes
Di's Digi Designs ~ Non-Traditional Christmas Colours
Catch the Bug ~ Favourite Christmas Song (Let there be peace on earth)
Brown Sugar ~ #72 Christmas
613 Avenue Create ~ # 50 Anything Goes
Left Of Center Creative Challenges ~ #20 LOC Winter or Holidays
QKR Stampede ~ #68 Three favourite embellies (burlap, buttons, ephemera)
Sweet Pea Stampers ~ It's Cold Outside
One Sweet Challenge ~ A Gift in Itself
Life is good; so is art.
Bonnie
Thursday, November 14, 2013
Dare
A little while ago, I bought a bunch of 4" x 4" x 1.5" canvases for a swap I was participating in. I bought extras because it's a great chunky shape and size. I decided to play with one for today's post. I started by scribbling various yellows of Neocolor II crayon over the entire canvas. The colour was spread and blended using a wet brush. Once dry, gelatos and Big Brush pens in the yellow and orange tones were added to deepen the colour in places, particularly around the edges of the front and sides.
White gesso was applied to the background through TCW's Halftone Borders and Well Rounded stencils. Jet Black Archival ink was used to stamp a TH script stamp by rolling it onto the background for an incomplete impression. Another TH splatter stamp was used to add random dots with the same Archival ink. It's important to use Archival ink which won't smear if more wet layers get added. Since my designs evolve intuitively (without planning or sometimes even thinking :D), I never know when I might add another liquid layer so it's best to be prepared rather than be limited or disappointed...been there!
The sun face comes from an Alpha Stamps collage sheet and the two black matted layers were fussy cut from gold coloured designer paper and inked with Worn Lipstick Distress ink. White gel pen dots were added to the top layer of rays. Each layer of the sun was popped up on foam tape for dimension. Inktense pencil was used to outline the sun and was activated with a waterbrush.
The Dare lettering is Idea-ology Alpha Tiles which were adhered to the canvas with Glossy Accents. More Glossy Accents adhered the cheesecloth cloud and the Idea-ology metal bird to the sky. Black and white striped washi tape was layered over a strip of white paper to make it opaque. This was adhered around the canvas with Scor tape. Black gesso rings were added to the edges with a bottle lid as a stamping tool.
My thought behind this piece was that sometimes one must dare to fly close to the sun in order to fulfill the dreams she has. It's worth the risk to gain the brilliance and warmth in life. When I started the piece, all I knew was that I wanted to use yellow...lol. Funny how things evolve.
Thanks for joining me on this creative venture today. I appreciate your time, your interest, and your support. You are awesome! I hope that some of the sunshine from this canvas spills into your life.
Life is good; so is art.
Bonnie
The following linked up products found in the eclectic Paperie store were used in this project:
Saturday, October 19, 2013
Sneakety peek of my ep post
It's my turn to post on the eclectic Paperie blog today so I created a canvas featuring the Susan K. Weckesser stamp, Happy Homestead. I love this house stamp. I had a good old play with all things messy...and had the hands and work table to show for it! Follow this link to see the results. Hope to see you there.
Life is good; so is art.
Bonnie
Sunday, September 29, 2013
Happy Fall Y'all ~ Eclectic Ellapu Sketch Challenge
I don't normally follow sketches when I make a project...not because I don't like them. There are some amazing sketches out there that I'd love to follow. I just find it difficult to work that way because for me it seems backwards to my normal process. Lately, I have been trying to learn how to work from the finished concept to the finished piece instead of just letting it evolve without a plan so I was delighted to learn that Jacki, our wonderful host for this week's Purple Team challenge at Eclectic Ellapu, had chosen to make it a sketch challenge. Here's the sketch she has chosen for us to follow:
Instead of a card. I began with a 5" x 7" canvas board, Using a black on cream text paper for the center panel and cream on black text for the torn side panels, both from DCWV's The Timeless Type Stack, the entire canvas face was covered using Matte Medium as the adhesive. The medium was also spread over the top of the adhered paper to create a good bond. A band of Graphic 45's Olde Curiosity Shoppe paper was glued horizontally across the middle. Another scrap of kraft coloured text paper was cut into a rectangle and placed at an angle over the center piece. A chunk of manilla tag was inked around with Black Soot Distress ink and layered over the kraft coloured text, both to follow the sketch and to allow the focal image to stand out.
This sweet little scarecrow is a Rick St. Dennis digi called It's All About Balance. I just love his facial expression and the detail that Rick always captures in his images. Sammy the scarecrow was coloured with Prismacolor pencils and then fussy cut before being adhered center stage as befits a scarecrow of his obvious talent and good looks :) He makes me smile.
Thanks for popping by today to meet Sammy and hang out with me. I always appreciate your good company. When you get a minute, pop over to the Eclectic Ellapu Challenge Blog to see how the rest of my wonderful Purple Teamies interpreted Jacki's sketch. It's always so fun to see how different the results are when we all start from the same place. I'd love to see your take on this, too, so join us if you can.
Check out the massive Treasure Hunt starting October 1 on the Eclectic Ellapu blog. Details are over there...it's going to be fun!
I am entering this little fellow in the following challenges:
2 Sisters ~ #163 Anything Goes
Di's Digis Designs ~ Colouring Skills
Simply Create Too ~ #47 Fall/Autumn
Designed to Color ~ #20 Anything Goes
House of Gilli ~ #54 Anything Goes/ Fall
Life is good; so is art.
Bonnie
Friday, September 13, 2013
eclectic Paperie & PaperHaus team up to celebrate
Well, we have been excited about today for a while now and it's finally here. PaperHaus, a wonderful online magazine, has invited its advertisers to be part of their year anniversary celebrations. That means that many of the eclectic Paperie design team will be posting projects on the eP blog all at the same time. That's a rare and exciting event plus we have the added bonus of being linked up at the PaperHaus anniversary post. And as if that isn't enough, the theme is Autumn which is my favourite time of year.
I started out with an 8x10" canvas to which I adhered two torn stripes of corrugated cardboard from an old box. These were placed at the top and bottom of the canvas after the corrugation was exposed. The middle area between the cardboard was layered with pieces of the paper torn off to expose the corrugation. It was adhered with Matte medium. White gesso was dry brushed across the top or hills of the corrugated paper, heavier in some places than others.
The face is Wendy Vecchi's Queen of Art stamp which was applied to white cardstock using Ranger black Archival ink. Colouring was done using layers of Prismacolor pencil, a little black Micron pen, and some white paint pen and then the face was cut out. The edges were inked with black Big Brush pen to get rid of the white edges and frame her face more dramatically. She was glued to the canvas using foam dots in the center of her face where it overlapped the area without the cardboard.
Now, the leaves...hmmm. I began by printing a maple leaf outline many times on white cardstock using two different sizes of the image. Then I sprayed the opposite side to the printed ones with Dylusions Ink Sprays: Postbox Red, Melted Chocolate, Squeezed Orange. Lemon Zest, and Fresh Lime plus lots of sprayed water. Once the pages were dry, I began to fussy cut until I had all 48 of them cut out. I know...I'm crazy but I had this picture in my head and I wanted to see if it would work IRL. The edges of the leaves were then inked with Distress inks :Vintage Photo and Barn Red. Then I just started adhering them around her face overlapping close to it and spreading out as they were getting farther away. The ones in the gully between the two pieces of corrugate were popped up with foam dots.
The partial quote "For everything there is a season" was done in two fonts. The top two words were letter stickers placed on heavy kraft cardstock which was then torn and inked around with Vintage Photo DI.
The lettering at the bottom is Idea-ology AlphaParts Ransom. White paint pen was used to dot each letter. The clock and the chipboard flourish are from Bo Bunny's Timepiece chipboard collection. The flourish was embellished with three brad tops adhered with foam dots. The last finishing touch was to ink the four outside edges using a Walnut Brown Big Brush pen right over the cardboard and the torn paper to frame the mixed media project.
Thanks so much for stopping by today. I'm so glad you did that. If you get a chance, pop over to the eclectic Paperie blog to see the amazing makes created by the rest of my talented team mates. And if you happen to drop by the PaperHaus blog be sure and wish them a Happy Anniversary and continued success.
Life is good; so is art.
Bonnie
Here are links for some of the products I used that can be found in the eclectic Paperie store:
Subscribe to:
Posts (Atom)