Showing posts with label cards. Show all posts
Tuesday, February 11, 2020
Love is all you need card ~ inspired by a Vera Lane Studio image
Hi everyone! I just couldn't let the week slip by without sharing at least one Valentine card since Friday marks the day. I love this image from Vera Lane Studio called All Heart which is an older image available from Janet upon request. She is quirky and whimsical...and fun to colour!
I coloured Dotty with a mix of Prismacolor and Polychromos pencils, fussy cutting her leaving a narrow white border. She was then matted with black and fussy cut again leaving a narrow black border which helps her contrast with the busy background. Foam tape was used to pop her up and add a natural shadow. White chalk paint was used to add her dress dots with a stylus.
The background for the card was kept simple. The Checkerboard Doodle background stamp from Whimsy Stamps was applied to white cardstock using Wilted Violet Distress Oxide. The same ink was used to add a script stamp from Indigo Blu as well as darkening the edges of the background. hearts were die cut from watercolour paper and washes of colour were applied using Candied Apple Distress Oxide plus water. Once that was dry, full strength Candied Apple was used to add stamping to each heart which was then matted with black cardstock.
A clear sticker was applied to white cardstock, fussy cut and matted with black, before a puffy heart was added in place of the one on the sticker. Faux stitching was added to the outside edges of the background before it was matted with black cardstock to frame it. Dotty washi tape was used to ground the image and the background was adhered to the white card base to finish it.
Thanks for stopping by today. Dotty and I wish you a wonderful week and a Happy Valentine's Day.
If you are shopping for ideas for this or any other (non) occasion, be sure to check out the amazing array of images in the Vera Lane Studio shop. We would also welcome you with open arms in the Vera Lane Studio Facebook group. Both are awesome places to hang out.
Life is good; so is art.
Bonnie
Tuesday, December 24, 2019
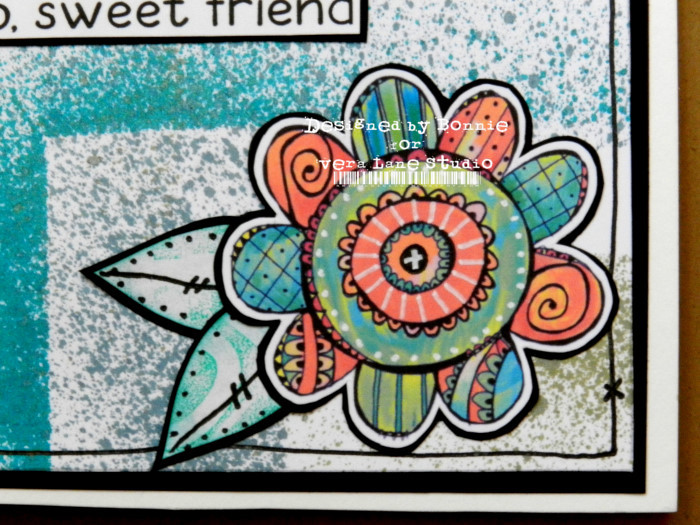
Hello, sweet friend card ~ inspired by a Vera Lane Studio collage sheet
Hi everyone! My second DT project today for Vera lane Studio is a quick and easy "thinking of you" type of card. This would make an adorable gift if you made a set of them. They would also be wonderful to have on hand when you want to send a little note to a friend. The card features one of the fabulous pre-coloured images from the Doodle Flower Stamp and Collage Sheet. If the colour palettes don't fit what you are creating, there is an uncoloured digi in the set for you to colour as you wish. Love that!
I fussy cut one of the pre-coloured flowers, leaving a white border, and matting it with black. I added a few extra white details with a Posca pen both because I like to add my own voice and to help pick up the white spaces left in the background. I also cut out two leaves from a scrap of gel printed paper, matting them with black and adding black doodles to tie in with the flower.
The background was simply a rectangle cut from a paper I had used to catch the over-spray from Lindy's Starburst sprays. I chose the section I wanted, cut it to fit the black mat, and doodled a simple border around the outside edge. The sentiment was printed onto white cardstock and matted with black to frame it. I love the results and how quickly the card came together.
Thanks for stopping by today. I appreciate that, especially during such a busy time of year. When you get a bit of a break, be sure to stop by the Vera Lane Studio Etsy shop and the Vera Lane Studio Facebook group to catch up and gather some inspiration for crafting when life settles into its quiter routine again.
Life is good; so is art.
Bonnie
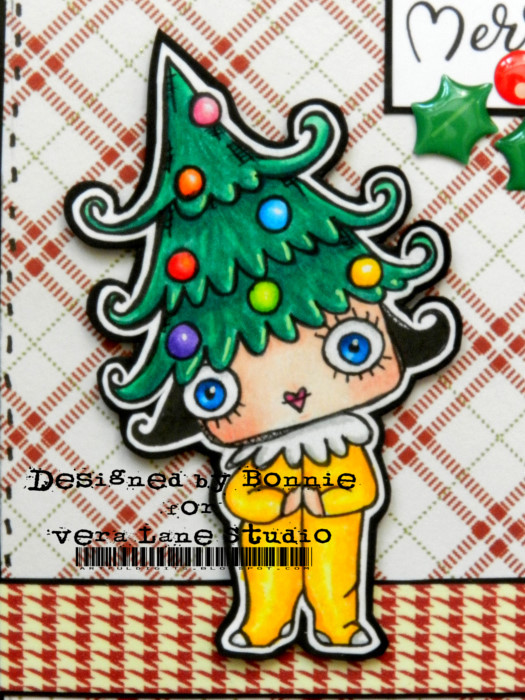
So Very Merry card ~ inspired by a Vera Lane Studio image
Hi everyone! I am posting my very last Christmas card for 2019 today. It's a little one (only 3.5 x 4.5 inches) just big enough to accommodate the sweet little image called Treena by Vera Lane Studio. She is one of two images plus a sentiment from the set. She is so cute I want to hug her!
Treena was coloured with Prismacolor and Polychromos pencils, fussy cut leaving a narrow white border, and then matted with black cardstock to give that second narrow border. She was popped up on foam tape to create dimension and shadow.
The background was a rectangle of plaid paper matted with black cardstock. A strip of washi tape was used to ground her and faux stitching created a border using black pen. The sentiment from the digi set was printed onto white cardstock, matted with black. Once it was adhered to the top right corner, two enamel holly stickers and a berry were added, overlapping the sentiment and the plaid background.
What a sweet and simple card to create! Thanks for joining Treena and me today. We both want to wish you a Merry Christmas or a happy holiday depending upon what you celebrate. Be sure to pop by the Vera Lane Studio Etsy shop and the VLS Facebook group when you get a minute. There is a lot of inspiration and more than a few must-haves to discover :)
Life is good; so is art.
Bonnie
Tuesday, December 17, 2019
Dear Winter...~ inspired by a Vera Lane Studio image
Hi everyone! For my first DT project today, I decided to create a postcard featuring some designer paper and one of the sweet It's Fall, Y'all images by Vera Lane Studio. I love how bundled up she is and her expression seemed to suit the letter I imagined her writing. This postcard could easily be attached to a card base to use it in another way.
I coloured Acorngirl (that's her name!) with a mix of Polychromos and Prismacolor pencils, fussy cutting her to leave a narrow white border. She was then matted with black cardstock and fussy cut again leaving a narrow black border. Foam tape was used to pop her up and create a shadow. Glossy Accents was applied to her eyes to give them some shine.
The "sky" area was a rectangle of snowflake printed paper. To create the snowy ground, a strip of embossed white cardstock left from a previous project was adhered to black cardstock, and then to the base of the green background. The letter was printed onto white cardstock, edged with Coffee Archival Ink, and faux stitched. Once adhered to the background, it was outlined with black pen and skinny washi tape was adhered to opposite corners. Two sizes of snowflakes were punched from white cardstock, adhere around the page, and topped with Icicle Stickles to make them sparkle. Three little enamel dots and a doodled border finished the background before it was adhered to a black mat.
Thanks for joining Acorngirl and me today. I hope her letter doesn't make Winter mad. Trust me, you don't want to annoy Winter! LOL For more inspiration and to find some must-have images, stop by the Vera Lane Studio Etsy shop and the VLS Facebook group. There is so much fabulous choice and ideas galore!
Life is good; so is art.
Bonnie
Tuesday, December 03, 2019
Poor Rudolf ~ inspired by a Vera Lane Studio digi set
Hi everyone! I have a quick post sharing a fun Christmas card I made with one of the images from the Rudolf digi set by Vera Lane Studio. They are the cutest reindeer with 3 different poses and the loveliest big noses.
I coloured Rudolf with a mix of Prismacolor, Polychromos, and Caran D'ache pencils. He was then fussy cut, leaving a narrow white border. Once matted to black cardstock, Rudy was fussy cut a second time leaving a narrow black border. This helps him stand out against the plaid background. Rudy was popped up on foam tape to give him dimension.
The plaid paper was matted with black cardstock which was cut slightly smaller than the black so it framed the plaid. This was adhered to the white card base which added a white border to the black. Three enamel berries and two holly leaves were glued to the upper right corner.
The saying was printed onto white cardstock, cut into sections, and matted with black. The wording was then popped up on foam tape to create a natural shadow. To ground Rudolf, although he wants to remind you that he can fly, a piece of washi tape was adhered to white cardstock and glued between the wording and Rudy.
Thanks for popping by to visit with Rudy and me. I hope you get a chance to stop by the Vera Lane Studio Etsy shop and our VLS Facebook group. There's lots to see both places :)
Life is good; so is art.
Bonnie
Tuesday, November 19, 2019
Merry Kiss-mas card - inspired by a Vera Lane Studio image
Hi everyone! It's Tuesday and that means it's my turn to post my DT projects for Vera Lane Studio. My first project is a Christmas card starring the couple from the image released last Wednesday called The Kiss. The set also comes with a sweet cat who had another appointment and isn't on this card...LOL.
I coloured the images with Prismacolor and Polychromos pencils. They were fussy cut leaving a narrow white border, matted to black cardstock, and then fussy cut leaving a narrow black border. Foam tape was used to pop them up and create natural shadow.
The background was a rectangle of Christmas cardstock, with a narrow contrasting strip at the bottom to ground the two. This was matted with black cardstock so it would stand out from the white card base. The wording was printed onto white cardstock, matted with black, and popped up with foam tape. To finish the design, a pair of kissy lips were punched from red cardstock, and coloured with Prismacolor pencils. It was then matted with the same punched image cut from black and offset. The lips were then adhered to a circle punched from sparkly white cardstock, matted with black, and popped up on foam squares so it would be higher than the images and sentiment.
Thanks for joining us today. That was so nice of you. Be sure to stop by the Vera Lane Studio Etsy shop to check out The Kiss and all of the other fabulous image sets. And while you're out and about, pop by our Vera Lane Studio Facebook group where there is daily inspiration with projects from our design team and our wonderful group members. It's an awesome place to hang out!
Life is good; so is art.
Bonnie
Tuesday, November 12, 2019
Lil Houses Projects ~ inspired by Vera Lane Studio collage sheets
Hi everyone! Last week, Vera Lane Studio released two collage sheets called Lil Houses. Let me just say right off, that I could live in any one of these quite happily. They are so detailed and cute with all of the quirky details I love. These houses come pre-coloured and each sheet has a different size so they work beautifully for so many projects. I decided to create a set of 3 artist trading cards as well as a welcome card.
The background for the card was spritzed with Heidi Swapp Ocean Color Shine to give the sky some colour. The ground was cut using the shape of a Dylusions stamp plate as a guide for the curves. It was fussy cut and matted with black both top and bottom. The houses were cut from the smaller collage images, matted with black and adhered with foam tape to pop them up. The little paths leading from the houses were created with washi tape adhered to white cardstock.
The wording was printed onto white cardstock, matted with black. The tiny clouds were printed from the Keep the Light image set onto French text paper, fussy cut, and matted with black. To finish the card, a faux stitched border was added to the outside to frame it.
The three atcs were constructed using the larger Lil Houses images. They were each fussy cut leaving a narrow white border, and matted with black. Foam tape was used to pop them up.
The backgrounds were cut from scraps left from other projects with a little additional stamping and stencilling to make them more interesting. The black and white washi tape was added to each one, varying the placement or the depth. The two houses with chimneys were given "smoke" details and the other one was given photo corners.
All three were finished with some black doodling around the edges as well as black Big Brush Pen to unite the background layers so they read as one. Small Chit Chat stickers matted with black cardstock provide the wording for each one.
Thanks for dropping by today to visit our neighbourhoods. That was awesome of you. When you get a chance, be sure to pop by the Vera Lane Studio Etsy shop to check out the Lil Houses collage sheets, as well as the other fabulous ones. They sure do make for quick and easy projects that are as cute as a button. Stop by the VLS Facebook group, too. We would love to see you there and there is a Stripes Challenge going on this month which I would be delighted if you joined.
Life is good; so is art.
Bonnie
Tuesday, October 22, 2019
A sweet little witch card ~ inspired by a Vera Lane Studio image
Hi everyone! Have you ever seen a cuter witch that this one from the Wee Witches digi set by Vera Lane Studio? I absolutely had to colour her and have her star on a Halloween card. She makes me smile and that's always a good thing.
I coloured Wee Hattie with Prismacolor and Polychromos pencils and fussy cut her leaving a narrow white border. She was then matted with black cardstock, and fussy cut a second time leaving a narrow black border. Foam tape was attached to the back of her to pop her up and add a natural shadow.
The base of the card is white and a black mat was cut from dotty embossed cardstock. A rectangle of orange patterned paper was cut to fit inside the black mat with a strip of the reverse side, a green stripe, peeking out the right side. To ground Hattie, a torn piece of plaid patterned paper was matted with black and placed along the bottom edge of the orange layer. A strip of Halloween washi tape adhered to white cardstock was placed where Hattie would stand.
The saying was printed onto white cardstock, matted with black, then purple, then black again. It was popped up on foam tape like Hattie was. She was surrounded by three die cut bats cut from black cardstock. A simple black border drawn with a ruler framed the card to complete the project.
Thanks for joining Hattie and me today. We love when you do that! Be sure to pop by the Vera Lane Studio Etsy shop to see Hattie's sister, Hettie, and all their other Halloween friends. Our Facebook group is also a lovely place to hang out and be inspired! Hope to see you there!
Life is good; so is art.
Bonnie
Tuesday, September 24, 2019
Happy Bouquet Card and Morty's Halloween AJ Page - inspired by Vera Lane Studio Images
Hi everyone! I have two projects using Vera Lane Studio images to share with you today. The art journal page, the first page in my new VLS art journal, stars the image from Morty's Halloween as well as one of the bats from one of the Halloween Collage sheets.
The image was coloured with Prismacolor and Polychromos pencils, fussy cut leaving a narrow white border, and matted with black. The collage sheet bat was fussy cut and matted in the same way as the other image. The punched stars were also matted with black to help them stand out against the background.
The 6x6 inch watercolour paper was spritzed with Lindy's Hag's Wart Orange Starburst spray. Tiger Lily Archival Ink was sponged through Colorbox Swirl Dot stencil to add pattern. Jet Black Archival Ink was applied to an Ellen Hutson Bokeh stamp and a VLV Cross Square background stamp to add even more pattern.
To give Morty and his cat a place to stand, torn strips of Halloween themed patterned paper were layered over torn strips of black cardstock to form a base. A heavy black border dotted with white paint pen was added to the four sides of the page to frame it and keep the eye on the page. Orange Inktense pencil activated with a water brush was used to shade inside of the border.
The second project, a CAS style card, was created with images put together from the Mix N Match Vases set. This is a fabulous set because it is so flexible and can be combined in so many ways, as well as the pieces being used individually.
The images were coloured with Prismacolor and Poychromos pencils and fussy cut/matted the same as Morty's crew.
The background of the card was embossed with a Carabelle Studio folder and then matted with black. The flowers were adhered to the back of the vase and then it was popped up on foam tape. Black and white washi tape was used to ground the vase.
Thanks for stopping by today. We appreciate that. To see more examples of the Mix N Match Vases set in action, be sure to pop by the Vera Lane Studio Facebook group. You can find this set, the fabulous Morty, and a whole whack of other awesome images in the Vera Lane Studio Etsy shop.
Life is good; so is art.
Bonnie
Tuesday, June 25, 2019
Give Peas a Chance...inspired by a Vera Lane Studio image
Hi everyone. This month in the Vera Lane Studio Facebook group, we made ATCs following a Beatles theme for our monthly swap. I like to make a card for my swap partner so I can include a little note. This time, I followed the same Beatles theme, only I modified the lyrics slightly to suit the Snap Peas image I chose...just a bit of fun!
I coloured the two Snap Peas images with Prismacolor and Polychromos pencils, fussy cut leaving a white border, and then matted with black cardstock. The wording was printed onto white cardstock, cut into sections, and matted with black as well. Both the peas and the wording were popped up on foam tape.
The background was a piece of white cardstock which had been used to clean the Linsy's Starburst spray off of a stencil. Why waste all that yummy ink?It was stamped using an Indigio Blu Tasty Textures stamp with Sunflower Archival Ink. The same ink was applied to the edges of the card front. A border with hearts was doodled around the outside edges and Jet Black Archival was used to stamp Bokeh Circles with an Ellen Hutson stamp. To bring a little of the pink from her dress into the background, small circles were punched from pink mop-up paper, shaded and highlighted with coloured pencils, and edged with black Pitt Pen. These were scattered across the card front which was then matted with black, and popped onto a cream card base.
Thanks for joining the Snap Peas and me today. When you get a minute, be sure to pop by the Vera Lane Studio shop to see the huge array of fabulous images to colour as well as the pre-coloured collage sheets. There's sure to be something to spark your mojo and calls to you :)
Life is good; so is art.
Bonnie
Saturday, June 01, 2019
Pretty Ladies Projects - Inspired by a Vera lane Studio collage sheet
Hi everyone! I am so excited. This is my first official post as a member of the Vera Lane Studio Design Team. I have long been a fan both of Janet's wonderful images and also of her creative team who have provided me with inspiration galore, encouragement aplenty, and from whom I have learned a ton. I am both delighted and incredibly honoured to have been asked to join them! Speaking of inspiration, have you seen the new Pretty Ladies Collage Sheet in the Vera Lane Studio Etsy shop? Oh my word, it's gorgeous and so versatile. Not only are there various sizes of the pretty lady but also various colourways, plus there are bits of border to act like washi, and sweet words, as well. I created three quick and easy projects to show just a few ways they can be used but the mind boggles with the possibilities!
The first creation I made was a notecard. I used a 3 5/8 x 4 3/4 inch rectangle of designer paper, matted with black cardstock as my background. Texture was added by applying French Ultramarine Archival Ink to Crafty Individuals Script stamp, Studio Light grid stamp, and Indigo Blu Tasty Textures dotty stamp, adding them to the background in several places. Ranger Texture Paste was scraped through TCW Punchinella stencil. The paste was brightened with white Posca Pen once dry and shaded next to using Inktense pencil and a waterbrush. The pretty lady was fussy cut leaving a narrow border, matted with black, and fussy cut leaving a narrow black border. She was then popped up on foam tape and grounded with two of the border strips added to cream cardstock. The Hello word was also matted with black and cream and adhered with foam tape. The final details before adding the background to a cream card base were a doodled border and a puffy triangle sticker.
The second project featuring another Pretty Lady from the collage sheet is a 6 x 2 inch bookmark. The base is a double layer of kraft cardstock which was edged with Coffee Archival Ink and a doodled faux stitching border. A left over scrap of gel printed, stamped, and Texture Paste background from a previous project was adhered to the left side with a piece of a small doily peeking out from its right side Both of these were outlined with black pen to help them stand out. The Pretty Lady collage image was fussy cut leaving a narrow border, matted with black, and trimmed out again leaving a narrow black border. To ground her, a length of the dashed border from the collage sheet was adhered beneath her feet along with a left over scrap of punched scalloped border. The other section of this same border was added to the top of the gel printed piece to repeat the element. White dots were added to both borders. The wording was printed onto white cardstock, cut into sections, and matted with black. A small puffy star was added to the top right corner and black Big Brush pen darkened the edges.
The third and final project I created using one of the Pretty Ladies from the VLS collage sheet was a tag which could easily be a card focal. The kraft cardstock base was one already in my stash and cut with a Spellbinders Office Supply die. It was patterned using Inkylicious Rye Grass stamp and Coffee Archival in a couple of layers varying the intensity of colour to create depth. The other piece of the doily used previously was adhered to the same blue patterned paper as I used in the card front, and then trimmed out. The asterisk stars were stamped on the solid circles of the doily and the center was doodled with black pen. The mounted doily was then adhered to the left side of the kraft die cut. One of the 3 1/4 inch pretty ladies was fussy cut and matted in the same way described above, and popped up on foam tape. She was grounded with one of the striped borders from the collage sheet which was then outlined with black pen. The word hope has fussy cut and the loops of the scallops were doodled with black pen before it was adhered beside her and outlined to help it stand out. A simple partial border was doodled on the right side of the tag before it was adhered to the black background. Green seam binding was used for the topper.
Thanks for joining the Pretty Ladies and me today. I still have many of the collage sheet images left so I'm thinking of creating a few more of the cards to give as a set of five for a little gift for a friend. They are so quick to create and I know she'll just love them. To check out the other fabulous collage sheets and the plethora of fabulous images by Janet Klein, be sure to pop by the Vera Lane Studio Etsy shop. I always come away with a bunch of new ideas and several must-haves :) For even more inspiration, check out the VLS Facebook group where there is always something new and drool-worthy.
Life is good; so is art.
Bonnie
Sunday, April 21, 2019
Take that ~ inspired by the Vera Lane Studio swap
Hi everyone! In an earlier post, I shared the two ATCs I made for the Off With Their Heads Swap at Vera Lane Studio Facebook group. I always like to create a card to go with the theme so I can write a little note for my partner. The idea with this theme is to take the head from one image and combine it with a body from another image. I love this...it's so fun and never fails to make me laugh. This time I chose to pair the head of a goat from Vera Lane Studio Farm Animals Set 2 with the body from one of The Foxes. The fox was holding an acorn but I wanted the merged guy to hold a cupcake so I took one from Caroline's Cupcakes.
I coloured the three parts for the merged image with Prismacolor and Polychromos pencils, cut the head and the body, leaving a narrow white border, and glued them together. Before matting him with black cardstock and trimming him out again, I used an Exacto blade to slice around his hand so that I could tuck the cupcake behind it in a more natural way. Foam tape was adhered to the back of him to pop him up when attached to the background.
The background was a gel printed rectangle covered with acrylic paint and the design from a piece of plastic mesh. Stencilling was added with Jet Black Archival Ink and AALL & Create Lotza Dotz template. Stamping was added with the same ink and a Viva Las Vegas stitching stamp.
To ground my friend, striped washi tape adhered to a strip of white cardstock layered over a torn strip of black was added to the bottom of the background. A black pen was used to doodle a border around the card front and two epoxy dots were added to the top left corner. The wording is two Big Chat Stickers with black backgrounds. The entire front was matted with black cardstock before it was adhered to the white card base.
Thanks for visiting today. My little friend and I appreciate that. It's not too late to play along in this fun ATC swap so hop on over to the VLS Facebook group to check out the details and gain some inspiration from the ATCs already completed and placed in the album. They are awesome!
Life is good; so is art.
Bonnie
Tuesday, February 26, 2019
Cake Happens ~ Inspired by a Vera Lane Studio image
Hi everyone! Today I am sharing a quick card created with a Vera Lane Studio image called Happy who is part of the Housewives set. All 4 of the images have a quirky headpiece/hat which makes them ideal for so many occasions. Happy, in particular, seemed to suit the celebrate theme for the February swap.
I coloured Happy with Prismacolor and Polychromos pencils, then fussy cut her leaving a narrow white border. She was matted with black cardstock and fussy cut again leaving a narrow black border, and then popped up on foam tape.
The card background started life as a gel print using Liquitex Light Blue Permanent, Bright Yellow Green, and Bright Aqua Green plus an extra layer of white applied to the plate through a checked stencil. It was trimmed to just under 4 x 6 inch rectangle. Jet Black Archival ink was used to apply a Carabelle Studio star stamp as well as an Ellen Hutson Bokeh stamp. Ranger Texture Paste was scraped through a Studio Light stencil (MB06) in several places. Black Big Brush Pen was used to darken the edges of the background. To ground Happy so she didn't float away, two different widths of washi tape were cut into fishtail flags. Another pair were adhered to the upper left corner.
The sentiment was printed onto white cardstock, cut into sections, and matted with black. The sections were popped up with foam tape. The background was matted with black cardstock and adhered to the white card base. Three enamel dots were placed on the top right corner of the background to help balance the design. Faux stitching was doodled around the outside edges of the card base to finish it off.
Thanks for joining Happy and me today. We appreciate your support. To check out other creative makes featuring Vera Lane Studio, be sure to pop by the Vera Lane Studio Facebook group. There is wonderful inspiration there daily. It's a great place to hang out!
Life is good; so is art.
Bonnie
Subscribe to:
Posts (Atom)