Showing posts with label tuck spots. Show all posts
Saturday, November 09, 2019
Collaged Bookmarks
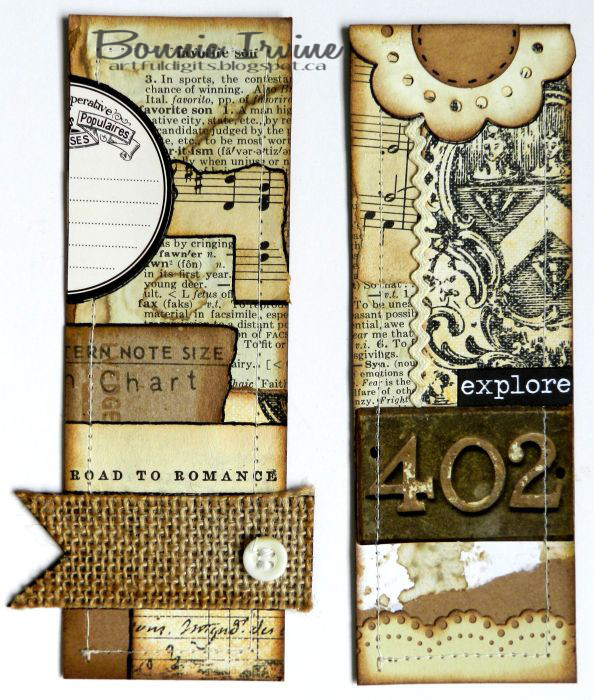
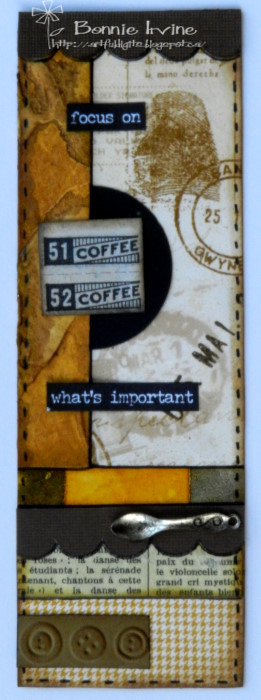
Hi everyone! Sometimes when I want to create but can't seem to settle on a particular project, I haul out my scraps and the 2 x 6 inch kraft bookmark blanks I cut and collage away. They make a great little gift, an idea for abandoned art, and are lots of fun to create. It's also something you can leave and go back to easily.
I layer up scraps of book and music paper, cardstock, corrugated coffee sleeve scraps, patterned paper, stamped bits or mop-up papers...anything I like. There are no rules.
I like to add punched or die cut bits, extra tags, metal clips, and fussy cut items like butterflies. I just audition things until I am pleased with the results. They also make great belly bands or tuck spots in junk journals.
For added texture, I layer in pieces of drywall mesh, Texture Paste added through stencils, tea dyed and crumpled pieces of paper, and lots of torn edges.
You can create your own wording and print it off but I often use Small Talk or Chit Chat Stickers. It's a great way to use them up without feeling that you are wasting them.
The edges are always darkened front and back with Coffee Archival Ink and black Big Brush Pen. Finer black Pitt pens are used to outline the sections and to add the faux stitching around the edges, again front and back. I think these would be sweet stocking stuffers or as a little table gift when you are entertaining. I donated over a hundred to my local library who sold them as a fund raiser. Win/win! I also donated hundreds to the Cancer Clinic when I was undergoing chemo to pass out to patients and family to brighten their day. There are so many ideas and I experienced joy in the making and joy in the giving!
Life is good; so is art.
Bonnie
Tuesday, May 15, 2018
Partial Tag Tuck Spots
Hi everyone. I am always looking for new ideas to create embellies for junk journals and art journal pages, especially ones that use items up from my stash. While browsing on Pinterest last week, I found one of those and I loved it so much the way it was, that I barely changed anything. It was originally on a blog belonging to Dorota Kopec, a very talented art journaller and artist. She is from Poland and her blog is certainly worth a good long look as she has wonderful ideas and creations. Her tags clusters were used on art journal pages but I thought they would make awesome tuck spots for junk journals as well.
I started by die cutting partial tags from both white and kraft cardstock. The white ones were 2 inches high and 2 inches wide. The kraft ones were 2.25 inches high by 2 inches wide. Both sets were inked around with Coffee Archival Ink and then Ground Espresso Distress Ink to deepen the edging. They were stamped with a variety of stamps using the same Coffee Archival Ink. Mainly writing or numbers stamps were used on the white tags and images or collage stamps were used on the kraft ones.
White reinforcements were punched to surround the holes on the kraft tags and kraft ones created for the white tags. The tags were topped with very fine hemp and then overlapped different amounts and with either the kraft tag on top or with the white one there. I wanted to change them up a little.
I created a few different embellishments for the tag clusters but before I adhered them, I had to decide the orientation on the page for each one. They would either be adhered along the bottom of the page or on either side. The one above would be adhered along the bottom edge of the tag cluster to allow something to tuck underneath with the tags holding it in place.
The one above would be adhered to the left side of a page. For the black and white heart embellie, I stamped the heart from one of Carabelle Studio Hearts & Pebbles stamp set onto white cardstock with Jet Black Archival Ink, fussy cut it, and inked the edges with Coffee Archival. Then the edge of each heart was inked with Black Big Brush Pen to help frame it. A small threaded vintage button was added over that and a scrap of cheesecloth was layered underneath the heart.
Similar steps were taken using a thread label stamp and also a die cut primitive heart. I also did a few using a tiny crocheted doily topped with a corrugated cardboard punched star. or a vintage white button. I think they all turned out really sweet and can see how they could be further adapted depending upon the tag paper and embellishments used. A big shout-out to Dorota Kopec for the wonderful idea!
Thanks for stopping by today. That was awesome of you :)
Life is good; so is art.
Bonnie
Sunday, May 06, 2018
Quickie Book Text Belly Bands or Tuck Spots
Hi everyone. I was checking out some mixed media projects on Pinterest and came across one that gave me this idea. The problem was I didn't pin it and couldn't find it again to link it for you and give credit to the artist. I have a lot of round punches as well as circle die cuts and decided to use them to create piles of book text circles. I also had some scraps left from corrugated coffee sleeves which were looking for a new purpose.
The 1.5 inch circles were inked around the edges with Coffee Archival. They were then overlapped and glued to a thin strip of cardstock, not meant to be visible from the front.. The corrugated sleeve was cut into .5 inch x 3.5 inch lengths and each was given a fishtail flag end. This was layered over the overlapped circles glued to the cardstock strip and then messy stitched on the sewing machine. Scraps of coffee dyed cheesecloth were layered under coffee dyed and inked mulberry flowers to finish this set.
The second set I created with a similar start except I glued five of the 1 inch circles to a cardstock strip. For the topper, I cut a just under .25 inch strip of black and white striped designer paper and stitched it horizontally across the overlapping circles. The ends of each strip were decorated with little buttons.
This particular book paper is quite thin so the cardstock behind and the striped cardstock sewn on top give this embellishment more strength.
I had two of the 1.5 inch circles left from the first set so I added one of the 1 inch circles and adhered the three to a strip of cardstock. I also had a 2.25 inch length of corrugated sleeve left over so I fishtailed the two ends, centered it over the three circles and stitched it all together. It could be a little tuck spot or simply an embellishment for a page or a mini notebook cover. The larger circles with three combined are 4 inches in length, the ones with 5 are 4.5 inches, and the last one with 2 large and 1 small circle is 3.25 inches long. I can see changing these up by varying the shapes, sizes, and papers used...lots of possibilities.
Thanks for visiting today. You know I appreciate that!
Life is good; so is art.
Bonnie
Friday, May 04, 2018
Tuck Spots, Belly Bands or maybe Bookmarks
Hi everyone. Recently I found a package of kraft cardstock 2 x 6 inch bookmarks in my craft cupboard. At some point, I was going to create bookmarks for everyone apparently...LOL. Anyway, looking at them with a junk journaller's eye, I realized that they would also make awesome tuck spots if you applied glue to the top and one side and placed it along one of the edges of your page. Similarly, some would make great belly bands where you adhered the two short ends across the middle of the page and can then slide something underneath the band which will hold it in place. I decided to collage some scraps and embellies and I can decide how I'll use them later.
I used designer paper, music paper and some with book text. I also pulled from my folder of left over embossed and punched or die cut scraps. If I've gone to all the trouble of embossing or die cutting, I tend not to throw away any of the scraps I haven't used. Actually, in the first photo, one of the pages looks rusty. That's because I used that particular piece of cardstock to dry my rusty safety pins and some of the rust and marks transferred to the paper. The four above I doodled faux stitching around the edges and to highlight the layers where they overlap.
The next batch had the background layering completed and then were stitched around using the sewing machine. A vintage button, TH ephemera flower and Big Chat sticker helped complete these two. The embossed paper is a scrap of Idea-ology Kraft Glassine which was embossed with a writing folder.
On the left tag above, you can see that I used another piece of the rusty cardstock used to dry my safety pins when removed from the solution. Can you spot the clear impression of the safety pin? I love that! There are also pieces of an inked doily, a little washi tape, and the holey edge of a shipping paper. The fussy cut butterfly was given a metal photo turn body.
On the left tag above, a burlap fishtail flag was added along with a vintage button (threaded of course :)) On the right one, a TH sticker and Chit Chat sticker were added to the bottom along with a punched border scrap. There's a little length of coffee dyed rick rack and a die cut flower topper. Dictionary paper, sheet music scraps, and designer paper are combined with little bits of the kraft background peeking through.
For the final "bookmark" in this set, I folded the bottom 1.5 inches of the rectangle up and lined it with another little piece of that rusty paper. Once I stitched around the edges, it created a little pocket which I filled with two tiny tags, shown below.
Thanks for dropping by today. I appreciate that you took the time to do that. It's always fun to share my latest creations and I love reading comments :)
Life is good; so is art.
Bonnie
Sunday, April 15, 2018
Fishtail Flag Tuck Spots
Hi everyone! A while ago I made those cute fishtail flag paperclips which everyone has seen by now. I love the fishtail shape and have seen these cute layered and overlapping junk journal tuck spots on Junk Journal Junkies, YouTube, and Pinterest although I can't give you any specific links. Anyway, I decided to try my hand at making some using designer papers as the base and then embellishing the heck out of them...'cuz that's what I do :) These will attach to the top of a page by either gluing or sewing the top of the flags to the page in the journal. That leaves the bottom free meaning I can tuck things under it and they will stay put.
I cut the flags using MFT Fishtail Flag Stax dies on pairs of coordinating papers. The flags were all cut at around 3.25 inches in length but the width varied depending upon which die I used. The edges of both flags were then inked with Coffee Archival Ink and one was adhered to the other one along the edge where they overlapped.
Bits of lace, scraps of vintage book paper, and elements from several TH ephemera packs were used to create the focal clusters bridging the two flags.
Buttons, tiny crocheted doilies, die cut tickets, and punched stars, hearts, and butterflies found their way onto these tuck spots. Even a rusty safety pin was used as a butterfly body.
Coffee dyed mulberry flowers, long neglected brads, and part of a paper doily helped the layers become interesting and add dimension.
Tim Holtz Chit Chat and Big Chat stickers also came into play to add a single word on some of the clusters. These were a lot of fun to play with and a great way to use up scraps and left overs. You certainly wouldn't need to use the dies. A simple template could be cut from cardstock to give you the fishtail shape and keep them uniform if that's a look you like.
Thanks for stopping by today. I'm so glad you did. I hope that if you make some of these tuck spots, that you'll tag me so I can see what you have done. I can never get too much inspiration :)
Life is good; so is art.
Bonnie
Subscribe to:
Posts (Atom)