Showing posts with label tutorial. Show all posts

Tuesday, September 12, 2017

Sneak Peek of my LeighSBDesigns Tutorial Tuesday Post


Hi everyone! Today, it's my turn to host Tutorial Tuesday on LeighSBDesigns blog. Recently, Leigh created two amazing images for a contest on Markers! Papers! Digis! Facebook group: one a colouring page and another a single image. Both featured these amazing Tangled Maple Leaves and being a proud Canadian I just couldn't resist using the single image, Tangled Maple Leaf, for my project today.

Above is a sneak peek of my art journal page where I used the leaf image in three different ways. Pop over to the LeighSBDesigns blog to see the full tutorial and step out photos showing my process. When you get a minute, stop by Leigh's Etsy shop as well. You can see her other unique and inspiring designs...and just wait until Friday...oops, can't say more but stay tuned...LOL

Life is good; so is art.
Bonnie

Friday, September 30, 2016

Sneak Peek of my post on the Joggles blog


Hi everyone! It's my turn to post a project on the Joggles blog and this time I decided to use Strathmore's 6x6 bristol artist tiles as the substrate for some mixed media fun with the new Joggles/Bloobel rubber stamps. You know that I am smitten with all of Lisa's fabulous Bloobel images and the Joggles Cling Rubber Stamps are amazing quality so this idea was a win/win for me. I created 4 tiles but I'm only showing you one here. To see the rest and get the scoop on my step by step process, you'll have to head over to the Joggles blog. I know...I'm mean :)

Hope to see you there!
Life is good; so is art.
Bonnie

Friday, September 02, 2016

We're baaaackkkk! ~ Joggles DT Project Sneak Peek


Barb was kind enough to give the Joggles DT Team most of August off so people could enjoy their summers. Today is the first day back and I am one of the two team members (the other is Amy) who are posting a new project on the Joggles blog today. As soon as I saw this fabulous  6 x 7.5 x 4 inch Paper Mache Gingerbread House in the Joggles shop, it became a Must Have. I love houses of all sorts and you'll often see them cropping up both in my home decor and my art. Above is a Sneak Peek of the project which I have added to the Joggles blog featuring some of the new Joggles/Virginia England cling mounted rubber stamps and some collage sheet images. To see the tutorial showing my process for creating this, be sure to pop over there and have a look.

See you there!
Life is good; so is art.
Bonnie

Friday, July 22, 2016

Joggles DT Post ~ Sneak Peek


Hi everyone! It's my turn to post a DT project on the Joggles blog so I thought I would give you a sneak peek in a shameless attempt to get you to pop over there and check out the full project. I created an accordion book filled with layers of goodness and starring a sweet little Joggles bird stamp called Tweet Tweet. Besides wearing very quirky hats created from bits of other stamped images, all the birdies have messages for us which just might make you smile. Just sayin' ....

I had an absolute blast creating this project and would love to share more...oh that's right, I did...over on the Joggles blog. See you there!

Life is good; so is art.
Bonnie

Friday, April 15, 2016

Sneaky Peek - DT Post on the Joggles Blog


Taroo! Taroo! That's my Dr. Seuss type trumpet which I am blowing because today is the first Friday post for the Joggles Design Team and I was lucky enough to have the honour :) We have been working towards this for a while now and I am excited. To top it off, I was able to play with 7 of the new Joggles/Margaret Applin Cling Mounted Rubber Stamps and they are gorgeous. I love the designs which can be combined beautifully or used on their own just as well. The Joggles rubber stamps are excellent quality...deeply etched and they stamp the detail so easily and clearly.

As a matter of fact, I couldn't seem to stop at just one art journal page as you will see when you visit the Joggles blog. There is a full tutorial and step out photos for the project above and I've included a photo of the second art journal page just to show you more of these great designs. Love them!

Thanks for stopping by. See you over there at the Joggles blog!

Life is good; so is art.
Bonnie

Friday, March 25, 2016

Guest designing & Exciting Joggles news


Hi everyone. I am fortunate to be a guest designer again today on the Joggles blog and it's doubly exciting because I was able to work with some of the new Joggles/Bloobel cling mounted rubber stamps which the wonderfully talented Lisa Bloobel Graham has designed and Joggles has produced. The designs are fun and quirky and like all of Joggles stamps, they are of top notch quality. The lines are so fine, the detail very clear, and they stamp like a dream. Happy Dance!! I decide to create a masterboard background which I chopped into four separate projects: a journal page; tag; ATC; and card front. They are CUTE!! To see the full tutorial and step out photos, pop over to the Joggles blog where you can view my entire process. I am so excited that Bloobel Stamps and Joggles have teamed up!


And now for another exciting piece of news which I have been sitting on for a while...Joggles had a DT call a while ago and since I am a huge fan of Joggles products and customer service, as well as Barb and her awesome art, I applied. The team was chosen and I was invited to be a part of it. Actually, I am acting as the lead. SO EXCITED!! My teamies are a very talented group of people from all over the world and I'm thrilled to be creating with them. You can check out the team on the DT page on the blog.

Now pop over to my tutorial there (pretty please) so you can get a better look at the adorable stamped images (close ups) and how I played with them! Thanks for visiting today and for sharing in my exciting news.

Life is good; so is art.
Bonnie

Friday, February 12, 2016

Guest Post at Joggles blog ~ Man of Mystery ATB


Hi everyone! Woohoo! I am celebrating this week because today I am a guest on the Joggles blog...so excited! Now as I have said before, Joggles is my favourite online store and also a huge source of inspiration for me. I love Barb's weekly Wednesday YouTube videos where she demos new products or new ways to use products we already have. I also am enjoying and playing along with her weekly Art Journal Adventure projects posted each Monday. Soooo...I was thrilled to bits when she invited me to do a guest post. Happy Dance!


I decided to create a mixed media Artist Trading Block using Joggles Precut Mat Board - Artist Trading Block in the Extra Large size on which I featured Deep Red Stamps - Man of Mystery. This is the fourth ATB which I have made (love them) and I am smitten with this fun stamp. So smitten, in fact, that I stamped and colourized him six times...one for each side of the block.


The background was pure play and layer after layer of goodness from supplies I found at the Joggles shop. The picture above shows many of the products I used. If you are curious about my process, head over to the Joggles blog where I have posted a full tutorial with step-out photos detailing my process. I would love it if you visited there and left me a comment :)

Thanks so much for stopping by this blog today. Mystery Man and I are delighted you did. Hope we see you over on the Joggles blog, too! A huge thank you to Barb as well for this fabulous opportunity. I had a blast!

Life is good; so is art.
Bonnie


Thursday, April 09, 2015

Background Process Tutorial ~ Altered book of Ed

Very LONG post...Viewer Discretion is advised ...LOL
Hi all. A few people requested that I do a tutorial on the process I am using to create the backgrounds for my altered book about Ed using Rick St. Dennis' cat images. The easiest way to do that would be a video but since I haven't learned how to do that yet (it's on the list), I did step-out photos instead. Grab a beverage and a snack...there are tons of photos because there are lots of quick layers. Above is the finished page which follows the theme of the other pages. You can see them here and here.


 I began with a child's board book which I sanded and then coated with gesso. On this one I did two coats because the pictures were very bright and pigment dense. You can still see some of them peeking through but I like that because it's a head start on layering. I use washi tape down the center and go over the top and under it with gesso. It strengthens the bend and covers any cracking of the gesso.


Next I added colour. On this particular book, I decided to use Neocolor II watercolor crayons activated with water. I scribbled it on with few gaps because I wanted strong bright colours and lots of pigment (not watercoloury). You can see the three blues that I chose above the book (light, medium, dark).


I dried the layer with a heat gun and applied a second layer of crayon which I again activated with water in a brush. I kept the darkest colour on the outside, medium toward the center and lightest in the center. This photo was taken before I added the water to spread the the second coat. It will still be somewhat streaky after this but I like the texture that adds.


Next I added some tone on tone stamping with Cornflower Blue Archival ink and a TH text stamp, rolling the unmounted stamp onto the page. I don't use a block because I don't want any perfect impressions ... just background noise to break up the blue...another layer.


To add more variation in tones of blue as well as smooth some areas out, I added Blueberry Gelato around the edges and in a few places in the centers...usually 3 or 5 places plus the edges. I spread this with a dry finger to keep the colour more intense. Had I used a wet finger it would have blended out more. I wanted the contrast.


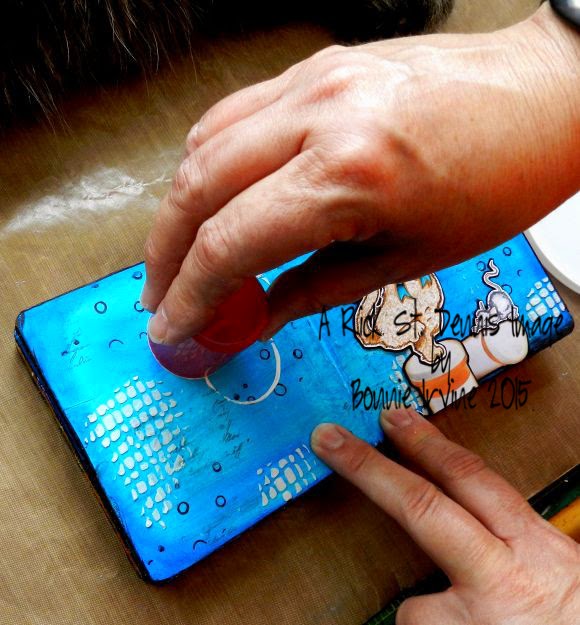
Here I am adding white embossing paste through TH's Burlap stencil using a palette knife. You can see below where I added it randomly, breaking the odd number rule :) This takes a little while to dry depending on how thick you layer it.


I always like my mixed media pieces to have a frame so I usually take a black Big brush pen and line the very edges. Then I come around the pages a second time angling the marker so that it shows on the face. I also make sure that I come onto the pages a little more in some spots to get the messy look I like. At this point the background is starting to develop into something interesting but we're not there yet.


Time for a little more background stamping, this time with Jet Black Archival ink and a bubbles stamp from Joggles. The black because it is darker than the background adds a stronger layer and pushes everything else back. Good contrast and it keeps the eye on the page instead of drifting off. In this photo you can also really see where I added the darker blue gelato earlier.


The background has a lot of texture and pattern here and there but it's time to tie it together which I have done with both white and black gesso rings. I use bottle lids or anything round and load them up with gesso which has been spritzed with a little water. This makes it create a more complete circle. I also give it a slight twist when I have placed the lid on the background. You can see by this photo that I have added the images, Bootsie and Fred, who are balancing on top of prescription bottle images (cuz Ed is Medi-cat-Ed).


Black and white circles in two sizes are done, Now it's time to add some torn paper. I could have used book paper or designer paper but I always keep a pile of atc size white cardstock papers on my desk to mop up over spray when I am using spray inks. The greeny-blue papers come from one of those mopper-uppers. Sometimes I punch them, die cut, stamp, or, in this case, just tear them. They break up the background and add...you guessed it ...another layer. I like the torn white against the deeper background. I outlined these bits with Big Brush pens in coordinating colours so the overlaps would show and they would contrast better with the background. These give the eye a place to rest from the busy background.


Almost there...are you still with me? Trust me...it takes way longer to photograph and write about it than to actually do it. This is where I look at the composition and see what details are missing. I added the letters using stickers. I had placed the torn papers with an eye to adding the letters on top so they would show up better. Once I added the Medi letters, it needed something to draw attention to that because my eye went to the word cat first because of the greater contrast. I added the faux prescription number on white cardstock under the word to attract the eye there first. The little clusters of pills added some fun detail and a pop of darker blue plus they tied the two pages together through repetition. To anchor the outside edges, create a diagonal sight line that takes the eye through the spread, and also better frame it, I added some black cardstock circles to the opposite corners. The last thing I did was use a black marker to make the doodled border.

And that's my process for these pages. I change it up but always do multiple layers of media to get the depth and layered look I like. It's a very intuitive process and I rarely have any kind of plan.Thanks for joining me today. I hope you found this helpful or interesting...or something. Ed and I are glad you hung in.

Life is good; so is art.
Bonnie