Showing posts with label Facebook contest. Show all posts
Sunday, September 11, 2016
Bee Bold ~ Sandra Caldwell FB Group Challenge
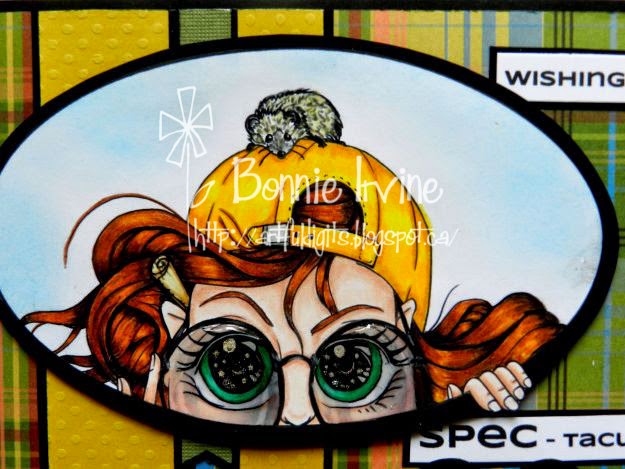
Hi there! There is a fun challenge going on over at the Sandra Caldwell Stamp Fans Facebook group. It's called Holley's Favourite Oldies. Holley has chosen three of Sandra's older images and has asked us to create a project featuring one of these three: 565 Bernie Bee; 538 Sunday Best; 599 Bearly Raggedys...all great choices!
I decided to create with 565 Bernie Bee because I love love love bees and Sandra's bees always make me smile! Just look at that face! I coloured Bernie with a mix of Prismacolor and Polychromos pencils. His glasses were filled in with Glossy Accents to create both shine and dimension. Bernie was fussy cut leaving a narrow white border and then matted with black. Once he was trimmed out again, Bernie was popped up on foam tape to add dimension and create a natural shadow.
The 6 x 8 inch mixed media background was spritzed with Yellow Rose of Texas, Marigold Yellow Orange, and California Poppy Gold Lindy's Starburst Sprays. Pale Ochre Archival Ink was sponged through TCW Honeycomb stencil in several areas to create a subtle texture and pattern.
Two lengths of washi tape, adhered to white card stock to take away the transparency, were placed under Bernie so he would have a place to sit. Two enamel dots were adhered to the tapes. Two sizes of hexagon dies were used to cut shapes from old book text. They were matted with black and faux stitching was added with black pen. They were then added to opposite corners of the background. A tiny brass bee charm was added to one of the larger hexagons.
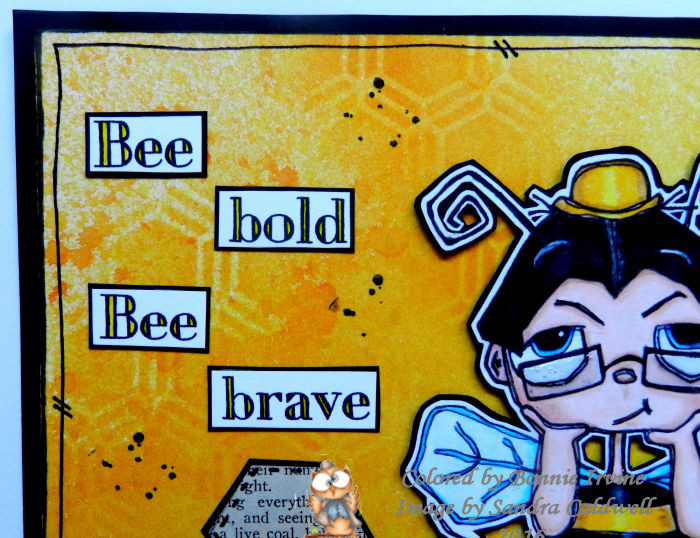
The sentiment was printed on white card stock and the letter openings were coloured with yellow marker. The words were then adhered flat to the background. A black border was doodled around the outside of the background and Black Big Brush Pen was used to edge the outside. Jet Black Archival Ink was used to stamp splatter dots here and there before a black matting was added to finish the page.
Thanks for joining Bernie and me today. You still have until September 16 to join in this fun challenge. We would love to see what you create with one of Holley's Favourite Oldies from Sandra Caldwell's Etsy shop, Babycakes Digis and Designs. Hope to see you there!
Life is good; so is art.
Bonnie
Tuesday, July 21, 2015
Rapunzel ~ New Facebook Contest theme at The East Wind
Hi everyone. On the 21st of each month, we begin a new Facebook contest on The East Wind Facebook group. The theme for this contest is Once Upon a Time so we want to see you use an East Wind image starring in a project with a Fairy Tale or Story Book theme. While there are some images in the shop which are clearly fairy tale or storybook related (Alice in Wonderland for example), there are tons of other images which could be used to depict a fairy tale/story book character. I decided to go that route.
Thinking that with her long braid she made a wonderful Rapunzel, I coloured Aurora Daisy Kiss with Prismacolor and Polychromos pencils. The dots in the flower centers were created with Buttercup Liquid Pearls...gorgeous little spots of pearlescent colour. I extended the circle shape from the bottom of the image because I wanted to create the illusion of Rapunzel standing in a window in the tower. Then I coloured in the background within the circle with black Pitt pen. When I cut her out, I had the window disappear behind her head at the top.Her braid also appears to be this side of the window.
The background of the tower began as a 6 x 8 inch rectangle of gray cardstock. Using a TCW Mini bricks stencil, white embossing paste was loosely mixed with both Nougat and Mocha Fresco Finish paints and scraped through the bricks. By not mixing the colours thoroughly, I got the variation in colour that made the bricks more realistic looking.
Once that was dry, two shades of green vines die cut with Cheery Lynn Fanciful Flourish were adhered to the brick. Three pink mulberry flowers were scattered on the vines. The sentiment was computer generated onto cream cardstock and die cut with an MFT die. Faux stitching and a black mat were added to the sentiment before it was popped up on foam like Rapunzel. A die cut black border was added to the bottom edge before a black mat was used to frame the entire piece.
Thanks for joining Rapunzel and me today. She's so happy she'll even let you use the stairs rather than having to climb her hair to visit. Be sure to pop by The East Wind Facebook page to check out the other DT projects created for this contest. We would love to have you join us and play along. I can't wait to see where your imagination takes you!
Life is good; so is art.
Bonnie
Sunday, June 21, 2015
TEW Facebook Contest ~ Step Away from the DP
Hi everyone. Today marks the beginning of a brand new Facebook Contest on The East Wind Facebook group. The challenge this time is Step Away from the DP (no designer paper) which for some will be a piece of cake and for others, more difficult. Because I do so much mixed media, I often create without using designer paper like I did with this project.
I chose Lucy Loo Punk Will Never Die to be the star of my art journal page. I coloured her with a mix of Prismacolor and Polychromos pencils and then did the usual fussy cutting leaving a narrow white border. Instead of matting her with black and trimming around her, I left the entire rectangle, no trimming, so that it could become a design element.
The background began as a rectangle of mixed media paper on which I sprayed Lindy's Stamp Gang's Hottie Patottie Hot Pink ink spray. Once dry, I sponged Magenta Archival ink through TCW's Triangle stencil and then used the same ink on a text stamp by Joggles. jet Black Archival was sponged through TCW's Tiny Circles stencil. before the image piece was adhered to the background, two doilies were cut in half and the parts were used behind it and in the top right corner. A small circle was punched from black cardstock and used to fill in the center of two doily halves. A small die cut bracket was layered over the two doilies on the left side. Another pop of black was added in the form of a punched scallop border.
The sentiment, one of my favourite things to say to my husband, was computer generated and printed on white cardstock using purple ink. The two segments were matted in black and a row of enamel heart stickers were added between to connect them. Black Big Brush pen was used to edge the outside of the mixed media paper and then it was double matted with hot pink and black cardstock to frame it and finish off the page.
Thanks for visiting Lucy Loo and me today. Your company was on our Want List and you gave it to us! To see other projects for this Facebook Contest, and to enter yourselves, please visit The East Wind Facebook group. We would love to have you play along with us.
Life is good; so is art.
Bonnie
Friday, May 22, 2015
Steampunk Sweetie ~ Sweet Pea Stamps Progressive Challenge
Hi everyone. Part 2 of the Progressive Challenge on Sweet Pea Stamps Facebook group started last Monday with this fabulous image from Sandra Caldwell. I absolutely love her quirky whimsical images and I love Steampunk so this project was a delight to create.
I coloured the image called Steampunk Old Lady can be found at Sweet Pea Stamps if you haven't been playing along. If you have you will have received this image free just for entering last time. I coloured Old Lady with Prismacolor and Polychromos pencils adding a resin monocle over the one in the image. I filled this with Glossy Accents to create the lens. She was then fussy cut leaving a narrow white border and then matted in black before being trimmed again. She was then popped up on foam tape.
The background began as a black piece of cardstock cut to a #10 size. A mossy green textured cardstock was cut to fit inside that black tag. A rectangle was cut from dotty embossed gold cardstock and then matted in black. Two lengths of black trim with silver metal 'rivets' were cut and adhered to the top and bottom of the gold rectangle. Another two lengths were stapled to the top of the tag with a TH tiny attacher. Metal gears, clock faces, and hardware were adhered with Glossy Accents above and below Old Lady to frame her and draw the eye through the image and tag. Black glittery letter stickers were added to spell Steampunk and scattered dots were stamped using Jet Black Archival to finish off the tag.
Thanks so much for joining Old Lady and me today. We appreciate your fine company. To check out other creations using this fabulous image from Sandra Caldwell, pop over to the Sweet Pea Stamps Facebook Fans & Friends page. We would love to see where Old Lady leads you. I love her to bits!
Life is good; so is art.
Bonnie
Thursday, May 21, 2015
For the Guys ~ The East Wind FB contest
Hi everyone. Today marks the beginning of the new contest at The East Wind Facebook group. Everyone totally rocked our last contest! Our theme this time is For the Guys, which I found a challenge. I rarely make anything suitable for men so it really made me think...hard.
I decided to use this cute Aurora image called Aurora Explore because I just love it. I coloured Aurora with Prismacolor and Polychromos pencils. The glasses were filled with Glossy Accents after highlighting the lights in her eyes with metallic pen. The sky was inked in with Tumbled Glass Distress ink. The oval was then fussy cut and the image was matted with black cardstock before being popped up on foam tape.
I kept the background quite tailored because I wanted the card to be more masculine. Plaid designer paper matted with black was adhered to a white card base. Yellow dotty cardstock and green textured cardstock were die cut into fishtail flags and matted with black.
The sentiment was computer generated and printed on white cardstock. It was divided into chunks and each one was matted with black cardstock. To complete the card, a pair of resin spectacles (glasses) were adhered overlapping the sentiment and then filled with Glossy Accents to create the lenses.
Thanks so much for stopping by today. You have made Aurora and me very happy. To see other DT projects and read about the contest, please pop over to The East Wind Facebook page when you get a chance. We had so many fabulous entries for our last FB contest and I'm hoping for the same this time. I love all of the inspiration!
Life is good; so is art.
Bonnie
Tuesday, April 21, 2015
New FB Challenge at The East Wind
Hi all. It's time for a brand new contest on The East Wind Facebook group. The theme this time around is It Started With a Song so we want to see your art using an image from The East Wind which has been inspired or relates to a song. Please be sure to tell what song got your mojo going.
The song that inspired me is an oldie but goody called Already Gone by the Eagles. The image that I chose to star on the tag it inspired is called Lucy Loo Voyage. With Lucy Loo's attitude , it seemed to fit the lyrics. I coloured Lucy with Prismacolor and Polychromos pencils. The dots for her shoe buttons and earrings were created with silver gel pen. She was then fussy cut leaving a narrow white border and matted with black cardstock. Foam tape was adhered to the back to add dimension and shadow when she was added to the tag.
The background began as a #10 manila tag which was covered with black cardstock. A section of MME's Traveler designer paper was added to the middle of the tag. Titan Buff paint was mixed with embossing paste and scraped through TCW's Mini Netting stencil in 3 places. In order to give Lucy a place to sit, a strip of black cardstock was added near the bottom of the designer papet. To tie in with the pink of her jacket, three lengths of washi on cream paper were added to the sides of the tag.
The sentiments were computer generated and printed on cream cardstock. The bottom one was die cut and both were matted with black cardstock to help them pop against the background. They were also popped up on foam squares. The shank was cut off the back of the metal plane button and it was attached to the cheesecloth "cloud" with Glossy Accents. The topper was created with text printed ribbon attached to the tag with a brad.
Thanks for visiting today. Lucy Loo and I are happy that you came by. When you get a minute, pop over to The East Wind Facebook group to see the other wonderful creations by some of our DT. We would love it if you joined us in this contest.
Life is good; so is art.
Bonnie
Monday, March 23, 2015
Sweet Pea Stamps Facebook Progressive Challenge ~ Zentangle Elephant
Hi there. With the 23rd of each month comes the beginning of the next Progressive Challenge on Sweet Pea Stamps Facebook group. This time it's Part 2 which means that all those who played along with Part 1 will also get to play along with this one. If you played, you received this adorable Zentangle Elephant image by Courtney McAnsh. If you didn't play, you can still join in this time because the image is available at Sweet Pea Stamps. It's a treat to play with!
I coloured her with Prismacolor pencils using all of the bright colours I could grab. I fussy cut her and then matted her with black cardstock to help her stand out against a colourful busy background. Foam squares were added to her backside and she was set aside to await her new home.
The background began as a 6x8 sheet of mixed media paper which I sprayed with Starburst's Hag's Wart Orange, California Poppy Gold, and Hottie Patottie Hot Pink. I allowed the inks to dry and then strengthened the colours, this time adding drips and splats from the over-spray Pattern was added over these layers with a TH circles stamp and Magenta Hue Archival ink. The black mat was cut to fit the background and then the background was cut into 4 sections and trimmed to allow some black to show through between them.
Black embossing paste was applied through TCW's Mini Punchinella stencil. A banner was added using black and white baker's twine and canvas pennants. Once it was adhered to the background< the sweet Elephant was placed so she was walking across the top of it. Because Ellie is so unusual and celebrates that, I decided that the message I wanted was Unique or You-nique. TH Ransom Alphaparts letters were adhered and dotted with a white paint pen. A black scalloped border was placed across the top of the three sections without the upper letters to help the word You stand out better.
A black doodled border and charcoal shading were added to the elements but there was something missing. I left it for a while and came back with fresh eyes. What was missing was a few pops of white. I added those with...are you ready for this?...the white paper dots in the bottom of my three hole punch. Seriously! I shaded them with charcoal and outlined them with black pen to finish off the page.
And that's how I chose to showcase this gorgeous image by Courtney McAnsh from Part 2 of the Sweet Pea Stamps FB Progressive challenge. I'm excited to see how you use it. To see how others on the DT responded to this challenge, pop over to the Sweet Pea Stamps FB group. Be sure to visit Sweet Pea Stamps store to check out the other amazing digi and rubber stamps there. It's a wonderful place for inspiration.
Life is good; so is art.
Bonnie
Saturday, March 21, 2015
Explore ~ Response to The East Wind Facebook Contest
Hi there.There is a brand new contest beginning today at The East Wind Facebook Community page. The theme this time is Make it Krafty so we want to see colouring on kraft paper using Unky's fabulous images..I love that effect of colouring on kraft. Normally I really enjoy the process, too, but I learned this time that not all kraft paper is created equal...lol. I have never had a problem before but this time the paper was more fibrous or fuzzy and didn't want to accept the pencil as easily as usual. Lesson learned: If it's nice to pet, I will regret :)
I decided to go all Steampunky and use Lucy Loo Magnified Star for my tag focal. I coloured her with Prismacolor pencils and a few Polychromos for face shading. I also used metallic gel pens for silver and gold accents. Her left eye has had a gem added to the center along with Glossy Accents for shine and dimension.I covered the right eye with a black and white puffy sticker toppped by a gem in the shape of a star and again topped it off with Glossy Accents. Lucy Loo was then fussy cut leaving a narrow Kraft border. She was backed with two die cut shapes, one in black and the other kraft cardstock. The kraft one was embossed with a TH folder and inked with Vintage Photo Distress ink. Once glued together, they were popped up on foam squares.
The background began as recycled packaging from a TH stencil. It was cut into a tag shape and pieces were torn from tool pages from an old Sears Roebuck calendar, inked with Vintage Photo, and adhered to the background. Gears were cut from a copper coloured metal sheet using the TH Gadget Gears die and added tothe background with Glossy Accents. Silver stars were punched from Ranger's Foil paper. A mix of thin metal gears were added over the holes in the die cut gears and in a cluster at the bottom. A few metal rings from the garage (no idea what they are) were also added to the mix.
The word Explore, written using chipboard letters, was glued to the bottom edge. A doodled border was added with black pen and the outside edge was inked with Vintage Photo and outlined with Black Big Brush pen. To frame the tag and add visual weight to the outside edges, black cardstock was cut as a mat and adhered to the back. It really needed this pop of black to provide the contrast and finish the piece. The ribbon for the topper has tiny silver "studs" to reference the industrial theme. The two lengths were attached with the Tiny Attacher stapler.
Thanks for joining Lucy Loo and me today. We love that you did that! To see what others on the DT created for this new contest, Make it Krafty, pop over to The East Wind Facebook page. We can't wait to see what you create colouring on kraft.
Life is good; so is art.
Bonnie
Saturday, February 21, 2015
New Facebook contest at The East Wind
Hi everyone. It's time for a brand spankin' new contest theme for The East Wind Facebook contest. Our theme this time is "I'm ready for my close-up, Mr. deMille" AKA I ain't got no body :) We want to see head shots or close ups of the face only...no bodies needed. It's a fabulous chance to practise those face colouring skills. While there are many head shot images at The East Wind, I chose to take an image with a body and crop it so that I only had the head left to colour.
I decided to play with Lucy Loo Delivering Love. She has those awesome big eyes and I love her hat and veil. I also find the profile nose more challenging than a full on nose so it seemed like a great opportunity to practise that in larger format. I coloured Lucy Loo with Prismacolor pencils as well as a few Polychromos for shading the skin. Purple Stickles was added to her earring and white paint pen for the eye highlight. Lucy was fussy cut and matted with black cardstock before being trimmed out again. Foam squares were added to the back of the image for dimension and to create a shadow around her.
The background began with a white rectangle of mixed media paper. Plastic netting from a clementine box was layered over that and Lindy's Stamp Gang Witch's Potion Purple Starburst spray was spritzed through that. I wanted to tie the background to her veil. Some splatter dots and bubbles were stamped on the background with both Jet Black and Red Geranium Archival ink. I fussy cut a view of the earth from a very old atlas and matted it with black. I wanted to get that earth image in there to support the sentiment from Create With TLC. It was printed on white cardstock, cut with a Spellbinders Labels 26 die, and matted in black. Doodling was done around the edge and it was popped up on foam squares. It seems to suit Lucy Loo's attitude so well!
For more texture and another nod to Lucy's veil, drywall tape was cut into small uneven sections and layered behind Lucy and in the top right corner of the layout. Stars were punched from red cardstock and Xmas Red Stickles were added to them to catch the light. A Sizzix border was die cut from black cardstock and then split into two segments and added to the top and bottom of the page. A black photo corner was punched and added to the bottom left corner followed by a doodled border. Black Big Brush pen was used to line the outside edges and the entire page was matted with black cardstock to frame it.
Thanks so much for visiting today. I love that you do that. To see the other wonderful inspiration projects for The East Wind Close-Up contest on Facebook, pop over to the FB group. We would love to see you join us there for this contest!
Life is good; so is art.
Bonnie
Wednesday, January 28, 2015
Easter Daffodil ~ Sweet Pea Stamps Progressive Challenge
Hi everyone. I am excited to announce that I have joined the Sweet Pea Stamps Challenge Design Team. I have long been an admirer of the artists in the Sweet Pea Stamps shop and the incredible variety and range of rubber and digital stamps that they offer so I was delighted to be asked to join this DT. They have such awesome challenges beginning the first and third Mondays each month. On the Sweet Pea Stamps Fans and Friends Facebook group, there is a Progressive Challenge where if you played along in Part 1, you get an adorable image sent to you for playing along in Part 2. The image is called Easter Daffodil by the artist Karen Middleton. No worries if you didn't join in for Part 1 because the image is available for purchase in the shop which means that you can still enter Part 2.
I coloured this cheerful little fellow and his flower using Prismacolor pencils. I used short choppy strokes on him to give the appearance of fuzzy. Awww! I added Glossy Accents to his eyes and to the ladybug on the leaf. The image was cut out with a Spellbinders Labels 25 die. Background colour was added to the white with Tumbled Glass and Peeled Paint Distress inks using an applicator tool. The image was matted in black and a doodled border was added around the edge. Isn't he cute!
The background began with a white card base. A piece of green text designer paper was cut to fit inside the base and a black mat was added. A second rectangle was cut from a companion piece and again matted with black cardstock. I added more of a mixed media feel to this rectangle by randomly applying Memento Bamboo Leaves ink through TCW's Tiny Circles stencil. Broken China Distress ink was added to the background with a Joggles bubble stamp.
A band of old text paper from one of the lovely old books a friend gave me, was matted in black and added across the middle of the background. The image was popped up on foam dots and centered over that. Two lengths of dotty ribbon were adhered coming out from the image over the text band. Four black and white dotty buttons were threaded with white floss and adhered to the corners with Glossy Accents. To complete the card, the word JOY was added to the image area with tiny square beads. My mom is going to love this Easter card! Shhh! Don't tell her :)
Thanks for stopping by today. To check out some of the other DT inspiration using this heart-melting image stop by the Sweet Pea Stamps Friends and Fans group on Facebook. We would love to see what you create with this image. There are already some wonderful makes in the folder there. Hope you will join us for the Progressive Challenge..
I am entering this card in the following challenges:
Through the Craft Room Door ~ Always Anything Goes (Jan.27 - Feb. 2)
Crafting From the Heart ~ #44 Always Anything Goes
Dream Valley ~ #98 Anything Goes
Make My Monday ~ Bright and Cheerful Colours
613 Avenue Create ~ #108 Create Your Own Challenge (image,diecut, stencil, buttons, ribbon)
Robyn's Fetish ~ #247 Animals
Life is good; so is art.
Bonnie
Wednesday, January 21, 2015
The East Wind FB Contest ~ Alice in Wonderland
Today marks the beginning of the new Facebook Contest on The East Wind Facebook Community page. The theme this time is Alice in Wonderland and you must use an image from The East Wind to play along. The good news...there are so many images to choose from, some specifically an Alice character and some which could be coloured up to become an Alice image. I chose to create a mixed media spread using Lucy Loo Mad Hatter.
I coloured Lucy Loo with my Prismacolor pencils and then fussy cut her leaving a narrow white border.She was then matted with dark brown cardstock. Foam tape was attached to the back to provide dimension.
The background began as a piece of mixed media paper which I sprayed with Dylusions Melted Chocolate and Tattered Angels Yellow Daisy, Creme de Rouge and Tattered Leather. Black Ink was dripped from the top edge to create runs. A rust coloured pattern paper as well as very old book text paper were torn, edged with Distress inks, and adhered over the dried inks. Pattern was added with Jet Black Archival ink using text and scattered dots stamps. The outside edge of the background was inked with Dark Brown Big Brush pen.
In order to further the Mad Hatter theme, I chose embellishments that reminded me of Mad Hatter scenes in A in W. The chipboard pocketwatch, From Bo Bunny, could have been either the Hatter's watch which the March Hare filled with butter or perhaps the Rabbit dropped it on his way through. The key could have been the one Alice used to open the door to Wonderland. The teacup is like the one Lucy has in her hand from the tea party and the stars remind me of the tune Hatter sang, Twinkle Twinkle Little Bat. I love weaving references and reminders into my mixed media pieces.
The saying which was computer generated is something Alice said to the Mad Hatter in the Tim Burton movie. Loved that line. So true! It was printed from the computer onto white cardstock. The words were cut apart, matted with black or red and black, and then popped up on foam tape. Three flat black pearls were used as periods to indicate that the middle of the quote is missing. To finish up and add strength to the piece, dark brown and black cardstock were used as mats.
Thanks so much for joining Lucy Loo and me today. We appreciate that you spent time here. To see other projects from others on The East Wind DT, pop over to our Facebook Community page. We would love to see your take on this fun challenge, too. Hoping you will play along, too.
Life is good; so is art.
Bonnie
Subscribe to:
Posts (Atom)