Showing posts with label bookmark. Show all posts
Saturday, November 09, 2019
Collaged Bookmarks
Hi everyone! Sometimes when I want to create but can't seem to settle on a particular project, I haul out my scraps and the 2 x 6 inch kraft bookmark blanks I cut and collage away. They make a great little gift, an idea for abandoned art, and are lots of fun to create. It's also something you can leave and go back to easily.
I layer up scraps of book and music paper, cardstock, corrugated coffee sleeve scraps, patterned paper, stamped bits or mop-up papers...anything I like. There are no rules.
I like to add punched or die cut bits, extra tags, metal clips, and fussy cut items like butterflies. I just audition things until I am pleased with the results. They also make great belly bands or tuck spots in junk journals.
For added texture, I layer in pieces of drywall mesh, Texture Paste added through stencils, tea dyed and crumpled pieces of paper, and lots of torn edges.
You can create your own wording and print it off but I often use Small Talk or Chit Chat Stickers. It's a great way to use them up without feeling that you are wasting them.
The edges are always darkened front and back with Coffee Archival Ink and black Big Brush Pen. Finer black Pitt pens are used to outline the sections and to add the faux stitching around the edges, again front and back. I think these would be sweet stocking stuffers or as a little table gift when you are entertaining. I donated over a hundred to my local library who sold them as a fund raiser. Win/win! I also donated hundreds to the Cancer Clinic when I was undergoing chemo to pass out to patients and family to brighten their day. There are so many ideas and I experienced joy in the making and joy in the giving!
Life is good; so is art.
Bonnie
Tuesday, August 13, 2019
August Bookmark Swap at Vera Lane Studio Facebook group
Hi everyone! Each month in the Vera Lane Studio Facebook group, we have a swap for those who want to participate. This month It is Sharon's turn and she has decide that we will trade bookmarks created for the theme All Creatures Great and Small. All you need to do is create a bookmark featuring a Vera Lane Studio critter image and post a photo in the album. I love to read so bookmarks always make me happy.
I combined three images for my bookmark focal. I used one of the birds from the Bird Houses digi set, the hat from the Boutique Hats set, and the books from the Book Lover set for Birdie to perch upon. The images were coloured with Prismacolor and Polychromos pencils and white gesso dots were added to Birdie's body. Glossy Accents was used on her eyes to give them both shine and dimension. Birdie was fussy cut leaving a narrow white border, matted with black cardstock, and fussy cut again leaving a narrow black border.
The background for the 2.5x6.5 inch bookmark was a left over scrap from a paper included in a Somerset Studio magazine. Book paper scraps were inked with Coffee Archival and adhered in two places as a nod to the book theme. Jet Black Archival Ink was used to add the Viva Las Vegas numbers stamp and the TH splatter dots stamp. Black Pitt pen was used to create the circles and the doodled border around the four sides. To bring some of the orange colour from the bottom book to the top of the bookmark, an orange flower brad with an enamel dot center was added to the top circle. More orange was added to the bottom of the tag by edging it with Tiger Lily Archival Ink.
The wording was printed onto white cardstock, cut into segments, and matted with black. To add strength to the bookmark, it was mounted onto chipboard before the back was covered with black cardstock. The edges of the bookmark were inked with Coffee Archival Ink and then black Big Brush Pen.
Thanks for joining Birdie and me today. We would love to have you join our Vera Lane Studio Facebook group and this swap, too. It's always lots of fun and there are so many fabulous images from the Vera Lane Studio shop to choose that fit this theme. Hope to see you there!
Life is good; so is art.
Bonnie
Saturday, June 15, 2019
Top Of My Head AJ Page and clips ~ inspired by Vera Lane Studio
Hi everyone! I am smitten with the new release from Vera Lane Studio called Top of My Head. There are six fabulous designs that lend themselves to everything from art journal pages to items as small as inchies, thanks to the re-sizing possible with digi stamps. I chose to make two projects: the first - an art journal page and the second - some paper clips for my planner. My goodness these guys are cute!
The art journal page features Worldy with a cat from another set called Crazy Cat Lady on top of his head. The saying, which if you know cats rings true, fit this image so well. They were coloured with Prismacolour and Polychromos pencils, fussy cut, and matted with black. The background was a mix of 5 acrylic paints ( blues, greens, white) brayered and gel printed onto the 6x6 background and boosted here and there with Gelatos. White Texture Paste through a Studio Light Mask, stamping with Jet Black Archival and a Studio Light Grid stamp, and some random doodling gave the background further interest. Washi tape layered over book paper, and the saying printed onto white cardstock and matted with black finished the page.
The next project was to create three 2.5 inch clips for my planner...or they could be used as bookmarks. They were inspired by a wonderful YouTube tutorial by Paula Foerder who demos so clearly how to construct them. I learn so much from her videos.
The images were coloured and matted in the same way as Worldy was (see above). When I was cutting the black cardstock to form the mats, I doubled the paper over so I could cut two of each at the same time. That way, I knew they would fit exactly when glued together. One half of the paper clip is sandwiched between the two layers of matting and glued shut.
Before I glued them, a large black paper clip was attached to the extra black mat which would form the backing. I then used E6000 on the inside of the back layer around the clip itself and Fabritac on the rest of each mat to adhered the two parts together. I added extra wording to the plain cup image because this saying always makes me smile, just like these heads do. Wouldn't these make adorable magnets?
Thanks for joining the Top of my Head guys and me today. I had so much fun with them and from the looks of the other fabulous projects shown on the Vera Lane Studio Digi Stamps Facebook group, I am not the only one! I love how creative people are :)
Life is good; so is art.
Bonnie
Saturday, June 01, 2019
Pretty Ladies Projects - Inspired by a Vera lane Studio collage sheet
Hi everyone! I am so excited. This is my first official post as a member of the Vera Lane Studio Design Team. I have long been a fan both of Janet's wonderful images and also of her creative team who have provided me with inspiration galore, encouragement aplenty, and from whom I have learned a ton. I am both delighted and incredibly honoured to have been asked to join them! Speaking of inspiration, have you seen the new Pretty Ladies Collage Sheet in the Vera Lane Studio Etsy shop? Oh my word, it's gorgeous and so versatile. Not only are there various sizes of the pretty lady but also various colourways, plus there are bits of border to act like washi, and sweet words, as well. I created three quick and easy projects to show just a few ways they can be used but the mind boggles with the possibilities!
The first creation I made was a notecard. I used a 3 5/8 x 4 3/4 inch rectangle of designer paper, matted with black cardstock as my background. Texture was added by applying French Ultramarine Archival Ink to Crafty Individuals Script stamp, Studio Light grid stamp, and Indigo Blu Tasty Textures dotty stamp, adding them to the background in several places. Ranger Texture Paste was scraped through TCW Punchinella stencil. The paste was brightened with white Posca Pen once dry and shaded next to using Inktense pencil and a waterbrush. The pretty lady was fussy cut leaving a narrow border, matted with black, and fussy cut leaving a narrow black border. She was then popped up on foam tape and grounded with two of the border strips added to cream cardstock. The Hello word was also matted with black and cream and adhered with foam tape. The final details before adding the background to a cream card base were a doodled border and a puffy triangle sticker.
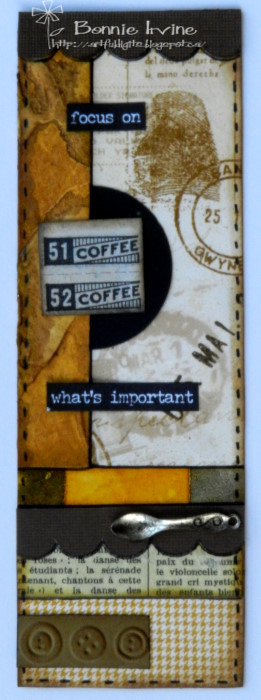
The second project featuring another Pretty Lady from the collage sheet is a 6 x 2 inch bookmark. The base is a double layer of kraft cardstock which was edged with Coffee Archival Ink and a doodled faux stitching border. A left over scrap of gel printed, stamped, and Texture Paste background from a previous project was adhered to the left side with a piece of a small doily peeking out from its right side Both of these were outlined with black pen to help them stand out. The Pretty Lady collage image was fussy cut leaving a narrow border, matted with black, and trimmed out again leaving a narrow black border. To ground her, a length of the dashed border from the collage sheet was adhered beneath her feet along with a left over scrap of punched scalloped border. The other section of this same border was added to the top of the gel printed piece to repeat the element. White dots were added to both borders. The wording was printed onto white cardstock, cut into sections, and matted with black. A small puffy star was added to the top right corner and black Big Brush pen darkened the edges.
The third and final project I created using one of the Pretty Ladies from the VLS collage sheet was a tag which could easily be a card focal. The kraft cardstock base was one already in my stash and cut with a Spellbinders Office Supply die. It was patterned using Inkylicious Rye Grass stamp and Coffee Archival in a couple of layers varying the intensity of colour to create depth. The other piece of the doily used previously was adhered to the same blue patterned paper as I used in the card front, and then trimmed out. The asterisk stars were stamped on the solid circles of the doily and the center was doodled with black pen. The mounted doily was then adhered to the left side of the kraft die cut. One of the 3 1/4 inch pretty ladies was fussy cut and matted in the same way described above, and popped up on foam tape. She was grounded with one of the striped borders from the collage sheet which was then outlined with black pen. The word hope has fussy cut and the loops of the scallops were doodled with black pen before it was adhered beside her and outlined to help it stand out. A simple partial border was doodled on the right side of the tag before it was adhered to the black background. Green seam binding was used for the topper.
Thanks for joining the Pretty Ladies and me today. I still have many of the collage sheet images left so I'm thinking of creating a few more of the cards to give as a set of five for a little gift for a friend. They are so quick to create and I know she'll just love them. To check out the other fabulous collage sheets and the plethora of fabulous images by Janet Klein, be sure to pop by the Vera Lane Studio Etsy shop. I always come away with a bunch of new ideas and several must-haves :) For even more inspiration, check out the VLS Facebook group where there is always something new and drool-worthy.
Life is good; so is art.
Bonnie
Friday, May 10, 2019
Bookmark Swap for Vera Lane Studio Facebook group
Hi everyone! There is a fun swap going on this month in the Vera Lane Studio Facebook group. This month we are swapping bookmarks and the theme is Let's Hear It For the Girls. I love making bookmarks, celebrating the females in our lives, and creating with Vera Lane Studio images so this was win/win/win all around. I chose to feature the earth from the Change the World set and the girl and stars from Pleiades. I turned the girl horizontal so she looked like she was flying over the earth in her invisible cape.
All images were coloured with Prismacolor and Polychromos pencils, fussy cut and matted with black cardstock. The stars were given a coat of Wink of Stella to add a little shimmer.
The background began as a 2.5x6 inch rectangle of mixed media paper which was spritzed with Lindy's Afternoon Delight Denim(top2/3) and Sassy Sapphire (bottom 1/3) Starburst Sprays plus water. Once dry, the card was splattered with white paint plus water using a rake brush to create a starry sky.
The sentiment was printed onto white cardstock, cut into sections, and matted with black. The topper was created from green and blue seam binding to pull the earth colours up to the top section. The background was adhered to a sturdy piece of black cardstock both to frame it and to add strength and faux stitching was added around the outside edges with a black pen.
Thanks for joining Pleiades and me today. We love that you dropped by. To see the other fabulous bookmarks already entered into the swap, be sure to pop by the Vera Lane Studio Facebook group and check out the album. We would love to have you play along.
Life is good; so is art.
Bonnie
Subscribe to:
Posts (Atom)