Showing posts with label junk journal. Show all posts

Friday, March 06, 2020

Captured!


Hi everyone! A while ago, I picked up these cute little mason jar tags on clearance at Michaels. I had no idea what I would do with them but the price was right and I always enjoy the challenge. They are  approximately 2 x 3 inches big which turns out to be the perfect size for the tiniest TH Paperdoll figures.


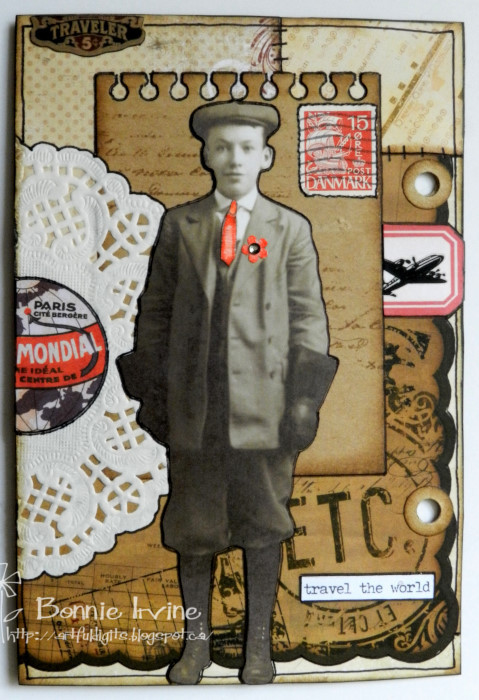
I first inked the outside edges with Coffee Archival and then used Inktense pencil and water to shade under the rim and between the white lines on the jar rings. White coloured pencil was used to highlight. The backgrounds were stamped and stencilled with Coffee Archival Ink or Gesso. To ground the people and give a little interest behind them, tiny collages were made with the smallest of scraps of vintage papers and washi tape, all of which were edged with Coffee Archival ink.


The people and the outside edges of the jars were edged with black Big Brush pen to help them stand out against the kraft background. To finish the tags, TH Remnant rub words were added as well as a number stamped die cut tag attached with glue and baker's twine. I think they turned out so cute!

Thanks for stopping by!

Life is good; so is art.
Bonnie


Thursday, February 13, 2020

Pretty Little Tags


Hi everyone! I've had these pretty translucent stickers from Paper Game Co. in my stash for a while and decided it was high time I made something with them. They are fairly small under 1.75 inches at their longest points so I thought that smaller scale tags would suit them well. I have an old Marvy Uchida punch with a nicely shaped top that cuts tags 1.75 x 2.25 inches so I used that on some tan coloured textured cardstock.


I started by stamping the punched tags with a text stamp using coffee Archival Ink and not much pressure to get a lighter effect. The edges of the tag were darkened with the same ink to create an aged look.


Scraps of vintage book paper were then torn to fit on each tag. The edges of these scraps were also darkened with Coffee Archival ink which helps this layer contrast with the background.


One of the translucent stickers was then placed over the book text. I love that you can see the text through the flowers. A hole was punched at the top of each tag and string was feed through to finish them off.


When I am playing and experimenting, I sometimes find it hard to stop. There's often that little nagging "what would happen if..." and that's how the last tag came to be. It's a 2.25 x 4.75 manila tag stamped with the same script stamp and ink. A layer of cheesecloth was adhered before the book text was layered on top. White gesso was used over the text to push it into the background before the sticker, this time with a bird as well as flowers, was layered on top. Because I had extra real estate, I added a Tracie Fox number label, a strip of music paper, and a Chit Chat sticker. I can see that a number of other tags in the same style might be calling my name :) After all, you can't just have one...LOL

Thanks for stopping by.

Life is good; so is art.
Bonnie

Thursday, February 06, 2020

Junk Journal Collage Tags


Hi everyone! I found a bunch of kraft cardstock tags when I was sorting through a bin and decided they would be great for collage style tags. It's always good to try to use up those scraps of papers and other bits and bobs before they take over the room :) Besides, this is one of my favourite ways to play.


I also had some translucent stickers I had purchased some time ago from Papergame and, although I had used some, I still had many that are too beautiful to hide away in a bin. I thought they would make awesome focals on these collaged tags...and I was right.

I also found an American Crafts Knockout punch which I haven't used in years. It punches 5 tiny stars in a row so I used it on the tops and sides of vintage book paper. Then I backed the star area with a scrap of black and inked the front edges. I think it might be my new favourite embellie. While I was punching, I used it on another scrap of black and adhered the punched out stars to the heart and two corners of the one tag. The stars are 3/8 inch at the widest...so cute.


Some of the tags have fussy cut butterflies. I have a little bin of these already pre-cut so all I do is ink the edges with black Big Brush pen. I inked many of the collage paper edges as well as the outside edges of the tag with Coffee Archival Ink.


I finished each with a faux stitched border and outlining of the individual papers because I like that look. It highlights all of the different papers and layers. A little string topper for each and I called them done. I will likely add a word to a few like the one above when I decide where they are going and can choose a word that fits.

Thanks for stopping by today. I appreciate that kindness. I'll be back in a few days with another set of smaller tags. I think I could make tags all day every day...LOL. Somebody stop me..ha!

Life is good; so is art.
Bonnie

Wednesday, December 04, 2019

Mini Envelope Tabs following a tutorial by Junk Journal Ideas YT channel


Hi everyone! I made these sweet little fold out letters following a tutorial on YT by Donna Phillips (Junk Journal Ideas) called Mini Envelope Tabs. It's an easy to follow tutorial so I'm not going to go into the details of how to construct them because she explains it better than I could.


Basically, she takes a rectangle of paper, folds it in thirds, and then folds the top section in like an airplane. I have seen my talented friend, Jen (Jenny Miller on YT) use these in her fabulous junk journals all the time. What I liked about Donna's tutorial was where she went next with these embellies.


She layered the flap with bits of lace, circles of paper, and sweet metal charms plus a plethora of other sweet ideas. Then she tucked the flap over a page edge and used a tiny paper clip to hold it in place as needed.


I used threaded vintage buttons, tiny crocheted doilies, bits of cheesecloth, ribbon, cork, and pretty much anything else that I could get my hands on. Some of the envelopes were made from coffee dyed paper, some patterned paper, some stamped and others not. It's pure play with no rules...a lovely playground for the imagination!

Thanks for popping by today. Thanks also to Jen and Donna for the inspiration. It's greatly appreciated.

Life is good; so is art.
Bonnie

Sunday, December 01, 2019

Scrappy Kraft tags


Hi everyone! I raided my scrap box again to decorate some tags die cut from kraft cardstock. I love collaging with scraps, although I'm building up enough of a stash that I think I'm going to have to send out some happy mail so I can create more. My joy comes more from the process of creating them than from actually using them :)


The two larger tags were die cut using a 3 x 4.5 die from Poppy Stamps with pinpoint detail around the edges. The other 4 were cut with a Paper Smooches die which is about 2x3 inches in size. All 6 tags were inked around the outside edges with Coffee Archival Ink. The four smaller tags were faux stitched around the outside edges to create a border.


Scraps of various sizes and shapes were layered onto each tag after they were edged with Coffee Archival Ink to help the layers stand out. Threaded buttons were added as well as punched reinforcements for the front and back. Fine cord was used as toppers for each of the tags.

Thanks for popping by today. That was awesome of you. I have several more tags and embellies to share with you later in the week so stay tuned...LOL

Life is good; so is art.
Bonnie


Thursday, November 21, 2019

Altered tags


Hi everyone! I had this tag pad from K&Company kicking around for ages. I had already used all the ones I really liked and was left with a bunch that were OK but not really my style. They sat neglected for so long that finally I decided to alter them, keeping the parts I liked about each but changing the parts I was less fond of. Now, I love them and can see myself or someone else using them.


First I added scraps of patterned paper to cover the sections or details I didn't care for or to create a different colour story.


Then I added details such as die cuts, clear stickers, lace, buttons, brads, or tags to make them more interesting. Coffee dyed paper was adhered to the back of each to add strength and texture to the plain white backs.


The front and back edges were darkened with Coffee Archival Ink and faux stitching was added with brown Sharpie pen. Reinforcement circles were punched from kraft or coordinating cardstock and edged with Coffee Archival Ink before being glued on to the front and back.


To finish them off, words from TH ChitChat Stickers were inked around with Walnut Big Brush Pen and adhered to the tag fronts. The good news is that I went from 10 tags I would never use to 10 tags I love. The bonus is that I used up more scraps and bits from my stash. And...I had great fun collaging them.

Thanks for joining me today. I appreciate that. Do you have anything kicking around your stash that you can alter to make something you like? Have a play! It'll be worth it :)

Life is good; so is art.
Bonnie

Thursday, October 10, 2019

Frankenpages Junk Journal


Hi everyone! Quite some time ago, when the neuropathy in my hands was really bad from chemo treatments, I made a bunch of Frankenpages based on a tutorial by Nik the Booksmith. It's a wonderful way to use scraps to create something new and useful and have fun in the process. Plus it was something that my hands were able to manage. I made large pages (no idea why) by gluing scraps onto larger scraps but I didn't stitch them together like she did. I added stamping and edged the scraps with Coffee Archival Ink before gluing them into a collage.


Then I wondered what to do with them so they sat patiently and waited for me to figure it out. I eventually decided to chop them up to make junk journal backgrounds for collage. They were cut to either fit into binders which I already had or to be joined with binder rings in a size I chose. Nothing was wasted. Even a few atc backgrounds were born.


These particular pages fit into an old MME binder from my stash. The pages are cut at 6 3/4 x 8 3/8 inches and are quite sturdy because of all the layering front and back. All holes in this binder are reinforced with black punched rings and the pages are edged with Coffee Archival Ink.  They are all also vintage and grungy in style which unites them.  I took each page  and started adding ephemera and left overs from other projects to decorate the page. I have had a sticker book from TH in my stash for years and years and made up my mind that I was going to use it up so you'll see a lot of those pieces in here.


I also have bits of punched borders, rub-ons, stencilling, and punched or die cut bits and pieces. At least one and sometimes two of the Idea-ology paper dolls star on each page and the sentiments come from Chit Chat stickers which have been hanging around too long. I also added the occasional charm or metal piece. a little washi, and anything else that was lying around and looked inviting :) I love this kind of creating...no rules, no expectations...pure play.

Thanks for joining me today. I have several more pages ready to share but I didn't want to bombard you with too much in one sitting...LOL. Until next time...

Life is good; so is art.
Bonnie

Friday, September 27, 2019

Collage ATC Junk Journal


Hi everyone! In my continuing effort to use things up and reduce my scrap pile and box of bits and bobs, I created a little atc sized (2.5 x 3.5 inch)junk journal book which I fastened together with binder rings. Each page was first cut from chipboard packaging and then collage was added to each side to create backgrounds.Above is the first and last page. I'm still pondering covers.


The wording came from either TH rub ons or Chit Chat Stickers. There is not a lot of real estate on these little cards so these were ideal.


I used the smallest of the Idea-ology Paper dolls and tiny die cut tags and bits of punched borders.


Extra stamping and stencilling provided pattern and texture to the plainer parts of the backgrounds.


The papers run the gamut from scraps of designer paper, coffee dyed paper, corrugated coffee sleeves to embossed scraps, and ephemera. Texture was also added with fabric scraps like burlap or cheesecloth.


There are bits of black accents on each page as well as the occasional pops of bright colours. All pages were finished with a doodled border, Coffee Archival Ink and black Big Brush Pen on the edges.

It was a delight to create and fun to look through, as well as making the tiniest dent in my stash. It makes me feel so noble to use those teeny tiny scraps I saved. Like James Burke says, "It's not hoarding if you use it in a journal."...LOL

Thanks for stopping by.

Life is good; so is art.
Bonnie

Thursday, September 12, 2019

Use It, Already journal ~ pages 19-22


I created a few more collage pages in my Use It, Already journal. This is a journal where I am using scraps,bits and bobs that have been in my stash far too long, either because I was hoarding or because I had forgotten all about them. It's time to either use them or pass things along to others who will use them.


The backgrounds are layers and layers of scraps of designer paper, mixed media papers, vintage papers, book text, and digital paper bits from kits. I also used a couple of Bo Bunny Journal Pages which have been in my stash forever. I'm happy to finally have a use for them. There's even an old Monopoly Chance card in the mix.


For now, I am using Tim Holtz Paper Dolls to star in these pages. I like adding little pops of colour in the form of flowers, hats, bowties, and other decorations to make them my own and add some of the background colour to the sepia images.


The wording was added with Big Chat, Small Chat, or Chit Chat stickers as well as rub-ons. Some punched or die cut borders, strips of patterned paper borders, and even a piece of lace plus some leftover die cut arrows helped to finish the pages. I like how the pages are untied by colour tones, by adding black reinforcements to the holes, and other black details. It makes for a more cohesive and pleasing flip through.

Thanks for stopping by today. I'm glad you did!

Life is good; so is art.
Bonnie


Thursday, August 01, 2019

Use It, Already journal - Pages 13 to 18


I created a few more collage pages in my Use It, Already journal. This is a journal where I am using scraps,bits and bobs that have been in my stash far too long, either because I was hoarding or because I had forgotten all about them.


One thing I have discovered in doing this (besides the fact that I love collage) is that one uses very little paper etc. when creating a collage of this size ( 4.75 x 6.5 inches).


While I do feel good about using things up, I could be at this until I am 202 and still not run out of "stuff"...LOL.


I am having fun though and thoroughly enjoying the process. To me that's what's important. I don't love all of the pages but I loved making them.


I also like the challenge of making unlikely pairings work together. It's good for those creative muscles that can get lazy.


Anyway, thanks for joining my friends and me. I'll be showing up again soon with some collaged bookmarks I've made using the same scrappy goodness :)

Life is good; so is art.
Bonnie

Saturday, July 20, 2019

Use It, Already! ~ de-stashing collage journal pages 9-12


Hi everyone! I'm back with the next 4 pages (9-12) of my Holy Cow! Use It, Already! collage book where I am taking time to play and de-stash at the same time. If you want to know more, here's the intro post with the first 4 pages.


The pages are cut from larger scraps to fit inside one of the TH binder covers with the rings. Smaller scraps of all kinds of paper types are used to collage the background and bits of leftover ephemera, washi, punched elements, and die cuts help fill out the design.


The larger Th Paper Doll images are used as the focal images and are embellished to give them their own identities, as well as suit the page. I really like to add my own artistic voice to collage images created by someone else.


There is really no plan for any of these pages. I love to work intuitively and see where things go. Chit Chat, Big Chat, and Small Chat stickers which have been patiently waiting for their turns have been used for the wording. For this project, anything in my stash is fair game no matter how junky or how precious I previously labelled it. Like I said...Holy Cow! Use it, already! :)

Thanks for stopping by. My friends and I appreciate that.

Life is good; so is art.
Bonnie

Tuesday, June 12, 2018

Altered Journal Cards


Hi everyone! I haven't been doing as much creating lately as I've been a bit under the weather so I thought I would start back with something simple. Years ago, I bought these Hope Chest journal cards from pinkpaislee at a great sale price. Then I decided that I didn't really like them as they were so I put them away and forgot about them. More recently, I purchased Tim Holtz Botanicals ephemera pack and then didn't know what to do with them either because, like the journal cards, they didn't really suit my style of junk journals, even though they were pretty. Well, the two packs landed on my desk at the same time and I had a blast altering the journal cards with the botanical images. Who knew! LOL


There were 12 cards in the pinkpaislee set plus the packaging was so cute that I cut another slightly bigger one. The thing I didn't like about them was that they weren't dimensional and they were a little plainer and more muted than the mixed media look I usually go for. The first thing I did was cover all of the printed doily parts with real doilies cut up and adhered, then outlined with brown ink. I used the same brown ink to faux stitch around each card's edges to frame them and then added Coffee Archival Ink over that to age and make an even more noticeable frame.


I added stamping to the background with Coffee Archival Ink and also stencilling with either the same ink or Ranger Texture Paste. Words were added in the form of Tim Holtz Big Chat or Chit Chat Stickers, each outlined with black Big Brush Pen.


Bits of washi tape, threaded buttons,  and yellow Stickles were all used to add more texture, sparkle,dimension, and interest to the cards. Several were decorated with the smaller butterflies in the Botanical set and I gave them each a different body style using anything from rusty safety pins, to hooks (from hook and eyes) to cutlery charms or photo turns.


I love the way these turned out and definitely can see me using them in future junk journals. I really like to alter ready-mades or printables to make them my own. While they look good in their original state, they make me smile when I add the "Bonnie touch". Besides...who can resist a chance to play? LOL

Thanks for visiting.

Life is good; so is art.
Bonnie