Thursday, September 11, 2014

RSD 1880 Hat ~ Altered Board Book


Hi there! I carved out some time to complete the last two page spread in my altered children's book featuring some of Rick St. Dennis' fabulous hat ladies. All that's left now are the covers and I have a plan!


For this spread I chose to colour this gorgeous image called 1880 Hat which can be found in Rick's Zibbet shop. I coloured her with Prismacolor pencils, dotting the centers of the violets with yellow paint. Marybelle (she told me her name) was then fussy cut and matted in black to help her stand out and strengthen the image for popping up on foam tape.


The background began by adhering textured designer paper to the gessoed spread with gel medium. Text printed designer paper was torn and adhered to the background. White gesso was spread across the paper to knock the pattern back somewhat. Stencilling was done on the same paper with Magenta Hue Archival ink applied with a make-up sponge through Memory Box's Rings and Puddles stencil. White gesso was pounced through a graduated circles stencil. Mini hearts were punched from gold paper which I eventually painted metallic silver and added to opposite corners.


I wanted to frame Marybelle but didn't have a pre-cut frame in the right colour so I flipped one over and added Watering Can Archival ink to it with a make-up sponge. I love how it came out mottled...couldn't have achieved that look on purpose but will gladly accept the happy accident. I matted the inside of the frame with black cardstock and added vellum to mute the background behind her. Four enamel dots were added to the corners and the sentiment was computer generated, matted in black, and popped up on foam tape.


The other sentiment, a quote by CoCo Chanel,  was also computer generated and printed on gray cardstock, matted with black. It was faux stitched, popped up on foam tape, and given two tiny doilies as accents. A harlequin border was cut from gray patterned paper and divided into two segments. Both were faux stitched, inked around the edges, and popped up on foam tape before being adhered to each page.


Three paper flowers attached to the top left corner were given enamel dot centers and tiny leaves to balance out the design and provide a little softness. The pages were completed by adding lots of black doodling, Magenta and Black Big Brush pen to the edges, and some pencil shading next to some of the stencilling and patterned paper.

Thanks so much for joining Marybelle with her 1880 Hat and me today. Please, come back for the front and back covers which will complete this altered book. Did you read all about the big events that Rick and the EDT have planned for the weekend and the coming weeks? You can check it out on Rick's blog post or stay tuned to our Facebook group for more details. We are so excited...hope you'll join us!

Life is good: so is art.
Bonnie

Monday, September 08, 2014

Going Round in Circles ~ CYP # 230


Hi there! Well, I am not sure where last week went. It seems like I was just writing my post for last Monday and here it is again. We have a new theme at Craft Your Passion Challenges: Going Round in Circles. We want to see circles  on your projects. I decided to play with an image from The East Wind for this challenge. I coloured Lucy Loo Flower Goddess with my Prismacolor pencils, adding some tiny punched flowers to her neckline and sleeve. The image was then cut out with a Die-namics circle die and inked around the edge with Peacock Feathers Distress ink.


A rectangle was cut from black cardstock slightly smaller than the white card base. Three smaller circles were cut from turquoise designer paper using dies from the same set. They were inked around the edges with Peacock Feathers and faux stitched with a black Micron. A length of black and white baker's twine was wrapped across the card bisecting the circles. Sparkly white letter stickers spelling JOY were added to the black background.


Once the image was adhered to the card, three tiny butterflies were punched from the same turquoise paper and shaded with Prismacolor pencil before colouring the bodies with black pen These were adhered coming off the image circle to seem like the butterflies were flitting about. It also ties the image to the background. A black button was added to the center turquoise circle...one more round element and it seemed to anchor the twine visually.

Thanks for visiting today. Lucy Loo and I appreciate you spending time with us. When you get a minute, stop by the Craft Your Passion Challenges blog to see the wonderful inspiration for the Going Round in Circles challenge that the rest of this talented team have provided. Did you know that CYP is having a DT call? We would love to have you join our team...check it out!

Life is good; so is art.
Bonnie

Thursday, September 04, 2014

Autumn ~ ePlay challenge


Hi everyone! It's time for our October ePlay Challenge to begin at eclectic Paperie. The theme this month is Fall or Autumn. Easy peasy since Fall is my favourite season of the year. I love the freshness of the temperature, the gorgeous changing leaves, pulling out my heavier sweaters...all of it.


I decided to have a play with my TH Tattered Leaves die since it hadn't seen the light of day in a while. I began by cutting the leaves out of watercolour paper. I wanted to add my favourite leaf which does not happen to beincluded on this die, the maple leaf. After all, I am Canadian, eh! I printed an outline of the maple leaf onto copy paper and then cut it out with a watercolour layer underneath. That way there were no inky lines on either side of it so if I messed up (and I did) I could just flip it over. I spritzed some Watermelon, Guacamole, and Glorious Art Anthology Colorations Sprays onto my craft mat with a little water and dragged my leaves through the puddles, layering until I was happy.


To intensify and vary the colours in some places, I edged and applied Walnut Stain, Vintage Photo, Spiced Marmalade, Barn Door, Peeled Paint, and Scattered Straw Distress ink paying particular attention to the edges of the leaves. The Mini Ink Blending Tool was awesome for getting into those tiny curves. The new Steampunk Gelatos were also used, spreading the colour with a dry finger...just had to try them out plus the metallic catches the light beautifully.


Once the leaves were coloured and arranged on the black matboard background, I was able to see where and in what direction eye stamps could be added. Two came from Wendy Vecchi's An Eye for Art set, and the other two came from a stamp from my stash. The Fall lettering is also an alpha set from long ago. Most of the leaves were adhered flat to the background with Beacon 3-in-1 glue. Three of the leaves were popped up on foam tape, with the Fall one getting a double layer to pop it up even further.


The center embellishment is a layering of clock/watch faces. The bottom layer is a cardstock one from a collage sheet which I fussy cut and edged with Black Big Brush pen. The next layer is a black metal clock face from my stash, and the top layer is a clock button. All layers have foam tape on the back for added dimension. The sentiment was computer generated and printed onto kraft cardstock, edged with Vintage Photo Distress ink, and adhered to the background with Scor Tape. To finish off the piece and add a little more texture to the background, steniclling was added by pouncing the Emboss It Dabber through TCW's Mini Netting stencil and then clear embossing it.

I love how this turned out. The fall colours contrasting with the black background, eye stamps, clocks, and a great quote..these are a few of my favourite things...LOL. be sure to check out Debbie's wonderful project on the eP blog. She is our fabulous hostess this month for October's ePlay Challenge. Others on the DT will be adding their links below her post so there will be lots of inspiration to encourage you to play along. Hope to see you there.

Life is good; so is art.
Bonnie

Here are links to the products I used from the eclectic Paperie store:

Monday, September 01, 2014

September Rick St. Dennis Progressive Challenge


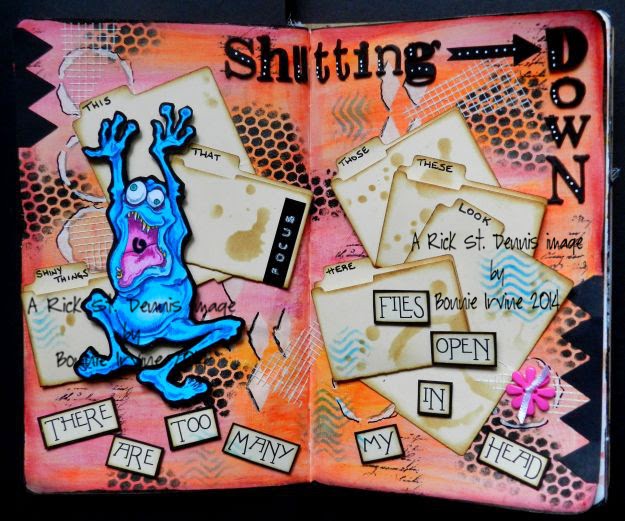
After a summer break, the Rick St. Dennis Progressive Challenge begins again today on the Rick St. Dennis Sparkle and Glitter EDT blog. The first month, which is September, features a theme and any Rick St. Dennis image is allowed as long as the theme is followed. For those who play along in the September Challenge, the free image will be given to them for the October round of the challenge. If you don't play in September, you will still be able to enter October's round, if you purchase the October image. This month our theme for the Progressive Challenge is Anything Goes with an RSD image.


I created a mixed media art journal page featuring Screaming Me! Me! who seems to depict exactly how I have been feeling lately. You know when you have too many screens open on your computer and it gives you that message about too many files open? Well, my head sometimes feels like there are too many files open and this is a fun way to remind myself to focus on one thing at a time. I coloured Me!Me! with Prismacolor pencils, fussy cut him, and matted him with black cardstock before placing foam dots on the back. I wanted him to really stand out from the page.


The background started with a gessoed double page spread to which I added scribbles of pink, orange, and yellow Neocolor II crayons. After activating the crayon with water, I let it dry and repeated the process. next I took gelatos in the same colours and deepened areas, spreading the colour with a dry finger. Red gelato was added to the outside edges followed by Black Soot Distress ink and Black Big Brush pen.


Pattern and texture was added with black gesso through TCW's Mini Netting stencil and with white gesso through TCW's Harlequin Circles stencil. Text was randomly stamped using Jet Black Archival ink. File folders were cut from manila cardstock, inked with Vintage Photo Distress ink, and labelled with a black pen Some were adhered fully open and others had foam dots inserted between the layers so that they would still appear open once folded. The word Focus was printed on a Dymo Labeller and added to one of the file folders. Me! Me! was adhered over the left pile of folders.


The large letters, Ransom Alpha Parts, were adhered to the top and side with Glossy Accents. An arrow was cut to create movement and white paint pen dots were added to both the arrow and the letters.


The other sentiment was computer generated onto cream cardstock which was then matted in black and popped up with foam tape. Drywall mesh was cut into chunks and added to both pages to add still more texture. In order to bring the blue colour over to the right hand page, Salty Ocean Distress ink was pounced through a stencil across the spread. To repeat the pink from Me!Me!'s mouth a button flower was threaded with white ribbon and added to the lower right corner. The final touches were some doodling with black pen and the addition of a zigzag border to one edge of each page.

I love the way that Screaming Me! Me! turned out and how he helped me turn frustrating feelings into a positive reminder...that makes me laugh. Rick's images inspire me and frequently spark an entire journal spread like this. To check out other fabulous projects from some of my talented EDT teamies, please pop over to the Sparkle and Glitter blog. We would love to see you play along in this month long Anything Goes challenge. There will be another set of EDT projects posted  on September 15 just to remind you to please join us.
I am entering this spread in the following challenges:
Anything But a Card ~ Use 5 (colours on BG, patterns from stencilling/stamping, peaks on border)
Through the Purple Haze ~ #56 Anything Goes
Hiding in my Craft Room ~ HIMCR#163 freestyle
Open-Minded Crafting ~ Office Supplies or Job Related (file folders)
Left of Center Creative Challenges ~ #43 LOC (creepy, dark)
Sweet Pea Stampers ~ Lots of Layers
Southern Girls Challenge ~ It's All about Texture

Life is good; so is art.
Bonnie


Back to School ~ CYP Challenge #229


Hi everyone! Happy Labour Day! For me, Labour Day used to be the dreaded day...the day before school started where there was a mix of excitement at a new school year as well as nervousness...because it was a new school year. Both as a student, and later a teacher, it marked the end of carefree, unscheduled lazy summer days and the beginning of new challenges, new learning experiences, new opportunities, and definitely routine. Now that I'm retired from teaching, it doesn't hold the same power...lol. Our theme this week at Craft Your Passion Challenges is Back to School  and our sponsors are the Robin's Nest and 2 Cute Ink.


I chose to play with this 2 Cute image called Crayon Bear. I coloured him with Prismacolor pencils and cut the oval out with a Spellbinders die. The edge was darkened with Black Soot Distress ink and tiny letter stickers were added to the crayon. The image was matted with a scrap from Graphic 45's An ABC Primer collection and then popped up on foam tape.


The background began with a rectangle of black cardstock cut slightly smaller than the white card base. Three rectangles of Graphic 45 paper were cut to fit inside the black base leaving space between and on the edges. Another paper from the collection was cut with My Favorite Things Fishtail dies and adhered perpendicular to each other. A scrap from the background paper was cut into a narrow fishtail strip to layer vertical one.


A metal star was Glossy Accented over the place where the fishtails crossed and a Doodlebug heart tile was adhered to the heart. The wording was created on the computer, matted in black, and popped up on foam tape. The #2 tile is also from Doodlebug. Three tiny enamel dots were added to the left of the wording and a rounded corner cut from the black was added to the top right of the card.

Thanks for joining Bear and me today. it makes us happy campers. When you get a chance, pop over to the Craft Your Passion Challenges blog to see the fun Back to School creations by the rest of my talented teamies. We would love to have you play along with us. If you are heading back to school or have kids who are, I hope that the year gets off to a wonderful positive start.

I am entering this card in the following challenges:
Sentimental Sundays ~ #222 Back to School
Kitty Bee Designs ~ #31 School
Sweet 7 Challenges ~ #3 Back to School
Wags 'n Whiskers ~ #136 Back to School
Cute Card Thursday ~ #336 Anything Goes
MilkCoffee Challenge ~ Back to School

Life is good; so is art. (so is retirement)
Bonnie


Birthday princess ~ TEW Challenge #14


Holy Toledo Mosquito! I have three posts today...hope you don't get sick of me. Since it it the first of a new month, The East Wind Freebie Challenge begins today. That's the one where the entire DT uses the same image that is free to subscribers of the newsletter. Our image this month is Baby Aurora: Birthday Princess and she is sweet!


I coloured Baby Aurora with Prismacolor pencils and cut her out with a Spellbinders Labels One die, darkening the outside edge with Tumbled Glass Distress ink. It was then matted with black cardstock and popped up on foam tape. Red gems were added to her lovely crown and the word princess was spelled out in letter stickers.


The background began with Mary Engelbreit paper which suited the theme beautifully. It was matted in black cardstock and adhered to a white card base. Red gems and black half pearls were added to the design for sparkle and dimension. I had auditioned several other embellies before settling on these but they all detracted from the background and image. A scalloped border was punched from black and adhered below the large crowns in the center of the design. This added interest and visual weight, as well as tying the center into the top and bottom black bands, therby moving the eye through the card.


The sentiment from Create With TLC was printed on white cardstock, cut with Spellbinder's Dec Mega rectangles Large die, and matted in black. It was then popped up with two layers of foam tape to elevate it above the image.

Thanks for joining Aurora and me today. Your fine company is always appreciated. When you get a chance, stop over at The East Wind blog to see the fabulous renditions of this sweet image by my talented teammates. We would love to see you play along with our Birthday Princess challenge at The East Wind whether you use the freebie or not. Hope to see you there!

I am entering this card in the following challenges:
613 Avenue Create ~ #87 Anything Goes
Robyn's Fetish ~ #227 Use a Digi
Suzy Bee's Bloomin' Challenge ~ #44 Anything Goes
Brown Sugar ~ #109 Anything Goes
Creative Corner ~ Anything Goes
Chocolate, Coffee & Cards ~ #72 BINGO (die cut, pearls, yellow) the pearls are tiny and black on the circles at the top and bottom of the image.

Life is good; so is art.
Bonnie


Monday, August 25, 2014

Rockin' the Flip Flops ~ CYP Challenge #228


Hi Everyone! Summer may be almost over but there is still time to enjoy some lovely weather. Our theme this week at Craft Your Passion Challenges is Summer Fun and our wonderful sponsor is Stitchy Bear's Digi Outlet.


I chose to play with the image called Flip Flops which I coloured with Prismacolor pencils. Maisie was then fussy cut, matted in black cardstock, and popped up on foam tape.


The background comes from Me & My Big Ideas Low Tide collection and was matted with pearlized green. A length of wave paper tape from my oldies stash was matted in black and layered across the bottom under Maisie. A piece of cheesecloth was adhered behind her and a pair of sunglasses button was layered to the left of her over the cheesecloth.


The sentiment was computer generated, trimmed out with a Spellbinders die, and matted in black. before popping it up on foam tape, the letters were coloured in and shaded with Prismacolor pencils. Three tiny threaded buttons were adhered to the top right corner to repeat the turquoise of her bikini and help balance the design.

Thanks for stopping by today to visit with Maisie and me. We both are so grateful that you did that. When you get a chance, pop over to the Craft Your Passion Challenges blog to see the wonderful Summer Fun projects by the rest of my talented teamies. We'd love to see you play along.

I am entering this card in the following challenges:
613 Avenue Create ~ #86 Anything Goes
Come & Get it Challenge ~ Anything Goes with a Sentiment
Fairytale Stampers ~ #43 Anything Goes
The Corrosive Challenges ~ #206 "B" Unique (bikini, buttons, beach babe, blond, blue)
Open-Minded Challenges ~ #17 Last Days of Summer
Suzy Bee's Bloomin' Challenge ~ #43 Anything Goes

Life is good; so is art.
Bonnie