Sunday, July 07, 2013
It's a Man's World
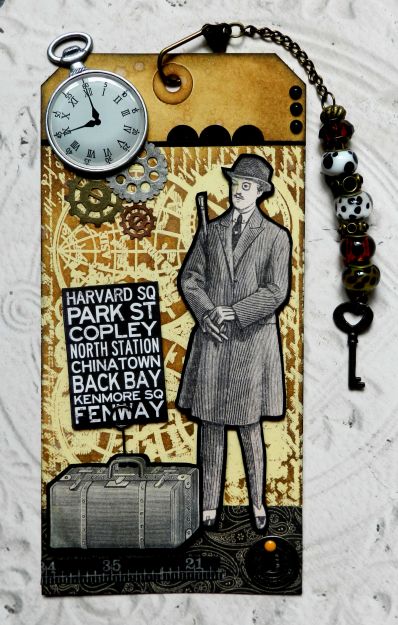
Well, the Purple Team are up to bat this week at Eclectic Ellapu. It's Jacki's turn to host and she has chosen the theme "It's a Man's World". Like many people, the ideas don't come as quickly or freely when I need to make a masculine themed project so this was a good challenge for me. I decided to create a vintage themed #10 size manila tag this time. I like the extra real estate it gives me since it is approximately 4" x 8" in size.
I began by applying Versamark to Just Rite's Vintage Map Collage background stamp and pressing it onto the middle section of the tag. Clear detail embossing powder was sprinkled over the Versamark and then heated. Gathered Twigs, Vintage Photo, and Walnut Stain Distress inks were applied to the entire tag with felt applicators and then the embossed parts were cleaned off so that the manila showed through. The tag was then flicked with water to create the water drop spots and heat dried.
A scrap of Graphic 45 's A Proper Gentleman paper was adhered to the bottom of the tag and a thin strip of black cardstock separated the stamped portion from the top of the tag.
The gentleman and his baggage were fussy cut from an Artchix Studio collage sheet, matted in black cardstock, and popped up on foam tape to add dimension. The subway sign is an internet image, matted in black cardstock, and held up by an Idea-ology memo pin.
Below the bag, a length of washi tape was glued to the patterned paper and an Idea-ology token which says Journey was attached to the tag with a Bo Bunny brad.
Three metal gears from my stash were Glossy Accented to the top portion of the stamped section and a pocket watch sticker was adhered overlapping the top two. Small black cardstock circles were cut in two and glued next to the thin strip above our gentleman's head. Three black half pearls were used to balance the upper right side.
An Idea-ology clasp was attached to a length of gold chain which had been "tarnished" with copper alcohol ink. Eight large beads were threaded over the chain and a key charm became the stopper on the end to keep the beads from falling off. Perhaps the key unlocks the man's baggage. I'll leave you to decide if he is arriving or departing...and is it business or pleasure that causes him to travel. He's quite a dapper fellow...will someone be waiting for him? I'm sure he has a story to tell.
Thanks for stopping by today. I always appreciate your fine company. Should you feel so inclined, pop by the Eclectic Ellapu blog to see what Jacki and the rest of my purple teamies have created for It's a Man's World. You won't be disappointed :) Come join in the fun!
Life is good; so is art.
Bonnie
Saturday, July 06, 2013
Just For Fun
I made a few more of these altered playing cards with watercoloured backgrounds. Of course, I had to add everything but the kitchen sink to the background after the watercolour dried (gelatos, Distress inks & Stains, acrylic paint, stamping, Big Brush pens, gesso...anything that inspired me). The images come from many different sources and are often a combination of several images. For example, the one above has three images from different sources as well as some tangling I did on the top "curtain". The sentiments are created on the computer and matted with black cardstock. Lots of fun!
The papers are all torn scraps from my vast collection. Now I'm saving even smaller scraps because I have found them quite useful for this project. If ever I go missing, tell them to look for me under the scrap paper in my craft room. I probably couldn't find my way out ...lol. The little guy above was sitting on a branch which I made into a swing, thanks to baker's twine. The black rings are made with slightly watered down gesso and a spray bottle lid.
Our class will soon be ending but I know that I will continue to play with these cards long after it closes. They are often my reward for a chore completed or for acting like a responsible adult...I bribe myself. Do you? I have signed up for Mary Jane Chadbourne's next class, House of Cards, on Artful Gathering which will create a house shaped box where these cards can reside. Can't wait!
Thanks for popping by today. I hope your weekend is going well and you are finding some time to get inky, painty, and messy :)
Life is good; so is art.
Bonnie
Thursday, July 04, 2013
Flutter ~ eP Get Altered challenge
Since it's the first Thursday of the month, it's time for the Get Altered challenge at eclectic Paperie. This is an opportunity for you and for us to be inspired by the creation of one of our design team. It's also about exploring your creative journey, stepping out of your comfort zone, experimenting with new products, and creating altered or mixed media art. I enjoy these challenges because they give me that nudge I sometimes need to try something new. This time, it's our talented Mary-Ann's turn to set the challenge and she has challenged us to "Bring It" (mixed media) to a layout. I haven't done a scrapbook layout in ages so I was curious to see how I would approach it in a mixed media way. I was, however, so engrossed in the process that I forgot to photograph the steps...sorry.
I started with this butterfly close-up photo that I took in my garden last summer and meant to scrap but never did. For the background to the layout, I chose a cream paper with some inky splotches on it from DCWV's Garden Tea Party Stack. It was lovely and neutral and I knew that Vintage Photo Distress ink and I would have a great time playing on it. I applied the Vintage Photo through the TCW Harlequin stencil in several places. The same ink was used on the Tim Holtz ink spills stamp. More ink splotches were added by flicking some VP reinker across the page when tapping a loaded brush. Bits of washi tape were added both on this layer and on other layers once they were adhered to the background in order to blend the layers.
The next paper layers were torn black cardstock, a golden toned paper from Authentique's Strong Collection, a black and white zigzag paper from Park Bench 6 x 6 pad, and barn board paper from the same Authentique pack. The gold toned paper was stencilled on one side using Vintage Photo DI and the Dylusions Luscious leaves stencil. The other side was fussy cut after tracing a template. Doodling was done on both sides and the edges were inked around. The barn board paper was torn, inked around, and given four metal stickers for accent. A piece of cheesecloth was added to one side before the paper was adhered to the other layers.
The scalloped border was cut using an MFT die and then accented with Bo Bunny brads (say that 3x quickly).
The corner cluster of embellies consists of two Maya Road butterflies stamped with script and layered with Idea-ology game spinners and brads. The large cream button came from my stash and was threaded with tan coloured seam binding.
The lettering for Flutter was done with Idea-ology Ransom Alpha Parts which I adhered with Glossy Accents to make sure they stayed put.
An Idea-ology word band saying Capture Life's Moments was threaded with the same crinkled seam binding before it was Glossy Accented to the black. The seam binding tails were stapled with my tiny attacher.
To complete this layout, lots of doodling was done with brown Micron pen. The edges of the background were inked with Vintage Photo DI, then Black Soot, and then lined with Black Big Brush pen. Golden Titan Buff acrylic paint was pounced through TCW's Mini Punchinella stencil in order to tie some of the background papers together. And there you have it...my first mixed media scrapbook layout. Definitely not my last though. Loved it!
Thanks so much for joining me and hanging in for this lengthy post. If you get a minute, pop over to the eclectic Paperie blog to see the amazing inspiration pages created by Mary-Ann as well as those by the rest of the DT. Great stuff! I hope you get a chance to join us for this layout challenge. I love visiting and learning from you.
You can get instantly connected (magic) to many of the products used in this project by clicking on the thumbnails below:
Life is good; so is art.
Bonnie
Monday, July 01, 2013
No rain on this parade!
Second post of the day!!
Happy Canada Day to all of my fellow Canadians! It's also my husband's birthday and he was generous enough to give many of you the day off to celebrate with him ...LOL. He does that every year, just 'cuz he's such a good guy :D We have a new challenge at Craft Your Passion this week. The theme is Red, White and Blue (only those three colours) which also ties in beautifully with Independence Day in the States. This week, our fabulous sponsor is Just Some Lines. I was fortunate to be able to work with this fun image called Emo Rain Check Springtime. I love the Emo images. I coloured her with Prismacolor pencils and paper pieced her umbrella using a paper from October Afternoon's Fly a Kite stack. I used a large balled stylus to shape the umbrella slightly so that the edges curved in to the center like a real umbrella would. Emo was fussy cut, lined in black around the edges, and then adhered to the fussy cut umbrella piece. Her eyes are black half pearls.
The background started with a white card base, covered with a blue checked paper from DCWV High School Matstack. Before it was adhered to the base, the edges were inked with Faded Jeans Distress ink. To create somewhere for Emo to stand, a piece of white and also blue cardstock were torn and layered over the blue plaid. White doodling was done along the bottom edge. The border consists of four layers of scallops cut with an MFT die and stacked so that each layer shows. A red piece of string was wrapped around the borders once they were adhered to the base.
Emo was layered on foam tape for dimension and her umbrella was given a double stack of tape just in the center to help create a shadow behind it. I created the rain drops by dotting Glossy Accents randomly around Emo. Once the dots were dry, I shaded to the left and under each drop to add dimension and help them show against the blue. Two puddles were placed on the ground and shaded underneath with black coloured pencil. The raindrops make me smile. The sentiment was computer generated and printed in blue ink on white cardstock. The ends were torn and the sentiment was matted in blue cardstock and popped up on foam dots.
This is a pretty simple card but for some reason, it makes me happy. Emo is so cute in her little coat and boots and she doesn't seem to mind the rain at all. Maybe she has already learned to dance in it. Thanks for stopping by today. If you get a chance, pop by the Craft Your Passion Challenges blog to see the wonderful creations by the rest of the DT. Then look through your papers and images so that you can join our (only) Red, White & Blue challenge. I can't wait to see what you come up with.
I am entering this card in the following challenges:
Gingerloft ~ Red, White & Blue
One Stitch At A Time #170 ~ Anything Goes
Just Some Lines ~ Anything Goes
Kitty Bee Designs Aloha Friday #2 ~ Red, White & Blue
QKR Stampede #45 Anything Goes
Life is good; so is art!
Bonnie
Altered Eclectics Launch
I have been waiting for this day for what seems like ages. Today is the launch of a brand new challenge blog called Altered Eclectics. It's a monthly challenge for Altered Art Only and the theme is always Anything Goes. Love that! It is run by the lovely and talented Elaine aka Ellapu who also owns the Eclectic Ellapu blog where I am on the Purple Team. The DT members for the Altered Eclectics are a stellar group of artists...wait until you see what they have cooked up for inspiration this time.
Anyway,without further ado...except for the trumpets which you may have to help me with...here's my first project for the Altered Eclectics Challenge. As soon as I saw the Graphics 45 Olde Curiosity Shoppe line, I knew that I wanted to create a shadow box to showcase all of the fun elements. I bought a Recollections Memory Box which has ten cubbies of varying sizes. Now I, like many of you, love all G45 papers but these really spoke to me because of the palette and patterns but also because of the wacky images like the legs in the bottle or the flying pigs. I would love to actually visit this place. I'll take you on a tour of the cubbies but will keep my chatter to a minimum (for a change).
The top left: fussy cut border and key matted with black CS, scrabble letters, Idea-ology lock plate
Second left: fussy cut border, Idea-ology ornate plate, computer generated word, Antique Linen Distress ink, G45 chipboard rectangle below
Third left: chipboard tag matted with black cardstock, burlap string ties
Bottom left: Apothecary chipboard tag, green brads, scrap of G45 paper, Idea-ology bottles with Internet image legs inside, two tiny bead bottles from $ store
Middle top: border, woman, and eye chart cut from paper stack and matted with black CS, jute topper on tag, chipboard butterfly flower, wooden button with burlap thread tie
Botttom center: specimen rectangle matted in black and text butterfly, both fussy cut from pad; bee chipboard circle, metal raven charm, Little Yellow Bicycle wooden clock, gear from stash.
Top right: Butterfly strip, postcard, and bee square all cut from pad, square matted in black, Idea-ology token (thoughts)
Middle right: eyes in frame cut from pad, clock charm below
tag from chipboard tags 1, burlap string topper, Idea-ology clock key
Bottom right: winged boot image fussy cut from pad, and matted in black, tag from Chipboard tags 1, scalloped border cut with punch and half pearls added, metal key from stash. scrabble letters
Wooden birdcage from Michaels, sprayed with Dylusions black, highlighted with Copper and Renaissance Treasure Gold, metal flower from stash
All background papers were cut from the paper pad and most items were popped up on foam tape or dots. So that's the scoop on my Olde Curiosity Shoppe shadowbox. If you get a chance, do pop over to the Altered Eclectics Challenge blog to scope out the amazing projects from the rest of the DT. Wow! Seriously. I hope you will join us this month with your altered art project. Thanks for popping by today. I always appreciate the time you take to visit and comment.
Happy Canada Day!
I am entering this project in the following challenges:
Simon Says Stamp & Show ~ Anything Goes
613 Avenue Create #26 ~ Anything Goes
One Stop Craft Challenge #232 ~ Add a Tag
Life is good; so is art.
Bonnie
Friday, June 28, 2013
A Bright & Cheerful ATC
We have a brand new challenge today on the ATCs With Attitude challenge blog. The theme is Bright and Cheerful which really is an easy one for me since that is my go-to style. I was fortunate to work with this lovely Flower Basket image from Eureka Stamps. I always enjoy colouring flowers...and there are no weeds to pull. Bonus! I coloured the image with Prismacolor pencils, fussy cut it, matted it in black for definition, and fussy cut it a second time.
The background was done with Neocolor II crayons over watercolour paper. Once dry, it was stamped with an Inkadinkado script stamp and Coffee Archival ink. Scraps of pink striped, purple dotted, and watercolour paper were layered in a band across the center and at the bottom of the atc. Picked Raspberry Distress ink was used to edge the card and white faux stitching was done over the purple border. The entire atc was matted with brown cardstock. When I am going to do this, I cut the top layer a little smaller than the standard 2.5" x 3.5" size so that when the mat is added, it brings it to the correct size.
The basket image was popped up on foam dots and adhered to the background. A small black dragonfly brad, a pink flower button threaded with brown floss, and a hand cut photo corner were added as the final embellishments.
Thanks for popping by for my second post of the day. If you get a minute, pop by the ATCs With Attitude blog and see the Bright & Cheerful inspiration atcs created by the rest of the DT. be sure to welcome our two new DT members, Vicky and Margaret. We're so happy to have them on board.
Life is good; so is art.
Bonnie
Sneak peek from eclectic Paperie
Hello everyone! Today is my turn to post on the eclectic Paperie blog. I decided to feature a few more of my altered playing cards from the Mary Jane Chadbourne class. I have a whole stack of them with the backgrounds coloured and the paper scraps on. I've even auditioned the images and have the quotes/sentiments chosen but this week other things have called shotgun and are playing navigator...hey, that would make a great journal theme :)
Anyway, if you aren't sick of these yet and feel so inclined, follow this link to arrive at the eP blog and have a look-see. I'd love it if you did. Thanks for stopping by. I hope you have an awesome weekend.
Life is good; so is art.
Bonnie
Subscribe to:
Posts (Atom)