Monday, January 19, 2015

You are inspirational ~ CYP Challenge 244


Hi everyone! After a bit of a break, Craft Your Passion is back with a new challenge, Anything Goes. Our fabulous sponsor this week is The East Wind for which I have a particular fondness...lol. I chose to play with the gorgeous Mother's Day Flower image also known as the braided hair girl. I coloured her with Prismacolor pencils, adding a little white paint for the whitecaps and some Tumbled Glass Distress ink for the sky. The black border which is part of the image was reinforced with  a black Big Brush pen once the image was trimmed. Tickled Pink Stickles was added to the pink flowers in her headband.


The card began with a white base, topped with a mottled piece of bright blue cardstock matted with black. The vertical band of plaid paper came from my scrapbox and was also matted with black before being adhered to the center of the blue rectangle. The image was matted in black, popped up on foam dots, and placed over the upper portion of the band.


The sentiment from Create With TLC was printed on white cardstock and cut with one of the  Spellbinders Deckled Mega Rectangles dies. It was then matted in black and popped up on foam dots before being placed just below the image. Although I auditioned many other embellies, borders, and trims, I finished the card off with three black half pearls in the top right corner. Everything else seemed to take away from the clean lines and the image.

Thanks for stopping by today. I appreciate your visits. To see the other wonderful projects created by the CYP DT and using The East Wind images, stop by the Craft Your Passion challenge blog when you get a chance. We would love to have you join us for our Anything Goes challenge.

Life is good; so is art.
Bonnie

Tuesday, January 13, 2015

Mall Girlz Mixed Media Tag Book Part II


Hi everyone. I'm here with the next three images from the mixed media tag book I showed you last week. If you missed that post last week, you can check it out here. Again, I have used images from Rick's Mall Girls digi sheet. Since the backgrounds were completed in the same fashion as explained in my last post, I won't go into all of that again. Instead, I will focus on how I have created continuity within the tag book while still changing up enough elements to keep it interesting and slightly unpredictable.


I coloured all of the  five images with Prismacolor pencils keeping the same basic palette but varying the combinations and the proportions of each. I fussy cut them leaving a narrow white border and then each was then mounted on black cardstock and fussy cut again leaving a narrow black border. This double mat provides greater contrast to the busy colourful backgrounds as well as providing greater strength to the image. This helps when the image will be popped up on foam tape like these have been and also frames the image stopping the eye and notifying it that something important is within the frame.


The sale signs were computer generated and the open letters were coloured with marker. The black border and signpost give weight to the signs and provide that pop of black that I like so much. Doing them all the same way adds continuity to the tag book but varying the colours of the markers as well as the sale words keeps it interesting and fun. The sayings vary in content and font used but all are printed on white cardstock and have been matted in black.


All tags have doodled borders but each one is slightly different from the others. All tags have punched black pieces added but again they vary in shape and detail. By repeating elements and details throughout the tag book, there is a sense that they belong to a whole. By changing it up within the elements, it makes each tag fresh and helps the viewer want to see the next one. It also keeps it fun and challenging for me while I am creating.


Thanks so much for stopping by today. All of the Mall Girlz and I appreciate it. The sale is still on at Rick's Zibbet shop which is where this digi sheet can be found...along with 800+ other fabulous images and a huge variety of content...something for every taste.. You can get the details and discount code in this post here. We would love to see your creations on Rick's Facebook page or as an entry in the Progressive Challenge or Facebook Art Contest.

Life is good; so is art.
Bonnie

Tuesday, January 06, 2015

Shop 'til you drop ~ RSD Mall Girlz


Hi everyone. Today I'm sharing part of a mixed media tag book I created with the five fabulous images from Rick's Mall Girls digi sheet. I love these women: their quirkiness, sense of style, and awesome hair. They are so much fun to colour and make me smile. Today I will share the cover and first two tags of the book which you can see above.


All of the tags were created in the same way. The larger tag shapes are heavy black cardstock and the smaller tags which those mat are cut from mixed media paper to withstand the spray inks and other media. The cover features one of the girlz enlarged and cropped to a head shot. It was fussy cut and backed with an oval of sprayed paper and then matted in white. The signs were matted in black and the open letters coloured in with marker. The hearts and a second mat were cut from more ink sprayed papers.


The mixed media backgrounds were created by spraying the mixed media papers with water plus a variety of inks, some with mica for the extra sparkle. Several layers were applied to get spots, drips, and splotches. White or black gesso and white embossing paste were applied through several stencils to create pattern and texture.  Stamping was also added with Archival inks. A different doodled border was added to each tag and various shapes punched from black cardstock were also added to the backgrounds.


Each tag has a shopping sign created on the computer with an open font. The lettering was filled in with markers and the sign was matted with black. A narrow strip formed the sign post on each one. The shopping sayings were also computer generated and matted in black.


Each of the Mall Girlz was coloured with Prismacolor pencils, sticking to the same colour palette for continuity. They were fussy cut leaving a narrow white border and then matted with black. They were each popped up on foam tape for dimension and to create those lovely shadows I like so much.


Thanks so much for joining me today. I hope you will return next Tuesday to meet the rest of the Mall Girlz. They are unabashed shop-a-holics and I'll bet they were first in line for those crazy Boxing Day sales. If this set of images speaks to you, remember there is still a sale going on at both of Rick's shops, Zibbet and Etsy. You can read more about it and get the coupon codes here. You can even shop in your pajamas and these Mall Girlz will never know...lol.

Bonnie

Thursday, January 01, 2015

Long Winter Nights ~ Rick St. Dennis Progressive Challenge


Happy New Year! I hope that 2015 is a wonderful year for all of us. because it is the first of the month, it's also the start of the Progressive Challenge on Rick St. Dennis' Sparkle and Glitter blog. Since it is Part One of the challenge, we are allowed to use any RSD image and any theme. I love snow people so I decided to choose two of Rick's images to create a winter scene. Ever wonder what they do during those long cold winter nights?


I coloured Frosty and Mrs. Frosty with Prismacolor pencils and fussy cut them leaving a white border only on the arms. I wove their hands together and glued them in place before matting them with black cardstock and cutting them out again. Then the two were popped up on foam tape for dimension and to create a natural shadow.


Their snowball kids were pinched from white cardstock and also from black which was glued offset to create a shadow. Broken China Distress ink was used to edge each one and features were drawn in with a black pen. The noses were filled in with an orange marker and the open eye were created with small black half pearls. Tiny pink embroidery floss bows were added to three of them. In my crazy little brain, that's what snowbabies look like...snowballs with features. Then they grow up to have bodies.


The background started with a purple-blue piece of cardstock to which I added white stencilled swirls and gold stencilled stars. I was wanting to create a snowy scene.I added iridescent snowflakes (actually confetti) and tore a piece of white cardstock for the snowdrift. It was edged with Broken China Distress ink. frosty and the Mrs. were adhered onto the background and then their kids were added around them. Some are popped up on foam dots and some are adhered directly to the background to vary the heights.


The sentiments were computer generated and matted with black cardstock. Both were popped up on foam tape. A piece of black cardstock was used to mat the background and frame the entire piece. The finishing touch was to outline the gold stars to make them more visible.

Thanks for stopping by today. The Frosty family and I appreciate your visit. Be sutre to stop by the Sparkle and Glitter blog to see the fabulous creations which others from the EDT created for this challenge. You will see even more on the 15th when the rest of the team post their projects for the Progressive Challenge Part 1. I hope you will play along. If you do, you will receive the February image free. Bonus!

Life is good; so is art.
Bonnie

Friday, December 26, 2014

New Release at The East Wind ~ Aurora What Matters


Since today is Friday, there is a new release at The East Wind. This one is called Aurora "What Matters". It seems like such a timely image with all of the hustle and bustle that we have been living with for the past few weeks. Sometimes it's hard to remember to take time for yourself, to slow down, and center yourself. Aurora is reminding us of how important that is.


I coloured the image with Prismacolor pencils and then fussy cut her leaving a narrow white border. Then Aurora was matted with dark brown textured cardstock and fussy cut again before being popped up on foam tape. The oval behind her was cut with an X-Cut die from DCWV's the Far East paper. A Washi tape was placed below her so she would be grounded and not levitating...not sure how relaxing levitating would be!


The background began with another paper from the same stack which was cut to allow some of the white to create a border. Another rectangle was cut from the same brown cardstock, again slightly smaller than the previous one to allow it to show. A length of cork ribbon was wrapped around the brown layer, forming a band. The Aurora oval was popped up on foam dots and centered on the background.


To continue the butterfly theme from the oval paper, three butterflies were punched from the same paper. The edges were inked with Vintage Photo and brown beads were adhered to the centers for the bodies. Three large pale pink pearls were adhered to the bottom right corner to balance out the butterflies in the top left. The sentiment was computer generated, trimmed close, and edged with Vintage Photo Distress ink to complete the card.

Thanks so much for stopping by today. Aurora and I appreciate your fine company. If you pop over to The East Wind Facebook group, you'll be able to see Jackie's beautiful project with this lovely image. I love her style!

Life is good; so is art.
Bonnie

Monday, December 15, 2014

TEW Challenge 21 ~ Lucy Loo Grinch


Hi everyone! There's a new challenge beginning today at The East Wind Challenges blog. The theme is Christmas and I decided to take a kind of a different take on the traditional card. My card features Lucy Loo - Lucy the Grinch, Unky's take on that lovable Dr. Seuss character.


I coloured Lucy Loo Grinch with Prismacolor pencils and fussy cut her leaving a narrow white border. She was then matted in black and fussy cut again before foam tape was placed on the (not her...lol) backside. Clear Wink of Stella was applied to the star and the ornaments on the tree. Once dry, Glossy Accents was added over that on the ornaments and on her eyes. White embossing paste was pounced onto her hat and dress fur as well as the fur on her shoes with a small brush.


The background began with a green rectangle, matted in black, and cut to fit on the white background leaving a border all around. Strips of other designer paper were adhered overlapping like a Christmas ribbon on a package. Three stars were punched from yellow patterned paper, then inked on the edges with Scattered Straw. Wink of Stella and Icicle Stickles were added to each star before they were adhered to the red strip.


The sentiment was computer generated as I was channelling what Lucy Loo Grinch might be saying. It was printed on white cardstock, cut out with an MFT die, and matted on black cardstock. Doodling and faux stitching were added to finish the card and tie the elements together.

Thanks for visiting Lucy Loo and me today. I know I appreciate it but she's a little busy to notice...so many trees, so few chimneys...lol. To see the rest of the Christmas themed projects from the rest of my talented teamies, pop over to The East Wind blog. We can't wait to see what you come up with if you decide to play along with our challenge

Life is good; so is art.
Bonnie.

Sunday, December 14, 2014

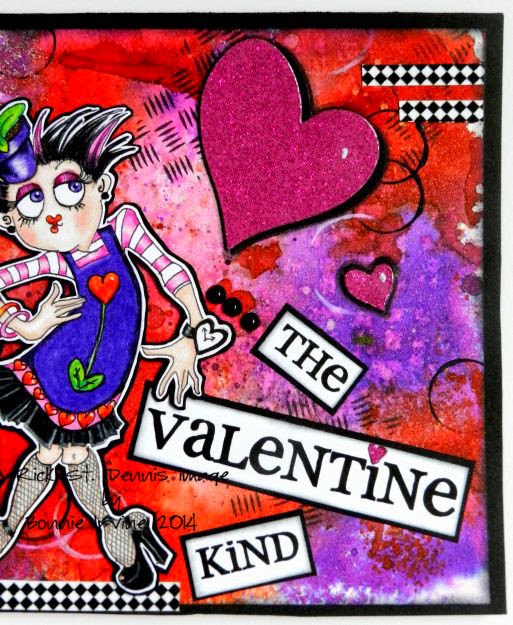
RSD Showcase ~ The Valentine Kind


Hi everyone. Today is the RSD Showcase on the Sparkle and Glitter blog and our theme is Valentine's. Rick St. Dennis has so many wonderful Valentine images  from which to choose but I am particularly smitten with these quirky Valentine girls that he recently released. Today I chose to play with Charlotte Chic Valentine Girl who can be found in Rick's Zibbet and Etsy shops.


I coloured Charlotte with Prismacolor pencils, adding some metallic silver gel pen dots on her eyelashes because she's that kind of girl, too. It's all about style for Charlotte. I fussy cut her leaving a narrow white border and then matted her with black cardstock before popping her up on foam tape.


The background began as a 6x8 inch piece of mixed media paper which I needed to use to stand up to the wet inky layers I knew I would add. I sprayed the paper with water, and then spritzed it with Postbox Red, Crushed Grape, and Funky Fuchsia Dylusions sprays. Once dried, I dipped the background into the leftover sprays on my craft sheet a few times, drying in between each time. Once I was satisfied with the depth of colour and drips/splatters, I misted it again with Tattered Angels Iridescent Gold to create shimmer appropriate for this fashion diva. The Dylusions bricks stencil was spritzed through with the same three colours I started with for extra pattern and texture.


Some background stamping was done with Jet Black Archival ink and a clear pattern stamp. Circles were added with black and then white gesso using a couple of lids as the stamps. Washi tape applied to white cardstock was added to where Charlotte would stand as well as to the side. Two punched photo corners were dotted and added to the top left corner.


Once Charlotte was placed, the sentiments (one from Create With TLC and the other computer generated) were printed on white cardstock. The lengthier sentiment was cut with a die. Both were matted with black and adhered to the background. Three sizes of hearts were die cut from shimmery paper and then matted in black. The tiny one over the i in Valentine was hand cut and added without the mat. Three flat black pearls were added to lead into the second half of the sentiment. The hearts were shaded around with a Stabilo pencil activated with a water brush. To frame the spread, black cardstock and plain chipboard were added to the back adding strength as well as contrast.

Thanks so much for stopping by today. Charlotte and I are delighted that you did. When you get a minute, check out the Sparkle and Glitter blog to see Aletha's incredible project using another of Rick's wonderfully quirky Valentine girls.

Life is good; so is art.
Bonnie