Tuesday, May 15, 2018

Partial Tag Tuck Spots


Hi everyone. I am always looking for new ideas to create embellies for junk journals and art journal pages, especially ones that use items up from my stash. While browsing on Pinterest last week, I found one of those and I loved it so much the way it was, that I barely changed anything. It was originally on a blog belonging to Dorota Kopec, a very talented art journaller and artist. She is from Poland and her blog is certainly worth a good long look as she has wonderful ideas and creations. Her tags clusters were used on art journal pages but I thought they would make awesome tuck spots for junk journals as well.


I started by die cutting partial tags from both white and kraft cardstock. The white ones were 2 inches high and 2 inches wide. The kraft ones were 2.25 inches high by 2 inches wide. Both sets were inked around with Coffee Archival Ink and then Ground Espresso Distress Ink to deepen the edging. They were stamped with a variety of stamps using the same Coffee Archival Ink. Mainly writing or numbers stamps were used on the white tags and images or collage stamps were used on the kraft ones.


White reinforcements were punched to surround the holes on the kraft tags and kraft ones created for the white tags. The tags were topped with very fine hemp and then overlapped different amounts and with either the kraft tag on top or with the white one there. I wanted to change them up a little.


I created a few different embellishments for the tag clusters but before I adhered them, I had to decide the orientation on the page for each one. They would either be adhered along the bottom of the page or on either side. The one above would be adhered along the bottom edge of the tag cluster to allow something to tuck underneath with the tags holding it in place.


The one above would be adhered to the left side of a page. For the black and white heart embellie, I stamped the heart from one of Carabelle Studio Hearts & Pebbles stamp set onto white cardstock with Jet Black Archival Ink, fussy cut it, and inked the edges with Coffee Archival. Then the edge of each heart was inked with Black Big Brush Pen to help frame it. A small threaded vintage button was added over that and a scrap of cheesecloth was layered underneath the heart.


Similar steps were taken using a thread label stamp and also a die cut primitive heart. I also did a few using a tiny crocheted doily topped with a corrugated cardboard punched star. or a vintage white button. I think they all turned out really sweet and can see how they could be further adapted depending upon the tag paper and embellishments used. A big shout-out to Dorota Kopec for the wonderful idea!

Thanks for stopping by today. That was awesome of you :)

Life is good; so is art.
Bonnie

Monday, May 14, 2018

Joggles Art Journal Adventure - Week 20 - the letter R


Hi everyone! Once again, it's my turn again to choose the prompt for the 2018 Art Journal Adventure. For Week 20, I have chosen the theme, the letter R.  For my R page, I chose the word Real and the passage from the book, The Velveteen Rabbit, one of my favourite stories. I was working on the back of the kraft coloured journal page from my previous AJA page but I knew that I wanted to use a copied page from the book which I found on the Internet.


For the rabbit image, I used Coffee Archival Ink to stamp one of the Crowned Bunny images by Crafty Individuals onto white cardstock. I added a little colour to him using Inktense Pencils activated with a water brush. He was then fussy cut and accented with black pen as well as Yellow Stickles on his crown. A length of green checked washi tape was used to indicate the ground level. Leaves and one of the flowers from Bo Bunny Flower Garden stamp set were used to add a little interest next to Mr. Bunny. The flower head was stamped onto white cardstock, coloured with pencil, and then sparkled up with Cinnamon and Yellow Stickkles. The leaves were stamped directly onto the background , coloured with green pencil, and outlined with black pen.


Two more pieces of the same washi tape were added to the top left corner of the page and another Bo Bunny flower from the same set was stamped onto white cardstock. It was fussy cut, coloured with pencils, and given a Yellow Stickles center. Two circle stamps from a Bokeh Dot set by Essentials by Ellen were stamped in a few places over the text using Jet Black Archival to add interest to the "book page". A tiny butterfly was punched from mop-up paper, edged with Forget-Me-Not Archival Ink, and given a Cinnamon Stickles body. The butterfly was adhered near the top where Mr. Bunny was looking. Because the page theme is R is for Real, that word was underlined with Turquoise Gel Pen and the phrase You are Real was traced over for emphasis.


I wanted the background to be softly tinted so the sky area was coloured with both Pthalo Blue Tint and Turquoise Pan Pastels. The grass area was tinted with Permanent Green and Permanent Green Shade Pan Pastels. I had difficulty capturing the tinting in my photos ...it's more evident IRL. I also went back and added two tiny pieces of turquoise washi tape under the greeen checked washi below Mr. Bunny. That continued the diagonal line of turquoise elements which starts at the upper left flower and moves through the underlined word to the bottom right corner of the page. This trick really helps the eye move through the page. Before the background was adhered to the kraft substrate, black and white striped washi tape was added to the outside edges of the page to form a playful little border, framing the page.

Thanks for stopping by today. Mr. Bunny and I both appreciate that :) You can see how others in the Art Journal Adventure Facebook group respond to the Week 20 prompt, the letter R. It's always inspiring to see what the talented and creative folks do each week.

Life is good; so is art.
Bonnie


Tuesday, May 08, 2018

Itsy Bitsy File Folders for Junk Journals


Hi everyone! I wanted to create something different from the tags and journalling cards I already had in my embellie stash. I have this very old, rarely used Cuttlebug File Folder die which creates a tiny folder that is 1.75 x 2.5 inches once folded. I thought folders cut from kraft cardstock, decorated on the front, and holding a little "pad" of coffee dyed papers would suit what I wanted.


I cut a dozen of the folders, inked around all edges inside and out, and used a bone folder to make a crisp fold on the perforated lines. Then I had a blast decorating the fronts.


I used the tags and bits and pieces which I had cut mainly from Graphic 45 Children's Hour 6 x 6 pad and matted all but one with black cardstock to help them stand out. They were an ideal size and theme for the focals and looked cute with tiny brads inserted through the holes. I also used scraps of designer or book paper to create some layering and interest.


Coffee dyed cheesecloth scraps added texture on some of the folders. Tiny punched flowers of various colours and with blingy centers were used as part of several designs. Tiny butterfly and bee stickers created more detail and extended the nature theme.


Each folder was given a Chit Chat Sticker as a label for the folder and an Idea-ology Mini Paperclip to keep the folder closed when tucked into a pocket.


To add a bit of journalling space in these little folders, I cut coffee dyed paper into 1.25 x 2.25 inch rectangles and glued three together at the tops only. The little notepads were then adhered to the inside of the folder with the TH Tiny Attacher stapler as shown below.


I love how these little folders turned out and think they will make a sweet addition to any junk journal. Besides that, they were a lot of fun to create! I call that win/win :)

Life is good; so is art.
Bonnie

Monday, May 07, 2018

Joggles Art Journal Adventure - Week 19


Hi everyone. It's Week 19 of the Joggles Art Journal Adventure and Barb has chosen the prompt: add texture to the background using collage scraps, washi tape, or masking tape. That's an easy one for me because I have been doing a bunch of collage projects lately plus I have an over abundance of paper scraps from which to draw :) I use and use them and they never seem to go down in number...magic! The page which I am working this time is a 5 5/8 x 6 inch kraft page in my disc bound journal.


I began by pulling a number of scraps which I thought would play well together. Then I auditioned them in different combinations and places until I liked what I saw. That's when I started to glue. I used scraps of book text and one cut from the pink grid paper to cover the seams where the papers butted against each other and added one of the Laurel Burch Icons stamps in a few places using Jet Black Archival Ink. I like the way it adds a pop of black and pattern both vertically and horizontally.


To add a little more black detail, I outlined the scraps and faux stitched the edges. The bright floral paper in the center of the page needed to be knocked back and blended in a little so I dry brushed white gesso over it as well as adding some to the other sections to create unity. A scrap from the perforated edge of a shipping paper as well as half a punched circle of designer paper were also added and outlined. I liked how the page was coming together.


I wanted to add a silhouette of a dandelion as the focal for the page. I love the joy of blowing dandelion seeds and making a wish at the same time and that's what I wanted this page to reflect. The die used to cut this is Memory Box Dandelion Stem. I also cut the leaves from another Memory Box die called Lorelai Leaf and adhered that over the other stem.


The part of the leaf die which I had cut off was added to the bottom left corner section. White paint pen dots and other highlights were added to the die cuts. I usually like to add wording on my pages and I thought three positive words would fill out the design quite well. I used three different sizes and fonts pulled from alphabet stickers.


White paint pen dots were added to the largest of the three words as well as to the three punched butterflies adhered above the dandelion. The butterflies seemed to finish the design because black touches were then found in every paper section. The final steps were to ink around the outside edges of the page with Coffee Archival Ink and then apply Black Big Brush Pen over that to frame the page.


Thanks for stopping by today. I appreciate you doing that. You can see how others in the Art Journal Adventure Facebook group respond to the Week 19 prompt to add texture to the background using collaged scraps, washi tape, or masking tape. I can't wait to see where everyone goes with this one :)

Life is good; so is art.
Bonnie


Sunday, May 06, 2018

Quickie Book Text Belly Bands or Tuck Spots


Hi everyone. I was checking out some mixed media projects on Pinterest and came across one that gave me this idea. The problem was I didn't pin it and couldn't find it again to link it for you and give credit to the artist. I have a lot of round punches as well as circle die cuts and decided to use them to create piles of book text circles. I also had some scraps left from corrugated coffee sleeves which were looking for a new purpose.


The 1.5 inch circles were inked around the edges with Coffee Archival. They were then overlapped and glued to a thin strip of cardstock, not meant to be visible from the front.. The corrugated sleeve was cut into .5 inch x 3.5 inch lengths and each was given a fishtail flag end. This was layered over the overlapped circles glued to the cardstock strip and then messy stitched on the sewing machine. Scraps of coffee dyed cheesecloth were layered under coffee dyed and inked mulberry flowers to finish this set.


The second set I created with a similar start except I glued five of the 1 inch circles to a cardstock strip. For the topper, I cut a just under .25 inch strip of black and white striped designer paper and stitched it horizontally across the overlapping circles. The ends of each strip were decorated with little buttons.


This particular book paper is quite thin so the cardstock behind and the striped cardstock sewn on top give this embellishment more strength.


I had two of the 1.5 inch circles left from the first set so I added one of the 1 inch circles and adhered the three to a strip of cardstock. I also had a 2.25 inch length of corrugated sleeve left over so I fishtailed the two ends, centered it over the three circles and stitched it all together. It could be a little tuck spot or simply an embellishment for a page or a mini notebook cover. The larger circles with three combined are 4 inches in length, the ones with 5 are 4.5 inches, and the last one with 2 large and 1 small circle is 3.25 inches long.  I can see changing these up by varying the shapes, sizes, and papers used...lots of possibilities.

Thanks for visiting today. You know I appreciate that!

Life is good; so is art.
Bonnie

Friday, May 04, 2018

Tuck Spots, Belly Bands or maybe Bookmarks


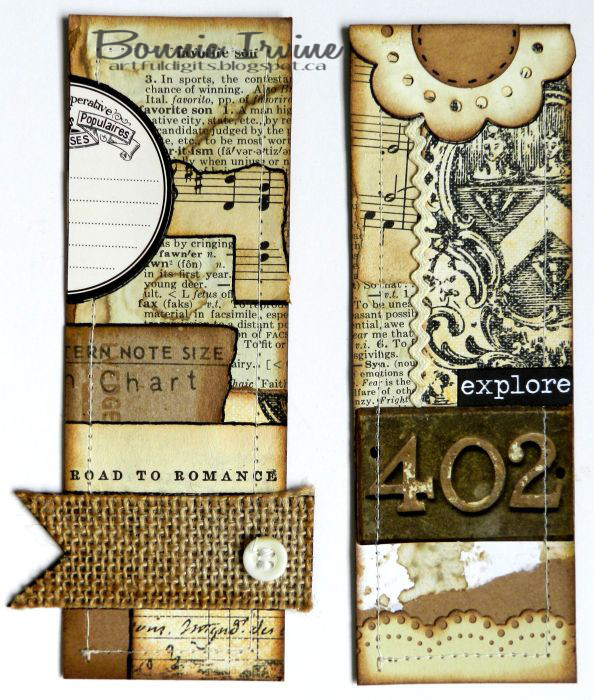
Hi everyone. Recently I found a package of kraft cardstock 2 x 6 inch bookmarks in my craft cupboard. At some point, I was going to create bookmarks for everyone apparently...LOL. Anyway, looking at them with a junk journaller's eye, I realized that they would also make awesome tuck spots if you applied glue to the top and one side and placed it along one of the edges of your page. Similarly, some would make great belly bands where you adhered the two short ends across the middle of the page and can then slide something underneath the band which will hold it in place. I decided to collage some scraps and embellies and I can decide how I'll use them later.


I used designer paper, music paper and some with book text. I also pulled from my folder of left over embossed and punched or die cut scraps. If I've gone to all the trouble of embossing or die cutting, I tend not to throw away any of the scraps I haven't used. Actually, in the first photo, one of the pages looks rusty. That's because I used that particular piece of cardstock to dry my rusty safety pins and some of the rust and marks transferred to the paper. The four above I doodled faux stitching around the edges and to highlight the layers where they overlap.


The next batch had the background layering completed and then were stitched around using the sewing machine. A vintage button, TH ephemera flower and Big Chat sticker helped complete these two. The embossed paper is a scrap of Idea-ology Kraft Glassine which was embossed with a writing folder.


On the left tag above, you can see that I used another piece of the rusty cardstock used to dry my safety pins when removed from the solution. Can you spot the clear impression of the safety pin? I love that! There are also pieces of an inked doily, a little washi tape, and the holey edge of a shipping paper. The fussy cut butterfly was given a metal photo turn body.


On the left tag above, a burlap fishtail flag was added along with a vintage button (threaded of course :)) On the right one, a TH sticker and Chit Chat sticker were added to the bottom along with a punched border scrap. There's a little length of coffee dyed rick rack and a die cut flower topper. Dictionary paper, sheet music scraps, and designer paper are combined with little bits of the kraft background peeking through.


For the final "bookmark" in this set, I folded the bottom 1.5 inches of the rectangle up and lined it with another little piece of that rusty paper. Once I stitched around the edges, it created a little pocket which I filled with two tiny tags, shown below.


Thanks for dropping by today. I appreciate that you took the time to do that. It's always fun to share my latest creations and I love reading comments :)

Life is good; so is art.
Bonnie


Wednesday, May 02, 2018

Collaged Scrappy Tags


Hi everyone. I'm sure many of you have seen Nik the Booksmith's Franken-page video on YouTube. Gayle Agostinelli also has some great tutorials demoing how she uses the idea on pages and tags. The thing I really like about the technique (besides it being super fun) is that it allows me to use up paper scraps and come up with something cool at the same time. I had some sturdy kraft paper tags from who-knows-where. I liked both the size (2.25 x 3.5 inches) and the ticket shape so I cut a template for future use and decided to quit hoarding them :)


Because I liked the combination of designer papers and vintage book/music paper with the kraft background, I wanted to be sure to let some of the kraft show on the finished tag.


I kept a lot of the designer paper scraps rectangular or at least with straight edges in shape because I wanted to play with that geometric look. The exception was the music and book paper which were shaped with circular punches.


The embellishments ranged from small stamped tags with rub-ons added to cork heart stickers, coffee dyed paper flowers with button centers, and small tags with tiny lace flower accents.


On three tags, Idea-ology Big Chat stickers were used to add a little wording and a little more black to the design.


As part of making the design my own, black faux stitching and outlining were added around the various layers of paper as well as the outside edges of each tag. I love black details and how the outlining emphasizes the layers and shapes. I even added a little x or angled faux stitch on some of the edges of the sections. 


The tags were edged with Coffee Archival Ink to tie in with the inking done on each individual scrap. The tags were topped with either cotton woven ribbon tied with hemp or a length of crinkled seam binding tied in a simple know.

Thanks for stopping by today. I hope I have given you another idea to add the texture/look of stitching without having to haul out your machine. Be sure to check out the videos linked above. They explain the Franken-page idea very well. It's a fun way to play with scraps.

Life is good; so is art.
Bonnie