Monday, November 18, 2019
Joggles Art Journal Adventure Week 46 ~ Dolls
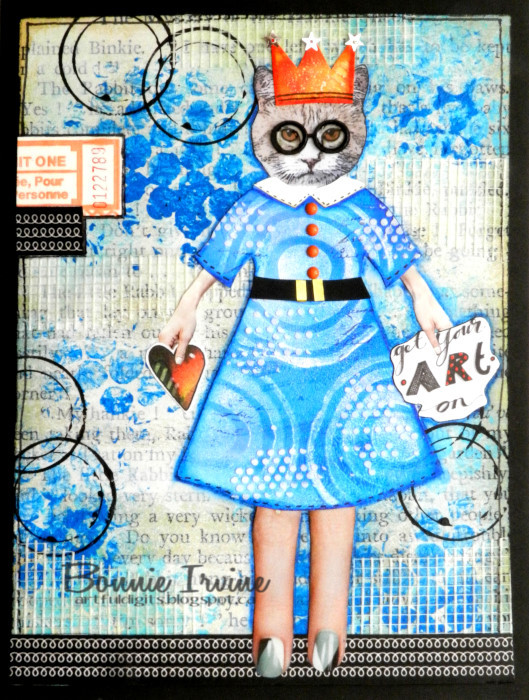
Hi everyone! It's Week 46 of the Joggles Art Journal Adventure. We are quickly approaching the end of the 52 week project. Our prompt for this week is Oh, you beautiful doll. That can include art dolls, raggedy dolls, mannequins, or people who are all dolled up...whatever inspires you. I decided to create my own art doll using bits and pieces from a gel print, magazine images, a digital download, and a few embellies to "doll" her up :)
Miss Kitty started with the cat head from a JLeeLoo download. Her dress was cut from a gel print and Texture Paste through a stencil gave it some pattern and interest. Her collar was cut from a scrap of white cardstock with a little faux stitching around the edges and some enamel dots for buttons. The belt was created from a scrap of black and the belt from gold washi tape. Miss Kitty's arms and hands were cut from a fashion image and her legs from a magazine image of a hand with fancy nail polish. Miss Kitty needed glasses which were from a pack of wooden ones and the insides were filled with Glossy Accents to create the shiny lenses. She also wanted to wear a crown so one was cut from some mop-up paper. A little doodling and some silver star sequins added the necessary bling and detail. A heart and a saying from Art by Marlene die cut blocks were adhered to her hands.
The 6x8 inch background began with a page from a vintage children's book which was adhered to light chipboard. White gesso was applied randomly to knock the text back. Once the gesso was dry, Lucky Clover and Salty Ocean Distress Oxides were applied leaving some white space for contrast. Light Blue Permanent and then Cerulean Blue Hue Liquitex acrylics were applied to the background using bubble wrap. Black gesso was added using the inside plastic roll from Scotch tape. To add texture, drywall mesh was adhered in several places using Matte medium.
To give Miss Kitty a place to stand, black and white washi tape was glued along the bottom edge. A simple border was doodled around the edges and a part of a ticket to add a little more orange and a piece of the same washi tape were added to the left side. The background was then adhered to the black background creating a frame for the page.
Thanks for joining Miss Kitty and me today. We love it when you do that! When you get a chance, pop by the Joggles Art Journal Adventure Facebook group to see how others in our group respond to this prompt. It's always so inspiring and fun!
Life is good; so is art.
Bonnie
Tuesday, November 12, 2019
Lil Houses Projects ~ inspired by Vera Lane Studio collage sheets
Hi everyone! Last week, Vera Lane Studio released two collage sheets called Lil Houses. Let me just say right off, that I could live in any one of these quite happily. They are so detailed and cute with all of the quirky details I love. These houses come pre-coloured and each sheet has a different size so they work beautifully for so many projects. I decided to create a set of 3 artist trading cards as well as a welcome card.
The background for the card was spritzed with Heidi Swapp Ocean Color Shine to give the sky some colour. The ground was cut using the shape of a Dylusions stamp plate as a guide for the curves. It was fussy cut and matted with black both top and bottom. The houses were cut from the smaller collage images, matted with black and adhered with foam tape to pop them up. The little paths leading from the houses were created with washi tape adhered to white cardstock.
The wording was printed onto white cardstock, matted with black. The tiny clouds were printed from the Keep the Light image set onto French text paper, fussy cut, and matted with black. To finish the card, a faux stitched border was added to the outside to frame it.
The three atcs were constructed using the larger Lil Houses images. They were each fussy cut leaving a narrow white border, and matted with black. Foam tape was used to pop them up.
The backgrounds were cut from scraps left from other projects with a little additional stamping and stencilling to make them more interesting. The black and white washi tape was added to each one, varying the placement or the depth. The two houses with chimneys were given "smoke" details and the other one was given photo corners.
All three were finished with some black doodling around the edges as well as black Big Brush Pen to unite the background layers so they read as one. Small Chit Chat stickers matted with black cardstock provide the wording for each one.
Thanks for dropping by today to visit our neighbourhoods. That was awesome of you. When you get a chance, be sure to pop by the Vera Lane Studio Etsy shop to check out the Lil Houses collage sheets, as well as the other fabulous ones. They sure do make for quick and easy projects that are as cute as a button. Stop by the VLS Facebook group, too. We would love to see you there and there is a Stripes Challenge going on this month which I would be delighted if you joined.
Life is good; so is art.
Bonnie
Monday, November 11, 2019
Joggles Art Journal Adventure Week 45 ~ Remembrance/Veterans Day
Hi everyone! The prompt for Week 45 of the Joggles Art Journal Adventure was an easy choice since today is November 11. In Canada, we call it Remembrance Day. In the US, it's called Veterans' Day but either way, it's an opportunity to remember those in the military who have served our countries and preserved our way of life. It's an opportunity to remember and to say thank you. The prompt is Remembrance Day/Veterans' Day or poppies. My dad was a WWII vet who flew a spitfire for the RAF so when I think of this day, that's who comes to mind, along with my mom's brother and several of my dad's brothers, as well.
I decided to feature a copy of a photo with my very young dad in his Air Force uniform. Just look at those dimples :) I cropped the photo and rounded the top corners before adhering it to a piece of designer paper printed with a world map design and done in sepia tones. I wanted a botanical image of a poppy which just happens to be one of my favourite flowers, to fill the right side of the page and overlap the photo slightly. This one, which I fussy cut leaving a narrow cream border, came from ArtsCult on Etsy. I loved that it looks vintage and slightly faded or muted since that suited my design.
I inked around the edges of a TH Adage ticket as well as a scrap of very old dictionary paper and added them to the top right corner of the page. I topped that with a one inch wooden maple leaf (Canadian, eh!) which I coloured with about 8 different Big Brush Pens. I know...so many colours on such a tiny leaf! The wording, which really struck a chord with me, was printed onto white cardstock, cut into sections, and matted with black. Foam tape was used to pop the wording up, adding dimension. To balance the design, a fishtail flag was cut from kraft cardstock, decorated with star rub-ons and faux stitching, and added between the photo and the top part of the wording.
The page was finished with a simple doodled black border, Coffee Archival inking around the edges, and the black matting provided by the journal page background.
Thanks for joining my dad and me today. I just know he's seeing this and smiling...probably my mom is, too. Thanks to all those who have served their countries, for the sacrifices they and their families have made, and the courage they have shown. I feel pretty lucky and I know I'm not alone <3
Life is good; so is art.
Bonnie
Saturday, November 09, 2019
Collaged Bookmarks
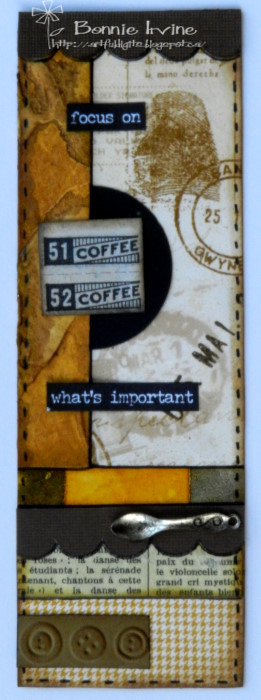
Hi everyone! Sometimes when I want to create but can't seem to settle on a particular project, I haul out my scraps and the 2 x 6 inch kraft bookmark blanks I cut and collage away. They make a great little gift, an idea for abandoned art, and are lots of fun to create. It's also something you can leave and go back to easily.
I layer up scraps of book and music paper, cardstock, corrugated coffee sleeve scraps, patterned paper, stamped bits or mop-up papers...anything I like. There are no rules.
I like to add punched or die cut bits, extra tags, metal clips, and fussy cut items like butterflies. I just audition things until I am pleased with the results. They also make great belly bands or tuck spots in junk journals.
For added texture, I layer in pieces of drywall mesh, Texture Paste added through stencils, tea dyed and crumpled pieces of paper, and lots of torn edges.
You can create your own wording and print it off but I often use Small Talk or Chit Chat Stickers. It's a great way to use them up without feeling that you are wasting them.
The edges are always darkened front and back with Coffee Archival Ink and black Big Brush Pen. Finer black Pitt pens are used to outline the sections and to add the faux stitching around the edges, again front and back. I think these would be sweet stocking stuffers or as a little table gift when you are entertaining. I donated over a hundred to my local library who sold them as a fund raiser. Win/win! I also donated hundreds to the Cancer Clinic when I was undergoing chemo to pass out to patients and family to brighten their day. There are so many ideas and I experienced joy in the making and joy in the giving!
Life is good; so is art.
Bonnie
Tuesday, November 05, 2019
99% angel - inspired by a Vera Lane Studio image
Hi everyone! There is a new challenge for November on the Vera Lane Studio Facebook group and I am hosting. The theme for the Challenge is Stripes so you must use a Vera Lane Studio image and you must include stripes either on the background or the image. Then all you have to do is pop it in the photo album by November 30. For my sample project, I created an art journal page using one of the sweet Haircut images released last week by Vera Lane Studio. I had a hard time deciding between the short hair and the long braids but in the end, decided that I really wanted to colour those braids since it looked like fun.
I coloured Braids with a mix of Prismacolor and Polychromos pencils using Pitt pen to retrace the lines that got muddied by the pencils. As usual, she was fussy cut leaving a white border, matted with black, and fussy cut again leaving a black border to help her contrast with the background. A halo was copied from an Internet image, outlined with black, and coloured with pencils.
I wanted stripes on the 6x6 watercolour paper background so I used different widths of washi tape to mask them off horizontally. Choosing colours from the image, Distress Oxides in the colours Scattered Straw, Peacock Feathers, and Cracked Pistachio were applied to the various openings between the tapes. When the tapes were removed, the white from the page remained between the coloured areas. Jet Black Archival Ink was used to apply AALL & Create Hearts & Lines stamp as well as a Bokeh stamp from Ellen Hutson. Tiny Xs were added with black Pitt pen using an Alexander Renke stencil as a guide.
A simple, rather scribbly border was doodled with black pen and 4 photo corners were added to the page. A length of washi tape was adhered to white cardstock, fussy cut, and given fishtail ends. This was placed under Braid's feet to ground her. The wording was printed onto white cardstock, cut into sections, and matted with black. To finish the page, Black Big Brush Pen was used to darken the edges.
Thanks for joining Braids and me today. You have made us very happy by doing so. Be sure to check her out, along with her cute sister, in the Vera Lane Studio Etsy shop when you get a minute. You can also see more projects featuring the pair by visiting the Vera Lane Studio Facebook group. We would love to see what VLS creations you are making, too!
Life is good; so is art.
Bonnie
You Can't Make me! - inspired by a Vera Lane Studio image
Hi everyone! Did you see the amazing digi set released by Vera Lane Studio yesterday? It's called What the Fluff? She comes with two different hats, and the sentiment and I love her edgy style. I decided to create a tag cut from a gel print where she could express herself.
I coloured the image and the fedora hat with Prismacolor and Polychromos pencils using a simple palette of colours for her clothing and hair. She was fussy cut leaving a narrow white border and the hat was fussy cut the same way except that I cut it tight to the black line along the bottom edge. I didn't merge the images because I wasn't sure what angle I wanted to place the hat until I was finished colouring and cutting. The hat was glued at a rakish tilt with the brim ends tucked under her hair. Then she (with hat in place) was glued to a black piece of cardstock, and fussy cut a second time leaving a narrow black border. Foam tape was attached to the back to pop her up.
I cut the tag shape from white cardstock, making it a little longer than a standard #8 tag. The gel print was adhered to the white tag base with the center of the circle as centered behind her as I could get it. I like the way it radiates out from her. A few Bokeh Circle stamps were added with Jet Black Archival Ink.
To ground her, a layered piece consisting of orange and red packaging, text printed paper, washi tape, and a Snarky Small Talk sticker was placed at the bottom of the tag, backed by a piece of black cardstock to set it off. A simple border was doodled around the tag and the edges were darkened with Black Big Brush Pen. Three black enamel dots were placed in the upper right corner and black ribbon with white stitching was added as the topper.
Thanks for joining us today. Be sure to pop by the Vera Lane Studio Facebook group to see more projects featuring this fabulous image set. Also pop by the Vera Lane Studio Etsy shop to see the other amazing digi sets available. There's a little something (OK...a lot) for everyone!
Life is good; so is art.
Bonnie
Monday, November 04, 2019
Joggles Art Journal Adventure Week 44 - Cliches
Hi everyone! It's Monday and that means it's time for another Joggles Art Journal Adventure prompt. The prompt for Week 44 is to illustrate a cliche. Yesterday was National Cliche Day so it seemed appropriate to celebrate that this week. I saw a funny saying to go with this theme: Avoid cliches like the plague...LOL. My mom was a great one for spouting cliches and they always made me smile.
I chose to illustrate the cliche, bats in his belfry. The 6x8 inch mixed media background was spritzed with Lindy's Shabby Turbine Teal and Tibetan Poppy Teal Starburst Sprays with a little water added to get things moving and blending. Once dry, music paper scraps knocked back with gesso were added in three places. Jet Black Archival Ink was used to add AALL & Create Frayed Threads and Hearts and Lines stamps to the background. A little white gesso was added to knock parts back and to other spots as well before Ranger Texture Paste was scraped through TCW Tiny Dots stencil.
I used an old image from Hidden Vintage Studio Love Bandits and added a pointy hat from the same set to create his belfry. The image was altered with doodled, paint pens, and coloured pencil. His hat was given a black heart over the pink one to create the opening where I added a bell shaded with pencils. Once the hat was glued to Bob's head, he was adhered to black cardstock and a narrow border was cut to frame him.
The bats were drawn from an example on the Internet, coloured with black marker, and fussy cut before being adhered to the background. The wording was printed onto white cardstock, cut into sections, and matted with black. To finish the page, a simple black border was doodled around the page and it was edged with black Big Brush Pen. The background was then adhered to the black page from the ring bound journal.
Thanks for joining Bob and me today. We appreciate that! If you get a chance, be sure to pop by the Joggles Art Journal Adventure Facebook group to see the wonderful responses to this Cliche prompt by others in our wonderful and talented group. I love seeing what everyone creates!
Life is good; so is art.
Bonnie
Subscribe to:
Posts (Atom)